We are in the process of shaping/installing a 16 oz/ft2 copper standing seam roof on a 30in X 100in arch (aprox 16 in rise in center) with a 8 in segmented “cove imitation” front and soffett. (See attachment for roof we are copying)
I bought some 50/50 “soldering paste” (melting point aprox 350 deg f)to use where needed, & ordered some “patina green” solution.
We have successfully “peened” the standing seam pieces to follow the curve. The parts are ready to go together over the wood form.
Has anybody learned anything about soldering or treating the copper that we need to watch out for Monday?


Replies
Not much help here, but their was a post just recently( 6-7 days ago)of a guy doing copper roofs and his work looked top shelf. Maybe somebody will come along and find you the link.
Its in the photo gallery
I checked out that copper work in the photo gallery and it's pretty impressive.
I'm not sure I understand how you've formed your roof panels and how you intend to install them. If I were fabricating and installing this roof, there would be no need to solder anything. Some photos of what you have fabricated and some clarification would be helpful. I don't exactly understand what you mean by "8 in segmented "cove imitation" front and soffett". Is this faricated from copper as well?
I will probably leave gaps in explaining, but here goes: The "standing seam" roof we have fabricated in 36 in lengths with 10 inches flat and 1 inch bent up 90 deg on each edge. We have used a plenishing hammer on the 1 inch lip to stretch and form to the plywood frame/arch. These will overlap about 3 inches and we were planning on using clear silicone on the horizontal joint.
At the (brick) house side we are going to use a arched counter flashing (cut into brick).
In mid-roof there will be a 1 inch X 1 inch "U" cap strip (peened to a curve) in 36 in segments with joints appropriately lapped and offset from roof pieces.
If you notice in the picture, the front "imitation cove" is put on in segments and these we were planning to solder (in place) one at a time with the paste. They "hook" over the front roof "standing seam" and go down about 2 in then make an "inside curve" (done over 3 in pvc) then continue on to a square return that lips over a under soffet lip. We are "peening" the top edge of these 8 in segments to the desired arch (over a curved angle iron) so the curved line will make the segments less noticeable.
The "soffett" pieces (refer to picture in first post) line up with the "imitation cove" segments, which seems to give some symetry. These are fit together with a joint very similar to standard aluminum soffet, except the "z" joint is almost flat.
Here are some of my specific questions:
When soldering the front cove pieces will "bar soap" make a effective masking line for any possible runout?
Does the "u" shaped cap strip (over standing seams) need to be "tack" soldered or rivited?
Is there a danger of getting the wood or tarpaper underneath too hot during soldering?
Is the "green patina" solution tricky to apply and make look right?
I'm not saying that the way you are doing this roof is wrong. There's more than one way to skin a cat, but I do this every day and your methods and concepts are somewhat foreign to me. I'll help the best I can.
1) I've never heard of masking with bar soap (doesn't mean it won't work - try it out before you start the project) . Skill is the only real answer I have to that question, but some sanding afterwards can get rid of the inevitable stray solder.
2)I would rivet the cap.
3)NEVER EVER use open flame to solder on a roof or cornice. Use soldering coppers.
4)Yes.
Good luck.
I appreciate all your advice. The "no flame on the roof" probably kept us out of a lot of trouble. This is the first time we have tried this; thus the reason for the unorthodox methods--and the call for tips. I'll post some pictures later.
We have a couple of the "coppers" like I saw in your pictures, so we'll use those.
It sounds like pre tinning is one of your "tried and true" fundamentals. I will plan to do that. A friend who is a great general metalworker told me about the "soldering paste". I've always used paste or liquid flux with solder on a roll. Since the copper is new--will I have to do any further cleaning before using the soldering paste?
As to your "yes" on the "green patina treatment", are there any pointers?
Here are a couple of pics of the form. (It was raining in the second, but it shows the supports.
Fonzie,
An acid cure silicone is likely corode the metal if placed between two pieces. Read the tube.
Cool project.
KK
This is a great point. Use none acid cure silicone. I always use Dow Cornings 795 it won't react with the metal and the lack of odor is great. It's also the best caulk I've ever seen.
I like Lexel, can't get 795 locally.
Really? Thanks. I didn't even know the difference. I might have to go lexel too unless the glass co has 795 silicone.
We'll go with the copper rivet tip on the "cap strip".
I normally use "Ruby fluid" which is zinc cloride to flux with and have found it works better for me than paste flux in in this type application. No further cleaning should be necessary. I've also noticed some paste fluxes work better than others. I haven't done research on this - I've just used paste when I run out of ruby fluid.
I've never been too successful with the patina application. There was a recent thread about it. The one tip that ran through that thread was "apply several light coats instead of one heavy one."
Good luck and show us some pics when you're done.
One other cool tip I've just discovered for fluxing a joint is to use a plastic syringe. I found them in the Lee Valley catalog and they work great. If I can't pretin a joint I shoot flux in, and the solder follows. I also use a liquid zinc chloride flux, the brand is Stay Clean. The paste's have never worked as well for me. Here are the syringes I'm talking about.
http://www.leevalley.com/shopping/shopCart.asp?SID=&ccurrency=2
Edited 10/12/2003 2:50:37 PM ET by Slater
We have the syringes and the liquid flux on hand (from some previous copper gutter work & the quy I work with solders his own radiator).
This "soldering paste" I got from Graingers has 50/50 lead/tin ground up in the flux. It's expensive & we've never used it. We'll hopefully bring reality to this today. I'll get some pics.
Any conceptions I had of the "green patina" thing being routine have been cleared up. We won't be "dousing" any of it on until we have a "working model". Thanks.
I have never had /or seen any liquid Ruby Fluid ,only paste .
on the "green patina treatment", are there any pointers?
I had poor results with Patina Solutions #MB Blend, 9%hydrochloric, applied to their recommendations. After trying a few home brew concoctions, recycled beer included, I gave up. Our climate isn't conducive to copper turning green however. My free offer of the Patina Solutions, nearly 2 gallons, stands.
Interesting project. Good luck.PAHS Designer/Builder- Bury it!
I don't have a set of these, never even used them or seen them in person, but they do look like just the thing for working with curved surfaces and seams perpendicular to the surface. I found them when I was researching tooling for copper work.
http://www.toolsplus1.com/shrstretch.htm
-- J.S.
This was fairly labor intensive. We got the roof on yesterday and the ends soldered. There's a pic to show how we "spread" the lip to make the roof curve. We couldn't get either silicone 795 or Lexel, so we used the regular silicone and kept it well back.
The 1 X 1in cap strip was a problem at first. We were able to spread the "U" somewhat and use the "furnace duct crimping 5 finger tool" on it, then tap it into the curve profile, and riveted it on with copper rivits. We plan to use the same tool to take care of the extra material on the "arched counterflashing" (30 > 2in strips cut on the curve, then 3/4 bent over and "creased" as necessary with the furnace duct crimping tool.
Today we got the roof hung (several preliminaries slowed us) and some soffett and soldering on the front cove remain.
The 50-50 (ground solder in paste) is expensive but works good. It was about 32$ for a pound-shipped with a basket full of cautions and disclaimers.
The "recycled beer" comment has got me out of the mood of "fake baking" the patina, though the stuff came today. I'm for letting it shine.
Thanks for all the tips and input. I'll aim to post a final couple when it's complete.
John,
A friend of mine that is an expert in these things said the same thing. At one time he had an old one and sold it. I don't think we will be doing much of this.
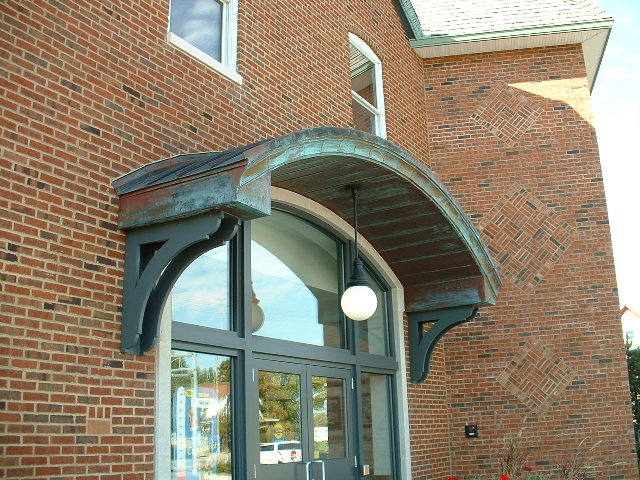
Here's the final shot (except for repl light fixture): (SORRY, ALTHOUGH THE ATTACHMENT PROGRAM SAYS I HAVE PLENTY OF SPACE BY THE BAR GRAPH AND THE NUMBERS, THE PROGRAM WON'T LET ME LOAD THE ATTACHMENT DUE TO "OVER LIMIT")
(Maybe the webmaster can check this out)
Here's the completed roof: