
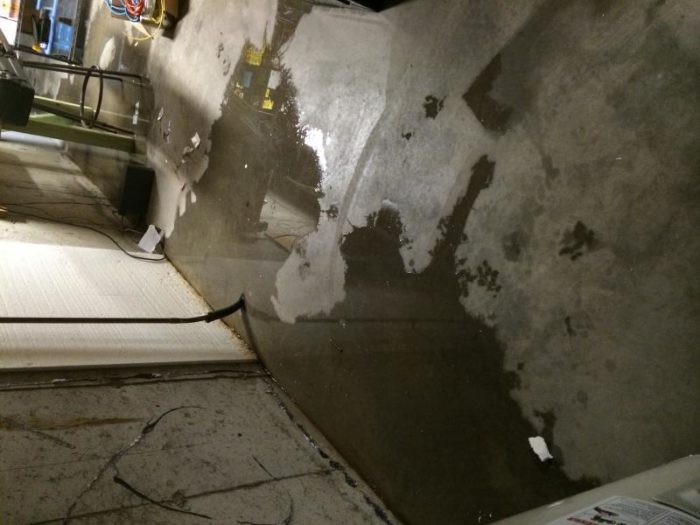
Sump pump stalled three days ago (2 months old, should have put in the 2-pump AC + DC model I’d discoverd that has the back-up in tandem) resulting is considerable seepage up thru joint between floor & wall.
When deal was struck last year to buy this place (built 1977) bank mandated Radon mitigation. Installer suggested caulking this joint for most effective operation of system he put in.
My question is rather than just wire brushing the surfaces for an inch either side of the seam, would taking an angle grinder & cutting a 1/4″ – 3/8″ deep channel, angled slightly to put seam in the middle of the bottom of the 1/4″ wide channel be worth the time & trouble? It’s my time, not something I’m paying for….
Groove’ll then be caulked with something from SIKA, likely their 15LM low modulus sealant as I’ve used it before.
Idea is a groove’d expose fresh concrete surfaces as well as increase surface area available for bonding. Before I adjusted sump pump float level water in sump well would leave footing drains still with water in them when pump cut off so there’s been seepage evident already at this joint (see pic but it’s cockeyed 1/4 turn off my iPhone) but NOTHING like last Friday night! 5 gallon shop vac emptied ~ 25 times & two 45 pint dehumidifiers’ve pulled another 4 gallons out of the air….


Replies
basics of a well performing caulk job
I use Vulkem 116 (Tremco) polyurethane caulk for these applications. It's sanded and non-sagging. Tools well (lubricate tool with mineral spirits). I get it at my local masonry supply store, but I've found it available online through Amazon now.
IMO, here are the most important things to remember when caulking for performance:
1. Only bond to two sides; not three. The third side usually being the "bottom". Caulking to three sides introduces a state of "infininte flexibility" which no caulk can handle.The joint will usually fail in short order. This is why the use of a backer rod is a good idea. It forces bonding to only two sides. Most folks think backer rod is to save caulk (in fact its marketed as "caulk saver". However, that is not its most important function). If you don't use backer rod, then you should use bond break tape at the bottom of joint. I find the tape more impractical for the application you're talking about.
2. Maintain sufficient body to perform. This is based on the gap your bridging. Generally the depth should be ground out to the width plus backer rod depth. I find Vulkem performs best with a min. 1/4" gap. I've also caulked up to 5/8" gap with it no problem.
3. Tool to an hour glass profile. If you mound up to a convex shape, you're most likely just wasting caulk.
4. Clean the joint with vac after grinding. Otherwise your likely to just bond to dust.
Here is a graphic and further info on caulking which might be helpful:
http://www.emseal.com/Knowledge/Hour-Glass/Sealant-In-Tension-hour-glass-shape.htm
I'm not sure what your problem really is - your post raises three distinct issues. I'll take them in order:
1) Sump pump failure: You have two pumps? I've never seen that sort of 'back-up' arrangement. What I HAVE seen is a standard AC pump, with a back-up battery supply. This usually places a battery quite close to the receptacle that powers the pump.
2) Radon mitigation. This has nothing to do with the sump pump. Radon is a gas that gan diffuse through solid granite - so it easily passes right through any concrete, paint, or finish you might have. You'll nver keep it out - the trick is to let it continue on it's journey to the upper atmosphere. You do this by increasing your ventilation. Most of the time, an ordinary humidity-controlled vent fan will also keep radon levels down to acceptable levels.
3) Caulking a seam. I'm not sure what this will accomplish, other than -perhaps- keep some ants out. In any case, the previous answer is spot on.
True, but...
renosteinke wrote:
I'm not sure what your problem really is - your post raises three distinct issues. I'll take them in order:
1) Sump pump failure: You have two pumps? I've never seen that sort of 'back-up' arrangement. What I HAVE seen is a standard AC pump, with a back-up battery supply. This usually places a battery quite close to the receptacle that powers the pump.
Right now, just one pump, AC-powered. Potential problem is if we lose grid power we lose that pump too. Item I just ordered:
http://www.homedepot.com/p/Basement-Watchdog-1-3-HP-Submersible-Combination-Sump-Pump-System-DFK961/202042662
- has DC-powered auxiliary pump that both augments main AC pump (should it get overwhelmed) as well as back-up capability if AC pump goes down for some reason.
I have a generator but not yet wired house for critical systems; that's farther down the 'to-do' list right now.
renosteinke wrote:
2) Radon mitigation. This has nothing to do with the sump pump. Radon is a gas that gan diffuse through solid granite - so it easily passes right through any concrete, paint, or finish you might have. You'll nver keep it out - the trick is to let it continue on it's journey to the upper atmosphere. You do this by increasing your ventilation. Most of the time, an ordinary humidity-controlled vent fan will also keep radon levels down to acceptable levels.
True enough but that's not my worry. System mandated by bank at seller's expense last year's already in place & functions 24/7/365 unless power goes down. I only brought it up because of the installer's comment about what I'd already ancitipated doing.
Installer suggested sealing floor/wall seam, not really necessary but worth doing if it further reduces potential for water intrusion.
renosteinke wrote:
3) Caulking a seam. I'm not sure what this will accomplish, other than -perhaps- keep some ants out. In any case, the previous answer is spot on.
Like I said, peace of mind. I can make every effort to keep sump pump system functional yet there still might be an instance where water somehow intrudes thru the uncaulked floor perimter seam. It may be tilting at windmills to proceed but if it makes the two of us living here feel more comfortable it's worthwhile.
further "peace of mind" advice
Not sure what your finish floor is going to be (or your budget is), but.....
If you want more piece of mind with regard to water and water vapor intruding into a finished living space, then you might want to consider a water proofing membrane applied over your caulked joint. I would recommend thinsetting Schluter's Kerdi membrane. It's 100% waterproof polyethylene membrane with heat bonded polypropolyene fibers for bonding. Use only high quality non-modified thinset. The more you cover, the more waterproof you'll be. In fact if you carry it across the floor and up the water about 4', you'll be creating an inverted shower pan that forces the water to the sump. It would take alot of hydrostatic pressure to break the thinset bond if applied properly. One thing to keep in mind: If your walls are painted, the bond is only as good as the paint. It may mean removing it the best you can.
Also, while radon gas can pass through concrete, brick and stone (not vapor or moisture impervious materials) from what I've read heavy mill polyethelyne blocks radon gas. Another bonus to the moisture proofing.
Baby Steps....
... are where I'm at with this place since we took on ownership. Haven't had a basement to live with since I left home for college late in 1967. I was 18, the house was built in the mid-40's, 2 15 amp circuits and asbestos-wrapped heating ducts exposed in the basement to feed heat upstairs from the 'gravity' gas furnace.
No water problems there, nobody but PhD's knew anything about Radon.
I spent a lot of quality time in that basement, I'm 65 & nobody in my family has had cancer.
Anyway, I'll take the suggestions for further mitigation & file them away, just in case. Grade around house is pretty steep to the east & south, not sure if sufficient to allow 'drain-to-daylight' option while I'm aware the house immediately to the south has such. Our bedroom window overlooks their roof & they're maybe 80' away, so it's steep but maybe not steep enough. I know I'd considered such an idea while vacuuming up water at 2 AM Saturday morning but not enough to get out my laser level & start planning for a trench....
The inverted shower pan idea is pretty radical despite my confidence it'd work but at present it's beyond what I'm willing to do. It's plain to me the need is to get water off the roof & away from the foundation as efficiently as possible, all four sides.
We need to live here another year or two for me to get to know how improvements / changes I make to what's already present affect system performance before I make a committment do doing anything towards what could be considered a finished portion of the basement.
The participants to this forum are a tremendous resource of experience & know-how. I'm glad I stumbled onto it after having read Fine Woodworking and Fine Homebuilding both almost since the first issues of each.
Yes, when the problem is infiltration following rainfall then getting surface water away from the house is a critical step. Start with downspout extensions, then walk around the house and note any areas where the soil does not slope away from the house at maybe 1/2" per foot or better for a distance of 15 feet or so. Correct those.
Particularly note driveways, sidewalks, and concrete patios adjacent to the house. Often soil has settled near the house and caused them to slope toward the house. These can be relatively cheaply and quickly remedied with "mud jackiing".
Yep,
Those areas were all inspected after the spring thaw. Driveway a disaster, just replaced w/ proper concrete install a month ago, same w/sidewalk from front entry to driveway. Added downspout where obviously necessary, others work fine & fitted with extensions. Problem seems to be clay soil over bedrock (sandstone) at undetermined depth. Not far away rock is exposed at grade so I'm guessing it's not too deep. Roof has fairly wide overhangs east & west but rafters square-cut so fascia's not plumb which pitches 5" seamless gutters forward, reducing capacity & increasing overflow potential. May opt for 6" later & trim / scab rafters to get vertical fascia but need to evaluate entire roof for insulation so may integrate everything when time comes.
We're getting used to how what we bought behaves over time. I think that's essential for avoiding costly efforts that may not pay off later. I'm pretty handy & not intimidated by scope of work undertaken. Right now the "grind a caulking groove" effort's focused on keeping dust created in such an endeavor under control. When prepping one major crack for urethane-sealing (Simpson product used with great results, at least so far!) I thought a polyethylene sheet tent would be adequate.
Boy was I mistaken! Even with edges taped to foundation & tent hung floor to ceiling, in short order I had a basement looking like a London fog, fine dust EVERYWHERE. So I need some kind of vacuum-assisted dust collection gizmo for my 4" DeWalt angle grinder before this endeavor gets started. Crack fix was one isolated area, entire basement perimeter's the target area for sealing operations. MUCH more opportunity for dust problem over time.
Caulking the seam is not going to substantially reduce water seepage (at least not for very long). To prevent seepage you need to keep the groundwater level below the level of the basement floor. Ideally this would be via a drain-to-daylight setup, but sometimes you have to use a sump pump.
One would hope that the sump pump only needs to run during "rainy season" (which only lasts a few weeks once or twice a year). If the pump needs to be running continuously then you have a serious problem and you should probably consider a more effective mitigation scheme. (Eg, excacate and tile the exterior and drain to daylight.)
The orginal poster has a sump pump system in place, genius.
I would recommend using closed cell polyethylene backer rod for your application.
If you can't beat it...
I've seen these types of systems advertised, but I can't recommend them because I don't have any experience with them. I think they are a last ditch effort, because they don't deal with the problem of water infiltration, but they redirrect the water to a drain. Anyway here's a look. http://waterproof.com/basementwaterproofing.html
I would hold off installing a product like this until all other means of attack are in place, but that's just me.
Yeah, around here that's known as a "Beaver" system. (Beaver is one vendor of them.) I understand that they're modestly effective, but I've never heard anyone (other than the vendors) rave about how good they are.
Pretty Common...
... in Wisconsin, seen several companies touting systems like this under various names (Beaver, Badger, etc.) in local advertising. Several properties we'd looked at had systems installed, which to me was more a "don't walk, RUN!!" signal those places weren't worth further investigation.
I don't think our current dilemma's permanent, just that efforts of prior owner weren't well thought out so what the builder built was never improved upon to deal with local soil moisture issues effectively.
At present it's obvious every effort must be made to keep water away from basement perimeter outside. Beyond that, what gets under the footings ought to find it's way into the footing drains, from there into the sump well. That looks to be ~ 30 gallons & if pump(s) are sized accordingly & properly maintained ought to keep up.
When testing a reconfigured float switch mount point yesterday on the original pump (1/3 HP I think) it kept up with flow from municipal water supply from garden hose, maybe 6 or 7 GPM or better. Keeping footing drains free of water to me is critical fir keeping water out of the floor/wall joint just above. The caulking project I'm planning is nuisance insurance as much as anything.
Thanks for the link too; my wife asked how those work last night, I'll pass the info on...