How would you handle this trim situation?
I’m about to get started trimming a bedroom in my house. However, I have a bit of an issue.
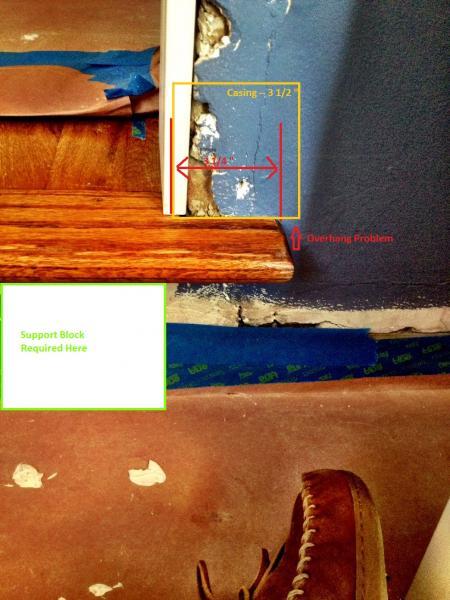
The bedroom has a closet that is raised about 9″ above the floor. There is a piece of nosing that sits under the door and protrudes onto the walls next to the door.
Unfortunately, I don’t have an easy way to replace this piece of nosing. The distance from the reveal line of the jamb to the edge of the “wings” of the piece of nosing is 3 1/4″. The casing is 3 1/2″ wide.
Using a different casing is not an option. The casing I’m using is the casing that was put on our windows when we had new ones installed last year (before I realized this would be a problem).
To complicate matters further, I need to put a support block against the wall under the nosing.
How would you guys trim this?
Only things I can come up with are:
1. Plinth blocks that I can cut to fit around the “wings.” Basically, the casing and the base would butt join the plinth blocks, and the plinth blocks would serve as “trim” for the support block.
2. Use base below the piece of nosing, turning two small pieces of base veritcal on the wall to trim the support block, and then knipping off the outside corners of the casing to make it “fade” into the nosing “wings.”
Any better ideas?
Really appreciate the help. Thanks.


Replies
Depending on the casing profile, you might be able to rip about 3/8" off it's width, without making it obviously different from the other casing.
But would it be that big a deal to use a different, intentionally contrasting casing? A casing that echos the profile of the nosing, eg.
mc
Step back and take another picture-the whole closet-w/door open and shut.
The support is easy-extend it to near the front of the nosing and take it back around to return to the wall.
It should be flat stock-no profile.
Actually, the support could be done like a window apron, vs having to run all the way to the floor. For an apron you'd want a tapered piece, consistent witht the style of the rest of the trim.
Thanks for the help. I like the suggestion to do a simple support block, return it on itself, and butt the base to it. I thought about the window apron approach. Unfortunately, the gap under the piece of nosing isn't big enough to allow an apron and the base, and I don't want to have base--wall--apron--wall--base, especially because where the wall meets the floor isn't very nice looking.
Additional pics are attached. If I use the simple support block approach, all that needs to be addressed is the casing.
Thanks again.
If you hadn't already gotten the door I'd lobby for a furniture-like treatment -- make it look like a built-in "wardrobe", eg.
mc
The solid base completely under the nose (minus the smallest of overhang), returned to the wall w/base up to it would look good.
Still agonizing about your problem with the casing. Would the profile of it allow just a bit of narrowing and then cheat the reveal on the jamb?
A plinth block could acomplish almost the same-but plinths notoriously are a bit wider than casing.
What about...
What about turning the support block into a giant, single plinth block?
The support block would be wider and taller than the piece of nosing, and would be cut to fit around the "wings" of the piece of nosing. It would be returned to the wall, and the base and casing could both butt join to it. If I wanted to, I could even put base on the support block.
Another thought I had is to cut the piece of nosing so that it sits within the jamb (essentially remove the wings, and rip it so that the actual nose is recessed under the closet door more). That would eliminate the casing overhang problem, but I'm not sure how to join the casing and the base.
Thoughts on these approaches?
Thanks.
mc
With no other plinths in the room, maybe / maybe not. consistancy or at least getting the mind to think so, is the one goal of remodeling..............the idea-make it look like it's been there all along and still carries the dwellings history and look.
You are there, we are not..............try some mockups that don't change anything you can't put back. This might help you see the right way to proceed.
That's another important thing in remodels/additions............know the look b/4 it gets nailed down.
I'll give this another fresh look and hope for a brainstorm instead of brainfade.
You got a picture of that casing?
plinth be good
I have a couple of ideas, but they do depend on the profile of the casing. I'll try drawing them out. An artist I am not.
If the outside edge ("outside" edge being the left edge in the drawing below) of your casing has a squared off "backband" type of profile like this:
View Image
I'd cut the casing long enough to go from the floor to about 2" taller than I need it at the top of the door. It'll be cut to finish length later. I'd scribe the casing to fit around the rounded over nosing of the closet threshold. For the part of the casing that is between the bottom of the threshold and the floor, I'd cut away the ogee'd casing profile, leaving only the square "backband" part of the profile. The cut and scribed casing would look a bit like this:
View Image
With both side casings scribed and set in place it'll look something like the drawing below. Once they are properly scribed and fit well, you can cut them to length up top so they proeprly meet the top casing:
View Image
Now I'd add a filler piece to go under the nosing and between the "backband" parts of the two side casings. I prefer to not edge butt similar thicknesses of material. If this example, if the backband of the casing is 3/4" thick, I'd consider making my filler piece 5/8" thick so I'd have a 1/8" reveal where the ends of the fill piece butt against the beckband of the side casing:
View Image
I'd consider wrapping the baseboard around the trim below the door. Because there is a 1/8" difference between the thickness of the side casings and the thickness of the fill piece, I'll add a couple of 1" wide by 1/8" thick fill strips. One at the floor, and one so the top edge of the strip is about 1/8" to 3/16th" above the top of the eventual baseboad:
View Image
When I wrap the baseboard around the entire thing, the top edge of that top 1/8" thick strip will show. It'll add another shadow line to the trim:
View Image
I don't know how much of an overhang you have with the threshold nosing and the wall beneath it. If after adding the fill strip the overhang is still excessive, you could add an apron of sorts under the nosing in the gap between the nosig and the base board. Sort of like this:
View Image
That's all I have to say about that...
Wow! Can't believe you did all that drawing. Very nice of you. You say you're not an artist, but I think that's pretty damn good. I also really like the idea.
I used some scrap wood to play around last night. The large plinth block idea from a few posts ago looked pretty good, but I like this better.
Unfortunately, I don't have enough vertical room to do the base and the apron, but I like the look even without the apron.
@calvin - The casing profile can be found here: http://www.kuikenbrothers.com/products/moulding-and-millwork/in-stock-mouldings/item/casing/kb126u-beaded-colonial-casing
This forum is awesome. Seriously appreciate the help! Thanks.