I’ll try to be brief, but provide enough info to give a good idea of what’s what.
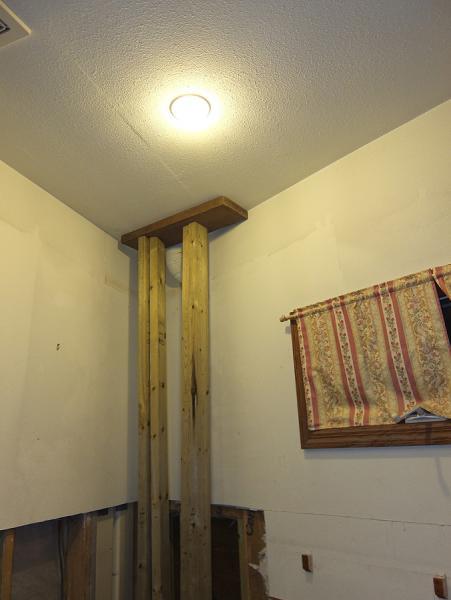
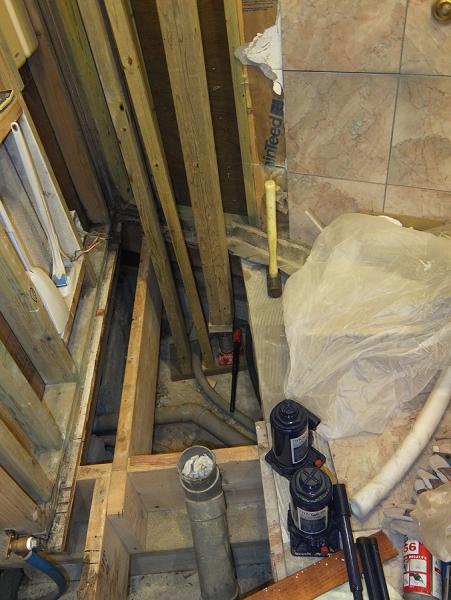
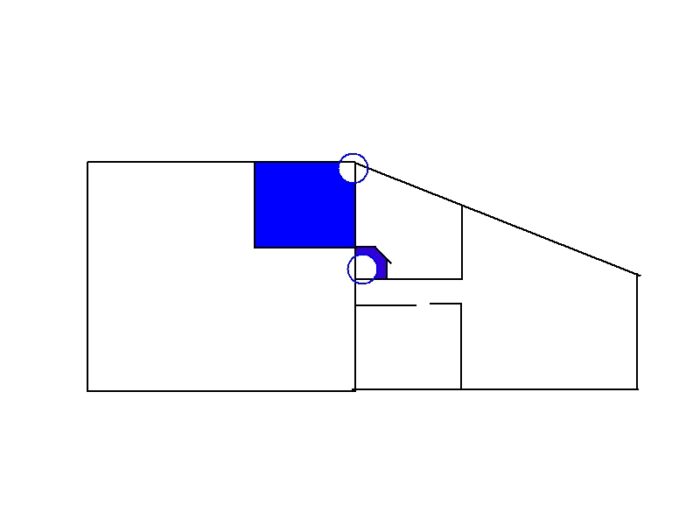
Our house is 20 years old. A number of years ago we noticed the house was listing to one side (the north). I suspected a) ground subsidence; b) ants (termites) and c) water damage. The correct answer is probably all three, but whatever. The first pic is a crude drawing of the general layout of the house (top side is north); the blue areas are wet (the big square is a Japanese style bath in the “main bathroom,” including a tub and open shower area; the lower circle is the corner of a “neo-angle shower” enclosure in the “master bathroom”; it had a water leak in 1996–the probable event that got the ball rolling there): the other pictures show the top corner area (circle) where the wall’s base plate and subfloor (plywood) has rotted and sunk. I want to lift up that corner sufficiently to install new subflooring and base plate, plus sistered studs where the lower parts have rotted (all this is going to be PT lumber). My question is: should I try jacking the wall as shown, namely, under the 2f joists; or remove the drywall all the way to the ceiling and place the posts directly under the wall’s top plate? I currently have the visible posts sitting on a 4t bottle jack, but I’ve got two new 10t jacks that I plan to insert for the actual lifting. I haven’t seen this kind of lifting job discussed on the web, but I’m all ears to opinions and advice. I should also note that our foundation is on a slab with only 20cm between the bottom of the 2×10 joists and the concrete surface.
Thanks for any advice!


Replies
Dont jack up as set up in the photos, you will just push your ceiling joist up.
in the second picture it looks like the wall on the left side is an exterior wall. what kind of siding do you have?
i have done similar things in the past. I screwed a 2x8 perpendiculat to the studs catching 5-6 studs away from the corner on both sides. set up 2-3 bottles on either side and start to lift enough to get the pressure off.
walls and siding
Thanks for the reply, Mark. The two photos are of the same corner, just up (ceiling) and down (floor/foundation). The outside wall is the one to the right (where the window is). I've cut the sheetrock away to a height of 120cm, and removed the insulation in the pic.
The perpindicular wall to the left also has damage to the plate and some studs, but the other side of the wall is the main bath's wet area, so I don't want to replace the entire wall--yet (it's the next job after doing the master bathroom/shower on the right (where the photo is being taken)).
; I just resided the house 5 years ago with Hardiplank (ColorPlus), and put it on over a new rain-screen, so I'd really prefer to avoid tearing that off, since the siding would probably be unreusable and I didn't save enough extra to replace much (and buying new here in Japan would likely be prohibitive, tho I haven't actually checked out the prices yet).
I could do the jacking work as you suggest, although there is a vanity just out of the picture to the right, so I'll probably have to screw the 2x8 to the wall next to the ceiling and use long posts to the jacks--either that, or just try to lift it using fewer studs; in the master bath to the left side of the wall, I'll also probably have to mount the 2x near the ceiling, due to the presence of a built-in bathtub right beside the wall. I'm not trying to go for full restoration this time, just enough to allow me to repair the base plate and subflooring.
Thanks again.
Yes i would attempt to lift the corner with fewer studs vs. trying to do it high. You wont need much lifting to do the repair your hoping for. when you set up make sure you are giving yourself enough room to work with around the corner. use multiple screws to attach your ledger.
let us know how it goes.
Thanks to all
I want to thank everyone for their advice; for the present, I'm going to try using a ledger as Mark suggested and see what gives.
A few other comments:
Two years ago we had some professionals do an assessment of the situation; one guy even got under the floor in two places and tried to scoot around looking for damage (with only 20cm clearance under the joists he obviously didn't scoot much); while they were able to verify the overall shift (about 4 cm, I think), they couldn't find water or ant damage, and so put the entire blame on ground subsidence, and suggested it would cost the equivalent of about USD $100,000 to fix.
While I think there is likely some ground subsidence (we have a little stream running along the north border of the property, as well as other underground water sources), the reason they missed dryrot/ant damage is simply because they didn't look in the right places (hard to believe); I have a continuing log of photographs of what I've found since beginning the demo: see
http://s27.photobucket.com/user/Peregrinor/library/ww/1506_shower
I assumed the damage was pretty much localized to the area of the neo-angle shower in the master br, but it extends quite a bit. I'm currently ready to begin installing new pt joists, the first step before replacing the damaged parts of subflooring and studs. I consider myself lucky that other than the outside north wall, none of the interior walls appear to be load-bearing.
FYI, I should also note that the joists, both 1f and 2f, run north to south (top-to-bottom in the drawing).
Ledger on each wall and beam in between?
Roof rafters or trusses may only be held in place with toenailing...a really bad idea to attemp to lift the walls this way. Maybe this is the same thing mark22 is suggesting...bolt a 2x8 ledger to the face of each wall; then place a couple of 4x8 beams between these wall ledgers and lift each beam with a jack - putting even pressure on each wall. You could use a couple of jacks on the longer beams (the further out from the corner the longer the beams will be) to fine tune the pressure needed.
Different problem if there is ground subsidence....
If the ground has settled and taken the house with it...this will be an entirely different problem...using the methods noted above will not raise the foundation. If there is subsidence, has it stopped moving? How much has it settled? Is there space under the footings? (I have experienced jobs where there was a much as an inch of clear space under a footing - the foundation was literally hanging from the framing as the dirt had settled away). Assuming it has stopped moving, you need to sperate the foundation from the floor framing, raise the floor framing back to level and shim between floor & foundation... To do this, you will likely have to remove some of the lower pieces of siding to expose the floor and rim joists and the top of the foundation stem wall.
Different problem . . .
The ground settling issue is what we originally called in the bigshots to analyze. They told us to watch and call them again in another few years to see if the house/land is still moving. They charged us about $450 for their "opinions" (+ measuring with a laser level), but even going under the house were unable to find the water/ant damage. They suggested that if the ground continues moving, the only thing to do would be to bore into the lower side of the land on the north side and then bore down until bedrock was struck and attach pilings there. One of the three guys gave me a ball-park estimate equivalent to US $100,000 or more, so I am currently waiting with hopes that the subsidence has stopped.
If the tilting is only due to dry-rot/ants and it's now stopped, I've figured before that the best way to respond is as you noted, separating the framing from the foundation and raising it, but there are some special issues involved in working on that (north) side of the house, mostly having to do with complicated plumbing to/from two water heaters (one electric, one solar) that sit on that side, and would have to be disconnected and moved in order to get to the siding at that point. That means living without hot water for the duration of the work, or at least sending the wife off somewhere.
I've attempted to do this sort of thing a couple of times. One time the jacking went quite easily and was done in minutes. The other time it took all the force I could manage on the (cheap Northern Tool) hydraulic jack to do anything, and then I had to keep jacking more over several weeks to get the framing to move the half-inch I needed. (Didn't help, of course, that the jack kept leaking down.)
There's no good way to predict how it's going to go.
New developments--and questions
(Edited for clarification, 2015-08-26)
Okay, I've gotten the problematic joists sistered and--hey for me!--I was able to actually replace the entire joist in 3 cases out of four. So the new PT joists are not merely sistered across bad areas of the old joists, they actually duplicate the old joists (I was able to do this due to the need to remove additional floor material in the ongoing process of discovery of rotted parts). So the new joists actually go from foundation footing to foundation footing. Therein lies the question: should I remove the old joists or just leave them be? To be honest, I've already screwed the new joists to the old, and I could find no sign of recent ant/dryrot activity, so I'm hoping there's no urgent neet to remove the old ones--after all, they're not completely rotten, so they do supply some utility, and Im assuming that any new ants and fungi will not move across to the PT joists.
Question 2: take a look at the photograph and tell me if this is SOP or just a clusterfk. As you can guess, the whole cotcatenation of connectors won't fit into a 16" bay, so the plumbers just chawed their way through a stud and mounted the shower valve like this. This was done 19 years ago by the original plumbers, so I don't know what to say, but the valve is an American Standard from two decades back, and I'm going to replace it with the contemporary version. I intend on using simple L (90o) connectors with short sections of 1/2" copper pipe to slim down the size to fin in a single stud bay, unless that way of doing things is evil or sometrhing.
(I cut the stud, by the way, due to termite/dry rot, so I'll be restoring it, of course.)
not SOP
When you go to replace it, have some blocking in the back so that you can secure the valve to the block. arm over through the stud and then drop down so that you dont chop it up.
the joist you sister to in the picture look like they have a good 3/4 of the lumber in good shape. i wouldnt worry about taking it out completely.
glad you gave us an update, and glad things are moving along.