Good Morning guys.
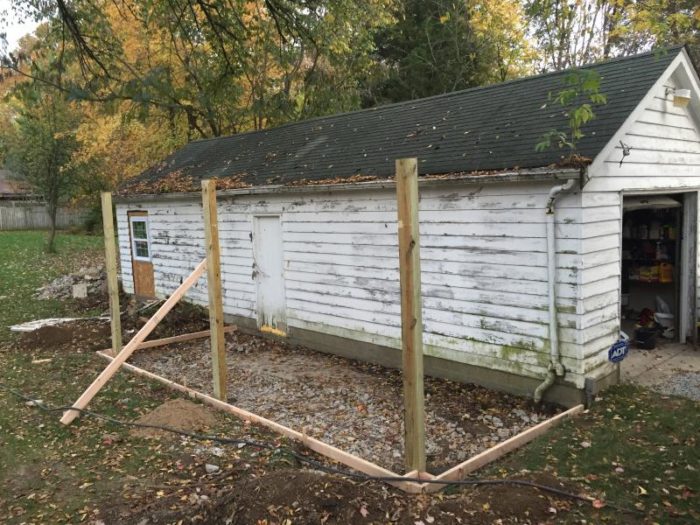
I need some advice. I’m renovating my 1950’s garage and building a covered porch on the side. When constructing the rafter, how do I cut the ridge so the rafter sits on top of the existing roof. I’m about 8ft away from the existing structure. I know it’s a steep cut, can you help me figure this out? Thank you!


Replies
One way.....
You can do a scale drawing, figure it out with math or......
Tack a string on one of your posts at the height of the top of the rafter and then onto the old roof where you plan to land the top of the new roof. the space between the string and the roof represents the portion of the new rafter you want to leave. You can take the angle with a bevel square or a couple long thin pieces of plywood or whatever held to final angle with a c clamp.
Transfer said angle to your new rafter. You can add the seat cutbirds mouth from the top of the rafter, measured for length.
Don't be shocked if each rafter has to be custom cut unless the old roof is perfectly flat and your post and beam setup is equally perfect.
To start with you need to nail downa 2" X 10" or so across the existing roof where the porch rafters will fall to give it strength. Then do as oldhand suggested and refine your cut until it fits nicely.
PT?
thank you sir. Should I use pressure treated for the beams and rafters?
Generally speaking, there's no point in using PT wood unless the wood will be kept damp for extended periods of time. This could be due, eg, to the way the building is shaded by trees or the way leaves might pile up on it, or building a new roof atop an old one with insufficient ventillation/drainage between the two.
Install/clamp a Board at the height your beam is going to be at for the outside "wall/edge" and make sure it runs out farther than the overhang at the front of the garage. Take a rafter and set it on top of your temporary beam run it up to over hang and just trace the angle from the roof itself. No muss no fuss. You might have to adjust from there if you really want to be picky. You can also check how far out of whack the roof is along your interecting "ridge line" by putting a piece of 3/4 or 2x stock under a string stretched along that line and then check the height at 16" intervals. If you don't get much variation then you probably have no need to worry about adjusting each rafter to a different angle.
Pressure Treated?
Thanks for all of your advice for this novice carpenter. Should I use Pressure treated for the beams and rafters? The beams are going to be sandwiched to the 4x6s.
Another reason to just clamp a rafter up to the overhang is you can get and idea of what position looks best instead of waiting for your wife to say that looks stupid.
You can move the rafter multiple time without ever cutting it to get a visual on what looks best
Remember if you do the mock up method the birds mouth cut will drop your rafter location on the roof but it won't change your angle
Well I don't have a wife and I'm 31 yrs old so I don't have to worry about that. Haha. The ladies don't want men that work with their hands anymore.
piktures might help
To mock it up, if you're trying for something like this:
View Image
...and don't want to use a framing square, then try this:
View Image
After you get your overlay nailer board installed on the roof, place an uncut rafter like the one shown in red. Notice the bottom of the red rafter is parallel to the bottom of the shaded rafter as it sits in its eventual location.
Then set a scribe board like the one shown in green. Or use a square or tape measure to strike a line parallel to the slope of the roof.
Scribe a line like the one shown in yellow.
Cut on the scribe line.
You can then measure, layout, and cut the birdmouth in the traditional way, or you can again mock up the rafter on the roofand mark the birdsmouth cut. Understand that when the birdsmouth cut is made it'll drop the heel end of the rafter. To account for that you can "lift" the roof end up off the overlay a bit when marking it, or accept the error at the seat cut. Depends on how precise you want to be. It is, after all, rough framing on a slightly skewed shed roof.
Test fit.
Use that first cut rafter as your pattern to mark and cut the other rafters.
A more detailed example of how to get the slope without measuring. Marking beats measuring whenever its practical. Nice job.
thanks
Thanks...
Thanks!!!
Thanks Mongo for the illustration, that's very helpful. I'm wanting to have at least a 3" pitch which leaves me 2ft away from the ridge on the original roof. So I might take the rafter all the way up to the ridge to get maximum pitch. Thank you!