Roofing pros: Detail when apron and step flashing meet open valley flashing
user-1163745251
| Posted in Construction Techniques on
Can someone please provide some guidance?
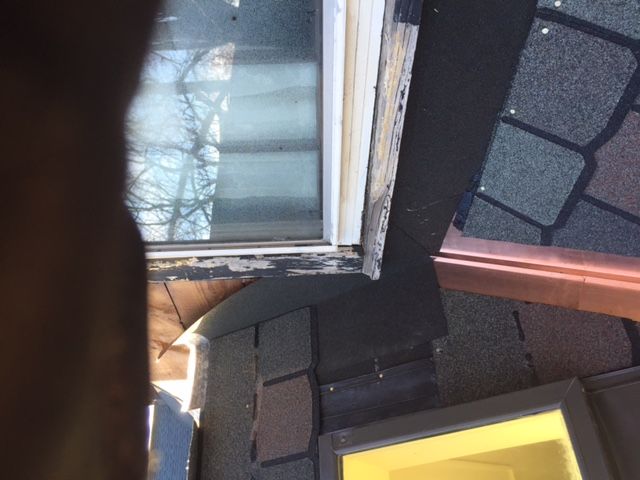
How do I detail the apron flashing that will come in from the right and the step flashing that will climb the roof to the left?
(The high shingle on the upper left was just tacked in an attempt to pick up coursing from bottom – ignore it)
Please help!


Replies
Should I maybe close the valley at the top course and then run the apron over that to the center of the valley?
solder is ;your friend
Why....
...does it look like your valley metal is upside down?
MIke, That's just because the photo is sideways - it is a tropical illusion. Just kidding... looks correct to me. It is in the "w" position, no?
Hi Jim, It is hard to tell from the photo a few key details that will help me make a recommendation. Most importantly, where does the copper valley end and does it roll up the sidewall at all? Is the last course of shingles that is top-nailed the exact kink where the roof and wall intersect? Thanks
Hard to tell...
It rolls up a bit. W is not upside down. The last row is at the roof to wall intersection. Was planning to have the apron flashing lap the top row. Maybe 2 pieces of apron - 1 that sits under the shingles and laps the valley and then one that laps the shingles and follows the valley cut profile?
And thank you!
.... For taking some time out of your Sunday to think about this!
In Firefox, if you right-mouse on the image and then select "view image" it will show the image right-side-up.
Thanks!
I think I understand and it sounds like you suggest what my original plan was, adding the counter flash. One thing throwing me off is that there's a gap the thickness of the two layers of shingle between the valley flashing and the roof leg of the apron. At least 1/2" - certainly too big to solder...
Any ideas?
You can say that again!