Built-in Banquet seating with storage
Hello All,
I originally posted this over on the knotts side but no one there seems interested in this so maybe this is the better place to post this.
I would like to solicit ideas from y’all on a built-in banquet seating project that SWMBO has just green lighted. Please see the attached pic oakdining1 so that we are talking about the same thing.
I want to do a three sided built-in banquet with lift up seats for storage of our not-super-often-used big kitchen gadgets.
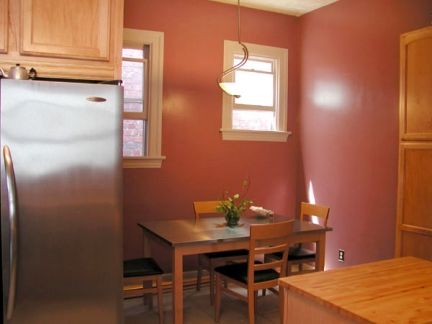
The breakfast nook is ~8.5 by5.5′ and looks like this (please see attached kitchen02.jpg.) I want to fill the three walls with the seating and hopefully be able to reuse the table.
I am not an official fine woodworker so my skills and tools are going to be limited. I am thinking that I would like to make the frame out of regular dimensional lumber held together with glue and pocket screws (which I have experience with). I would then like to face the banquet with some nice maple and stain it to match the cabinets.
Taking into consideration that the main tools I have to do this with are only a SCMS, a tablesaw (yet to be purchased but I did get the okay), a circular saw, a router and the super pocket hole kit (what ever the heck its called). What are folks thoughts on this idea.
Any pointers or points to some useful plans would be greatly appreciated.
thanks,
Daniel Neuman
Oakland CA
Crazy Home Owner


Replies
The ones I made had seating on opposing sides only. Been a long time so I'm fuzzy on dimensions, which might not fit you anyway. Both were commissioned and I was careful to measure the occupants to get a comfortable sit.
This is basic box building, nothing complicated except you want to get seat height, slope, and angle to the back right. Then decide where the hinges on the seats go. As long as the hinges, preferably piano, are near the back, your butt won't ever feel them. A more complicated design would include a pull-out shelf for those kitchen appliances, better access if they're heavy.
One of my couples was a real Mutt&Jeff. Either his knees were gonna hit the table or her feet were gonna dangle. I made the seats different heights, backs the same height. Tall people on one side, short on the other. Screwed up the seat to table top dimension, but it was the best I could do. I hope you don't have that situation 'cause it'd get complicated in a U shape.
If you get the dimensions right, you can comfortably sit there for hrs without any seat or back padding. I know from dining experience. Find a chair that really fits you, measure it, and go from there. Make sure the back doesn't catch anybody right at the bottom of the shoulder blades. Changing the table top to seat height even an inch makes it feel a lot different, so make sure you have all dimensions figured out before you start.
Sounds like you're in for some fun. Plans you don't want, design to your dimensions. Sheet goods would make it a whole lot easier.
PAHS Designer/Builder- Bury it!
Hello VaTom,
So are you saying that it would be easier to build the entire thing out of sheet goods?
To my way of thinking building a 'frame' out of 2by4's to get the correct shape and strength and then skinning it with maple ply sounds easier to me. Course I've never done it before so what the heck do I know.
I like the pull out shelf idea. I'm thinking big strong full extension slides and make the two sides of the booth at the top of the U slide out into the room for access. I could then make the longer bench at the back of the U have a flip top for additional storage.
I'm not looking for specific plans but I'd like to look at plans for similar ideas that I can steal from and make work in my specific situation.
Daniel Neuman
Oakland CA
Crazy Home Owner
So are you saying that it would be easier to build the entire thing out of sheet goods?
Can't speak for you, but for Doug, me, and pretty much anybody else used to shop work, yes. 3/4" ply would be fine. Plenty strong. I'm not much of a carpenter and would find it far better to keep dimensions with sheet goods. Edgeband it with solid stock and you're good to go. I like 1/8" thick banding. Masking tape works great for clamping. Scrape it flush. Or, if you like molding, go crazy.
Creating a panel for the slide out is simple, just decide where and how large. Ply's amazingly strong stuff. If you get nervous about a thin section you can always add some solid stock on the inside of the box.
Start drawing to scale. I'd think that the seating was paramount, so start with those dimensions. It'll then let you see how much room you have inside and how to maximize it. Those will be large boxes so, depending on how hard you want to work, there's an amazing amount of space available. You could do narrow pullouts in the backs too, or hinge the top for cookie sheet or posterboard storage, whatever you have. Good place for Christmas mugs or Passover dishes in the far recesses. BTW, I've got Blum 28" full extension glides on a pair of lower desk drawers here. Both are fully loaded with hanging files. DW loves them.
Which holiday is the move-in date?
PAHS Designer/Builder- Bury it!
Attached is a rough drawing and notes on the booth/banquet I built/am building.On your flip forward seat back: I would move the hinge to the top. As designed I could see that thing braining a little kid.I can't find my earlier post so I will add the following again:
* I like that my seat overhangs my base, much more comfortable.
* the kick at the bottom makes sliding in easier.
* one of the few times I used a gloss finish (see above...)I attached a few pictures and a pdf (not a plan just a rough idea.)Good luck.(To the pros out there: I'm a desk jockey so be gentle.)
Ted, pretty sure you meant to reply to Daniel. Doubtful I'll ever build another one. Mine were simple boxes made of 3/4" sheet goods. Next to no reinforcing, unnecessary.
Your woodworking may be great, but the photography needs work. Kinda hard to tell what's there. Good thought though.PAHS Designer/Builder- Bury it!
sorry, I'll fix.Thanks for the heads up.
Hello Brooklyn Ted,
Thanks for the pics and the pdf it has helped be tremendously. I really like the overhanging lip on the seat and the recessed toe-kick. It would give the design more interest (different depths and shadow lines) and give me a place to add some nice moldings. SWMBO was worried that it would look too boring with my original idea of the flat sides.
You have an idea of how far the overhang on the seat should be? Or how deep the toe-kick should be recessed?
Thanks,
Daniel Neuman
Oakland CA
Crazy Home Owner
Overhang on the seat is about 2 1/2 inches. (It makes the seat more comfortable because the back of your calf is not against the box.)Toe kick is about three inches. (It makes sliding in on the long side so much more comfortable. Because you can get your foot under you better.)I understand why everyone says cushion the unit but if you have kids or plan on them in the near future, I would argue you should consider carefully. My thinking in not goign with cushions was: booths with cushions are much harder to slide into and cushions get dirty/wet/stained.If I have a chance tonight I'll find my original plans, mark them up with final dimensions, note my changes, and attach.(My biggest advice is the orientation of that brace so you have more hinge options. I realized too late and had to go with piano hinges.)
Daniel
I'm building a set of kitchen cabinets right now that has banquet seating.
I'm not putting any backs on mine so they are a bit different.
I would do as VATom suggested, get all the seating height, angles for the backs and seats, and any other pertinent data that you think you will need. Might check restaurant fixtures, they have that info down to a science.
One other thing that I found helpful and I think Tom might have touched on it as well, build out of sheet goods. You don't need to make a rough frame out of dimension lumber. The sheet goods will be plenty strong and you'll have more space inside for storage, plus it looks a lot better.
Doug
One other thing that I found helpful and I think Tom might have touched on it as well, build out of sheet goods. You don't need to make a rough frame out of dimension lumber. The sheet goods will be plenty strong and you'll have more space inside for storage, plus it looks a lot better.
Shoot another vote for sheet goods. Are you thinking like 3/4" maple ply or something like that? I may have my head up my butt (mhumb) about this but I don't exactly see how the sheet goods would be better. It seems like if I want the full extension pull out drawers in the two sides I will have to reinforce those benches for sitting on?
Do you really think that if I built it with dimensional lumber then attached the maple ply to it that it would look significantly different than if the entire thing was built out of ply?
I know I have the Tauton built in ideas book at home that I will have to rummage thru tonight.
Daniel Neuman
Oakland CA
Crazy Home Owner
Daniel
Do you really think that if I built it with dimensional lumber then attached the maple ply to it that it would look significantly different than if the entire thing was built out of ply?
No, I don't think it would look different from the outside but when you add in all that 2X material to the inside you decrease your volume area.
Plywood is strong, it can hold a lot more then the 2X's. Its a lot more stable, sizes are more constant, everything about it makes it a better choice for this application.
Try sketching something out, doesn't have to be real neat, post it and lets take a look at what your doing. It might help you and I know it will help me to visualize what your doing.
I'll have to go back to your original post and see if I can figure out what your doing with the drawers to see why you think you need the extra substructure.
Doug
Daniel
Just got done looking at the pix that you posted. The one with the table sitting in the nook is your current setting, correct?
And the table sitting in that spot is the one that you want to use? If so what's the dimension of the table and the dimension of the nook?
Doug
You mention lift lids on the seating area but I also see that you are talking about drawers. Which do you want, not that your restricted to either just curious.
Edited 11/10/2005 11:34 pm ET by DougU
Doug, he mentioned lift lids and kitchen appliance storage. I suggested pullouts if anything was heavy. That's where the drawers came from. But I don't have any more idea what's to go in there. Big boxes, lots of potential.PAHS Designer/Builder- Bury it!
Hi VaTom,
Which holiday is the move-in date?
Wha???
Doug, he mentioned lift lids and kitchen appliance storage. I suggested pullouts if anything was heavy. That's where the drawers came from. But I don't have any more idea what's to go in there. Big boxes, lots of potential.
I would like storage for all the big seldom used kitchen appliances I am sure we will get at the wedding plus the ones we own now. Breadmaker, food processor, blender, big mixer that kind of stuff. Plus a place for all the cookie sheets, pizza stone, muffin sheets. The kitchen is small my McMansion standards and we are already feeling a space crunch with the existing cabinets and we don't have any kids yet... Check out the attached pic for a view of the kitchen from the nook.
I had a crazy idea last night, what if the bench backs were hinged at the bottom and pivoted forward? I could put a bunch of cookie sheets in those......
Daniel Neuman
Oakland CA
Crazy Home Owner
sorry heres the pic...Daniel Neuman
Oakland CA
Crazy Home Owner
Purple, the favorite color of teenagers of all ages...
As a frequent baker, I'd suggest you sell the bread machine. There was a $5 offer here somewhere. <G>
Pretty sure I'd hinge the top and/or sides of the back for that sheet storage. That would leave the back structural.
Do you like the pizza stone? We use a pizza pan, which is 2 layers of aluminum with a lot of holes. It is superior to a cookie sheet, but a PITA to clean.
Here's real bread:PAHS Designer/Builder- Bury it!
if the bench backs were hinged at the bottom and pivoted forward?
It's an excellent idea, really. Maybe not for anything as frequently used as a cookie sheet (a nicely detailed "slot" in the back of the ends of the upper backs pointing "into" the kitchen will not go amiss, though).
Oh, you need to decide early on if the seat bottoms are going to get cushions or not, as you need to knock the 1" or 2" of height out before you get started (not a bad idea to have a perpendicular "flat" the same height before angling backs, back, too).
Oh, and if you get cushions, have the upholsterer make up a couple extra (they will store behind the hinged backs nicely) and a couple of "booster seat" cushions. This can help accomodate a wider range of different sized folk.
Occupational hazard of my occupation not being around (sorry Bubba)
It's an excellent idea, really. Maybe not for anything as frequently used as a cookie sheet (a nicely detailed "slot" in the back of the ends of the upper backs pointing "into" the kitchen will not go amiss, though).
Are you thinking that pivoting the seatback forward will just be to inconvienient? The open slots in the seatbacks is a good alternative....I'll have to run it by SWMBO, but I think she is going to lean towards the stuff being hidden from view....
Oh, you need to decide early on if the seat bottoms are going to get cushions or not, as you need to knock the 1" or 2" of height out before you get started (not a bad idea to have a perpendicular "flat" the same height before angling backs, back, too).
Yep we are deciding on that right now. I am leaning towards the no cushion side but SWMBO is not convinced that it will be comfortable without them...
Daniel Neuman
Oakland CA
Crazy Home Owner
Are you thinking that pivoting the seatback forward will just be to inconvienient?
It can be, but I was more thinking of the frequency one uses cookie sheets, adding a step or two to everyday activities can wear thin (or the really infrequently used flat goods wind up 'lost'--sort off--in the storage space.
My personal preference in the kitchen (and it's admittedly personal) is to have/make an area for all the cutting boards & cookie sheets and have it in an open and visible area. But I also use a range of flat goods in cooking, too, and most every day I cook at home, too.
but I think she is going to lean towards the stuff being hidden from view....
Which is one of those realities of life. Put a "false front" of sorts over the end slot, and it still works, though. Being able to retreive/replace flat goods parallel to the seating means never having to "mush" your guests (the ones who will settle in the banquette while you cook like swallows to Capistrano) to get a serving platte, or the "insulated" sheet to make the garlic bread on. (BTDT <g>)
but SWMBO is not convinced that it will be comfortable without them...
To get real comfort out of a wooden seating surface requires the kind of curves seen in old-fashioned, solid-wood, seat construction. Those radii are not complementary with sheet-goods contruction on the whole. (Yes, that's also a hinting suggestion that it's worthwhile to use some pretty beefy solid-lumber sections--as in 6/4 & 8/4 stock--to trim the edges of some of the seat goods; that's so you can get 1", 1 1/2" and better round-overs in them.)
Keep the shapes simple, and the upholsterer will thank you. Now, another thing to pass by the decorating committee is whether you need/want more than one color cover for the cushions. The upholsterer can put a simple fabric cover over the seat cushions, which can then get seasonal-decor slip covers for what is not very much more investment. I know soem empty-nesters who have leather covers for day-to-day use of their built-ins, but have stain-proof ginkham for when they have the kids in the house.Occupational hazard of my occupation not being around (sorry Bubba)
Keep the shapes simple, and the upholsterer will thank you. Now, another thing to pass by the decorating committee is whether you need/want more than one color cover for the cushions. The upholsterer can put a simple fabric cover over the seat cushions, which can then get seasonal-decor slip covers for what is not very much more investment. I know soem empty-nesters who have leather covers for day-to-day use of their built-ins, but have stain-proof ginkham for when they have the kids in the house.
Thats a good idea stain resistant and then a fancy set. I am liking the cushion idea more and more. It seems that with the cushions overhanging the edge (like in the art.) you would not need to round over the edge-makes it easier for me.
Daniel Neuman
Oakland CA
Crazy Home Owner
It seems that with the cushions overhanging the edge (like in the art.) you would not need to round over the edge-makes it easier for me.
That's correct. Go with at least a 2" thickeness cushion (I want to remember that "ideal" ergonomics for the back of most knees hits about 1 3/8-1 5/8" radius.
Oh, and you need to tell the upholsterer that you will be overhanging. Some upholstery people fuss over that (some don't); the ones that do, do want to know (maybe they use a different foam, maybe not).
Hope that helps.Occupational hazard of my occupation not being around (sorry Bubba)
Sorry for the late reply been crazy workin on this Veterans day...
I'm working on a sketch so that this will make sense but I have discovered that I really stink at drawing so give me a couple of more minutes.
Just got done looking at the pix that you posted. The one with the table sitting in the nook is your current setting, correct?
And the table sitting in that spot is the one that you want to use? If so what's the dimension of the table and the dimension of the nook?
Yep the table/chairs is what I have now. The 'nook' is 8'10" long by 5'6" deep. I am not married to the table-if I can make another bigger table to fit the new seating that would be cool. I would like to maximize the amount of folks that can be sitting around the table enjoying their food.
Daniel Neuman
Oakland CA
Crazy Home Owner
I did this at home...found that the seat profile is very important to comfort....if you can build up the profile to match your butt, it makes a world of difference....I had access to a great deal of cedar 2x lumber, so I used it, and it's more comfortable to sit there at the table, than move to an upholstered chair....trust me...
Regarding the plywood for strength - think about how heavy all that granite is on your countertop - on (hopefully) plywood boxes. The good Blum & Accuride glides are 100# to 150# capacity - hung off the sides of plywood sides & capable of extending to full depth. Yea, the plywood can handle it!
All right I got a couple of diagrams done finally. These are not meant to be the final word by far I just wanted folks to know what I am talking about.
Daniel Neuman
Oakland CA
Crazy Home Owner
Your concept looks good. (It should after all the pointers you got here!) I definitely like the flip forward seat backs.
Not sure where you got your measurements. I think somebody suggested that you try measurements from a restaurant. Try a mock up if possible to make sure that whatever you are doing fits your body. An extra degree of incline, or an extra inch here/there can make the difference between pleasure and annoyance. Same goes for the table. Make sure it's high enough to give you room above the legs (for sliding in and out) but not so high that it's uncomfortable. You might want to leave allowances for cushions, too.
IIRC Susan Susanka did an article on these about 2 years ago in FHB. You might try to research that. She had a couple of dimensions that she said were important. I can't remember them at all, but I haven't built mine yet.
Don K.
EJG Homes Renovations - New Construction - Rentals
Hi Don,
Your concept looks good. (It should after all the pointers you got here!) I definitely like the flip forward seat backs.
Thanks, the pics are the general idea I just got to figure out how to make it a reality-I'm a bit worried about making the flip out seatbacks feel sturdy/ be sturdy.
Not sure where you got your measurements. I think somebody suggested that you try measurements from a restaurant. Try a mock up if possible to make sure that whatever you are doing fits your body. An extra degree of incline, or an extra inch here/there can make the difference between pleasure and annoyance. Same goes for the table. Make sure it's high enough to give you room above the legs (for sliding in and out) but not so high that it's uncomfortable. You might want to leave allowances for cushions, too.
We took them from our existing chairs they do not seem to be that far off of norm-except for maybe the 24" seatback. SWMBO would love it if I could figure out a way to make the seatbacks curved...that would be much more difficult.
IIRC Susan Susanka did an article on these about 2 years ago in FHB. You might try to research that. She had a couple of dimensions that she said were important. I can't remember them at all, but I haven't built mine yet.
I just got done going thru every FHB in the house and I must have every issue except that one. I probably put it someplace 'special' so I wouldn't lose it......
Daniel Neuman
Oakland CA
Crazy Home Owner
I dug this up from FHB Fall/Winter 2004 by Susanka, I hope it helps. I will be doing a similar project in our new house's half-octagon informal breakfast nook. I'll post pics, but it'll be three months before I get started on it.Awesome thread so far, just what I needed!Thumbwhacker
I dug this up from FHB Fall/Winter 2004 by Susanka, I hope it helps. I will be doing a similar project in our new house's half-octagon informal breakfast nook. I'll post pics, but it'll be three months before I get started on it.
Wow thanks thats exactly what I needed. I couldn't find my dang issue. I won't be able to start on this project right away either. I managed to hurt my back so no labor for me for a couple of more weeks. To keep from going crazy I am trying to plan the heck out of my next couple of projects.
I'm going to read the art and then apply that to my design and post back here when its done.
Daniel Neuman
Oakland CA
Crazy Home Owner
Daniel
Your drawing looks good. The flip forward back is clever.
I wouldn't build this seating arrangement to accommodate your table, you can always get/make another table.
You don't need to over think the dimensions on this project, others have done this for many years. Take advantage of the info out their.
I'd use the common dimensions that are well established and go with that, unless of course your of some freakish shape! <G>
I like the idea of one flip up seat and one big pull out drawer. You do know that you can get drawer guides up to 5' in length don't you? You'd really be able to make a big drawer!
Doug
Hi Doug and thanks for replying.
Your drawing looks good. The flip forward back is clever.
Thanks SWMBO saw it on my pencil sketch and got really excited about it. She wants somewhere to put the serving trays and cookie sheets and stuff.
I wouldn't build this seating arrangement to accommodate your table, you can always get/make another table.
I agree though if it works out that I could magically keep the table I wouldn't mind it matches the rest of the kitchen. We were planning on cutting the legs off of it and installing some sort of pedestal base instead.
You don't need to over think the dimensions on this project, others have done this for many years. Take advantage of the info out their.
I don't think I'm over thinking the dim. I built the model to fit the space of the nook The CAD program makes slapping dim on easy and several folks were asking for them so....
I like the idea of one flip up seat and one big pull out drawer. You do know that you can get drawer guides up to 5' in length don't you? You'd really be able to make a big drawer!
I can only use the pull out drawer on the one side because there is existing cabinets in the way on the other side. I am planning on having the flip out seat backs on both short sides. I will have lift up seats on the one short side and along the back also.
I was thinking about the big sturdy pull out drawer full of heavy appliances and had another crazy thought. What if I set the drawer on some sort of rollers-wheels-casters and install some sort of guides on the bench so that I could roll the drawer in and out? This might be easier for a novice than installed some 5' slides. That drawer can only be ~4' because it will bash into some pre-existing cabinets.
My search of bookstores was not so fruitfull. Stanely has a book on built-ins that has one bench with flip up seat but I wasn't going to buy a $20 book for 4 useful pages (not yet anyways).
I would also like a way to hinge everything invisibly. I know that piano hinges would be pretty standard but I just think that well.. they are ugly...
Daniel Neuman
Oakland CA
Crazy Home Owner
Daniel
Stinger(BT'er) posted some hinges for something like this not to long back, I'll see if I can find the post.
For this long drawer, how often do you think you'll be accessing the contents?
I built a tool box for my truck with roll out drawers, six footers, they are on simple home made rollers. I'll take some pix of them tomorrow, very simple and cheep. I open and close the drawers on the truck several times a day and they are loaded down with maybe 200 lbs of tool per box.
I also have a top to the box that is 6'6" and its on a full extension drawer guide that's rated for 500 lbs. Of course it opens and closes as well as any full extension guide.
You have to think about who will be opening and closing the drawer the most and how well it will work. Certainly doable if you go the homemade route.
Doug
Hi Doug,
For this long drawer, how often do you think you'll be accessing the contents? You have to think about who will be opening and closing the drawer the most and how well it will work. Certainly doable if you go the homemade route.
Myself and SWMBO will be using the drawer probably not super often. We do love our breadmaker (take that VaTom) and use it often but the function of it would be to store the kitchen appliances some used more than others but none used every day.
Daniel Neuman
Oakland CA
Crazy Home Owner
We do love our breadmaker (take that VaTom)
Did I disparage them? LOL Well, probably.... But did we really discuss bread? I know I'm prejudiced. (Come on over, I'll convert you.)
Anyhow, the hinges that I was thinking about were Soss. My bench seat was a slab off the saw mill. That was a hickory, once growing here.
I built a large kitchen, so we could afford a storage-less bench. And we have only one dining table, which the bench gets moved to with company. PAHS Designer/Builder- Bury it!
Depending on how you orient your bracing inside, you should be able to use European type hinges and make everything invisible.I just finished (well 80% done is finished in my book...) a booth/banquet in my casa. It looks good. I wish I had done some things differently but overall, I'm pleased.I'll try and post a few pictures and a lengthier discussion tonight when I'm on Ted-time.I will say this:
* I agree about building with ply. (I used birch ply and dimensional lumber and lots of biscuits.)
* My booth sits on a frame/base which is less deep than the booth. This makes it much more comfortable;
* The seat overhangs the case -- also adds comfort;
I just finished (well 80% done is finished in my book...) a booth/banquet in my casa. It looks good. I wish I had done some things differently but overall, I'm pleased.
I'll try and post a few pictures and a lengthier discussion tonight when I'm on Ted-time.
That would be much apprecitated
thanks,
Daniel Neuman
Oakland CA
Crazy Home Owner
Attached is a rough drawing and notes on the booth/banquet I built/am building.On your flip forward seat back: I would move the hinge to the top. As designed I could see that thing braining a little kid.I can't find my earlier post so I will add the following again:
* I like that my seat overhangs my base, much more comfortable.
* the kick at the bottom makes sliding in easier.
* one of the few times I used a gloss finish (see above...)I attached a pdf (not a plan just a rough idea.) Thought it might help.Good luck.(To the pros out there: I'm a desk jockey so be gentle.)
On your flip forward seat back: I would move the hinge to the top. As designed I could see that thing braining a little kid.
That's a good point. I think it would be more functional hinged from the bottom. Maybe some sort of travel stop so it can't slam all the way down and a catch that takes a decent amount of force to get it open??
Daniel Neuman
Oakland CA
Crazy Home Owner
or put a chain on it so it can't drop more than 25 degrees or so...
put a chain on it
Which is better than a lid stay, especially if you make it so the chain can be "undone" (with a considered effort).
Now, normally, banquettes wind up with enough stuff on them, that opening them more than 15º or so when bottom-hinged is a bit of a chore anyway. My experience is that a speed-decreasing 'closer' is more needed around small fingers than an opening limiter.
Oh, I didn't say before, but more moving panels are better. Somewhere between 14 to 20" wide works out much better--at least that's what I've found.Occupational hazard of my occupation not being around (sorry Bubba)
Now, normally, banquettes wind up with enough stuff on them, that opening them more than 15º or so when bottom-hinged is a bit of a chore anyway. My experience is that a speed-decreasing 'closer' is more needed around small fingers than an opening limiter.
I'm thinking that the lift up seat bottom and pivot forward seatback would both need soft closing devices with the chain on the seatback to limit travel.
Daniel Neuman
Oakland CA
Crazy Home Owner
Just a quick thought... Instead of hinging the one lid at the back of the seat, you did it on the end toward the back of the seating area, you could lift one long lid from the accesible end while not being impeded by the table itself.
Just a quick thought... Instead of hinging the one lid at the back of the seat, you did it on the end toward the back of the seating area, you could lift one long lid from the accesible end while not being impeded by the table itself.
I had to read that like three times before I understood what you were saying. Huh, that could work but I would be worried about kids getting not being able to lift it up. It would have to have some sort of soft close mechinisim so that it would not slam down on any little fingers.
Daniel Neuman
Oakland CA
Crazy Home Owner
Hi Daniel, I'd looked at your drawings. Hadn't mentioned anything 'cause they look good to me. Well, I'd make one very small change. 4" at the top of the back seems large, depending on how you treat the cap. If it's solid wood overlaying both backs, that's fine. If it's 4" plus the hinged back, kinda large.
You want totally concealed hinges? I suggested piano for ease of installation and maintenance, but beautiful they're not. Having a senior moment here, no brand name presently available, but there are barrel hinges that would be totally concealed. The drawback is the solid stock necessary at the seat-back corner for seating the hinges. To me, this would be one of those judgement calls, largely dependent on the pocket depth of the client. A whole lot more work than piano hinges which would work fine with a thin solid strip edgebanded to your plywood.
Curved backs certainly would add complexity. There are a couple of good ways to accomplish them. Somewhere in here we get to your skill level and the probability that the project finally reaches completion. Not to suggest that you shouldn't do a curved back, your call, but I would caution you to only moderately overstep your current skills. A challenge is good, only as long as you succeed.
Strong recommendation to mock-up a bench with your chosen dimensions, prior to cutting the sheet goods. Pull up a table and see how it feels.
Just for fun, as long as it's your thread anyhow, I'll attach a photo of a very comfortable bench that lives here. The seat is modestly scuplted, as is the minimal back. No application that I see for your project.
PAHS Designer/Builder- Bury it!
Hello VaTom,
I'd looked at your drawings. Hadn't mentioned anything 'cause they look good to me. Well, I'd make one very small change. 4" at the top of the back seems large, depending on how you treat the cap. If it's solid wood overlaying both backs, that's fine. If it's 4" plus the hinged back, kinda large.
It would be 4" including the back not plus the back. We were thinking that we needed it so that when people leaned their heads back they would not immediately smack the wall.
You want totally concealed hinges? I suggested piano for ease of installation and maintenance, but beautiful they're not. Having a senior moment here, no brand name presently available, but there are barrel hinges that would be totally concealed. The drawback is the solid stock necessary at the seat-back corner for seating the hinges. To me, this would be one of those judgement calls, largely dependent on the pocket depth of the client. A whole lot more work than piano hinges which would work fine with a thin solid strip edgebanded to your plywood.
I found an old Rockler Cat that had the big beefy barrel hinges of which you speak looks to me like they should work. For me the time is less important because I'm doing the work.
Curved backs certainly would add complexity. There are a couple of good ways to accomplish them. Somewhere in here we get to your skill level and the probability that the project finally reaches completion. Not to suggest that you shouldn't do a curved back, your call, but I would caution you to only moderately overstep your current skills. A challenge is good, only as long as you succeed.
Yep I agree. Some folks call that project creep. Where what starts out as a simple project keeps having more and more features put on till it becomes impossible for it to get done. I'm hoping to avoid this-the pull out drawer and flip forward seat backs are not optional now but curvy seats and seatbacks probably are.
Just for fun, as long as it's your thread anyhow, I'll attach a photo of a very comfortable bench that lives here. The seat is modestly sculpted, as is the minimal back. No application that I see for your project.
That's a pretty fun looking bench. Its definitely got that rustic hunting cabin look to it.
Will do on the mock up.
thanks again for the help.
Daniel Neuman
Oakland CA
Crazy Home Owner
Looks good. My only bias is personal from having lived with hinged seats. It's such a huge operation to get every thing off the seat bottoms (and what you want will always be under the greatest amount of "stuff") that either nothing is stored there, or it's done without.
So, I always try to plead a case for all drawers on high quality full extension guides. Even if you have to crawl under the table to get to the back of the "u," being able to pull the drawers out will be easier than climbing over/through the table to tip the seats up.Occupational hazard of my occupation not being around (sorry Bubba)
Looks good. My only bias is personal from having lived with hinged seats. It's such a huge operation to get every thing off the seat bottoms (and what you want will always be under the greatest amount of "stuff") that either nothing is stored there, or it's done without.
I see what you are saying. I don't think the plan is now to store anything that gets used everyday. The pull out appliance drawer will probably get the most work followed by the flip forward seatback.
Daniel Neuman
Oakland CA
Crazy Home Owner
Hey Daniel, I've done several of these for clients, and I'm stealing that hinged back, thanks<G>Lot of good ideas here, thought I'd toss in a few moreI did the first one with flip up seats at the client's request. They never use them, well hardly ever, just because they are a pain to get into. I think cushions are a must, besides eating, it's also a place to hang out.A toe kick is good, but angled fronts are even better.Measurements are important. You've got to be able to slide under the table...if it's got an apron, that can make a difference. Relaxed seating is different than a formal dining room chair, so measure stuff you feel comfortable in...built-ins are a bitch to un-build<G> What in the gosh darn golly have you done to Rez?
Hello BiteMe and thanks for replying.
Hey Daniel, I've done several of these for clients, and I'm stealing that hinged back, thanks<G>
No problem, just send me my licenseing fee with every unit you build...But seriously if you can figure out a good way to do it I would love to see a sketch. If you have any pics of your previous efforts and could post them that would help me out extremely.
A toe kick is good, but angled fronts are even better.
I would love to see a pic of that. Do you think that with the angled fronts that you do not need the toe kick? Or would both be better?
Measurements are important. You've got to be able to slide under the table...if it's got an apron, that can make a difference. Relaxed seating is different than a formal dining room chair, so measure stuff you feel comfortable in...built-ins are a bitch to un-build<G>
Point taken I'll look into cushions. Do you think that just the cushions on the seat area is enough? Yea, if I have to un-build them SWMBO will kill me!!
Daniel Neuman
Oakland CA
Crazy Home Owner
just one minor detail that may have already been covered ...
along the lines of a toe kick area ...
with low drawers ... toe kick or no ... it's better to have the drawer elevated a bit off the floor. I've seen the no-kick detail with low drawers ... and a slightly sloping floor makes for big problems.
either go with a toe kick to lift the whole box or make sure you raise the drawer a coupla inches.
Jeff
Buck Construction
Artistry In Carpentry
Pittsburgh Pa
hey Dan, just got around to measuring for you.
Sorry for the delay.
Surprise birthday party this past weekend (for SIL) was the unveiling of the booth. Rave reviews.
At one point there were 8 people sitting at it eating.
In NYC that kind of an option is huge!
Good luck.
Hello Ted,
Where there going to be measurements in this email or are you refering to an older email??Daniel Neuman
Oakland CA
Crazy Home Owner
sorry, I thought I attached.Here we go... Sorry.