I think my favorite parts of BT are the photo essays. Since I just learned how to resize batches of pics (thanks Hammer), I thought I’d give it a shot with a set of stairs I did this fall…
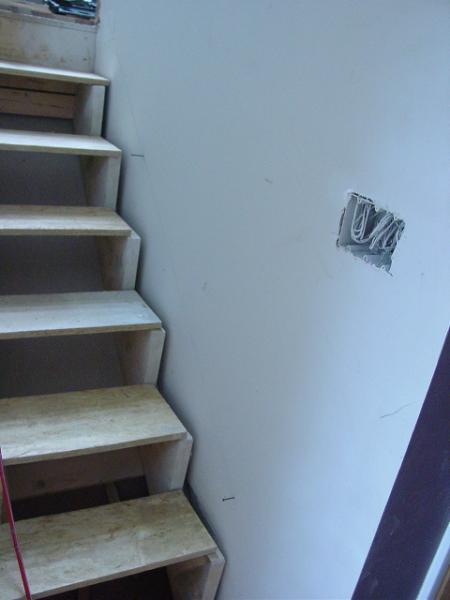
This set was framed to have a half wall and cap from the second floor up across the balcony. When the HOs saw it sheetrocked, I had to figure a way to get pickets in there instead…I call that “pre-modeling”<G>.
First thing I do is pop and draw out the skirtboards:
Don’t worry, we can fix that later!


Replies
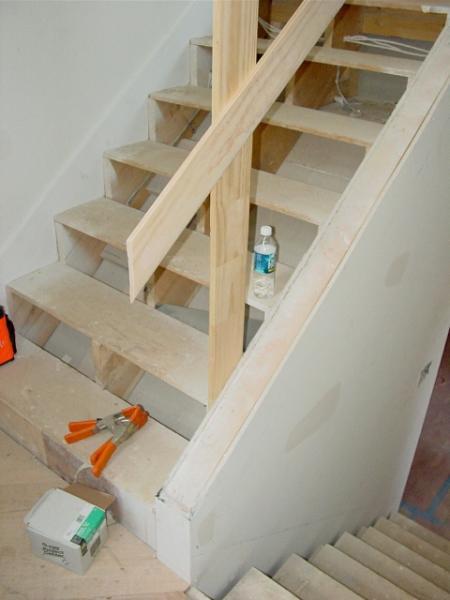
Next I set up a temporary handrail.
#6 shows a laser in the window pointing the way...want to be sure the rail is straight from the landing to the balcony wall!
First, I lay out the baluster spacing on the temporary rails. Now I know where to set the newels. So, the hackin' begins by hacking out the newel pockets. I try to keep all hacking hidden by the skirts.After I've got the pockets cut, I slip in the newels. The temporary handrail shows what I need for a height. Slip them in again and mark for any notching. Some shims, a lot PL and screws...and, yes, these newels get surrounded by the skirts. Don't worry, we can fix that later!
so far..... so good.. keep 'em comming , snortMike Smith Rhode Island : Design / Build / Repair / Restore
Thanks, see what you, and a rainy off can do<G> Don't worry, we can fix that later!
hey....howcum your stringer ain't spaced off the framing enough to drop the skirt ?
View Image
we always nail a 2x spacer onto the stairwell studs .. so we get 1 1/2 "
between the stringer and the stud.. which leaves us 1/2" for the gypsum...and 1" for the skirt
it looks like someone tried to leave enough room , but missed
Mike Smith Rhode Island : Design / Build / Repair / Restore
That's why I carry shoe horns, ha, ha, ha...Actually, it's framed like you do, things like dry-ins just take a little longer here in south<G> Don't worry, we can fix that later!
RE skirt clearance, same Q as I wuz gonna axe.
Billy,
Im having level envy with all the stabilas I can see in one of those.
suggestion- try to resize at least below 100k, they are still a bit slow on the dial.
and ummm, Id be the one to buckle over your temp rail while trying to paint the ceiling or something. 2x4s would be great.
-zen
waiting for the big oak finish.
Sorry about the size, but this is taking plenty long enough to do as it is. I'm resizing to 640 X 480 pixels...macs just want to pass along quality LOL.And, that temporary handrail is not for safety, I'm just trying to do my part to keep the gene pool healthy<G> Don't worry, we can fix that later!
I do the handrails next, just in case I have to do any newel tweaking, LOL. I also like to start at the bottom...gravity is my friend<G>I cut a sliver off the handrailing, hold it on the newels where I want the railing to go, and, mark the bottoms lightly.#12 Next I clamp some scraps on the newels to hold the rail. The scraps need to be level.#13 After I get the bottom of the rail right, I set it on the scraps and scribe the top end.#14 Fasten each end off with a couple of screws to stop any twisting...#15 & #16 Make a wall rosette for the balcony, fasten up.When everything's right, I take the rails down and hide 'em 'til everything else is done. I need some room now, and they'll just get in the way<G>
Don't worry, we can fix that later!
Now, I finally get to run the skirts:#21 I drive in two 16d finish nails just below the chalk line, and into some studs, I hope<G> Then I set the prospective skirt board on the nails and tack it to the wall. Good thing I let the point-up guy go fishing with me LOL.#17, 18 & 20 Time to sit down and work. I plumb up all pertinant points, marking the skirt, and making a tick on the floor or tread. Next, I measure from the tick mark on the floor to bottom of the skirt. I pull that distance hooked from the top of the skirt down the plumb line, mark, and draw a level line...that's the seat cut.#25 & 26 More hieroglyphics. I try to mark all the intersections and cut lines clearly, and scribble out any lines I don't want to cut...I am easily distracted and confused<G>#22 & 23 Woh, after cutting and sanding, it fits...it's gonna be a good day!#26 The inner skirt on the upper flight is set up on 1/4" shims because it gets a cap. I'll need a little wiggle room to get it level... Don't worry, we can fix that later!
I like the looks of the newell and the handrail. Did you glue up the newells? Looks good, can't wait to see more!
Dustin
Thanks Dustin. All these parts were store bought...hand-picked out of the L J Smith catalog...then Lowe's Contractor yard sent out the cheapest imitations they could find, no lie...making a silk purse out of a sow's ear<G> Don't worry, we can fix that later!
Nothing wrong with that! Customers often don't want to spring for shop or on site fabricated parts, and I can appreciate that-it gets expensive quick. All the same, it is a nice look. Don't forget to post some finished pics.
Dustin
Still running the skirts:#29 Transition from 1st to 2nd flight...#28 Wrapping the newel#30 End of the day...who drags all this stuff out...I need a porter (yes, both kinds, ha, ha, ha)! Don't worry, we can fix that later!
Riser time! #31 &32 Show getting level marks off the tread of the rough stringer.#33 I level across the stringers to see if there's any discrepancies, ha, ha, ha! I also vaguely check to see if the stringers are too far out of plane, especially the center one.#34 Shows why I check. Gotta go with the higher one...#35, 36, & 37 Riser jig in action<G>#38 Level the actual riser and nail 'er up.#39 Shim the skirt, and mark the plumb lines on the skirt (these will be painted), it's amazing how many people will climb up the risers when I'm out getting a beer. Don't worry, we can fix that later!
I like to get all the risers in at once. Next, I knock all the risers around to get them plumb, straight and close to the same distance apart.Now that I know my tread width (s), I rip them with a 5° back bevel so they'll fit nice and tight to the risers.Okay, I'm steppin' up<G>#40 Shows the tread jig, look familiar? #41 The jig did ok<G> I pull the tread out, sand off cut marks and anything else that the floor finishers will have trouble getting to later.#42 I have goobered copious amounts of PL adhesive where the riser hits the stringers, and on the stringer tops where the tread sits. Pop the tread back in, make sure the tread is tight to the top of the preceeding riser, and butts to the plumb lines I drew on the skirts for the back riser. I nail off the nosing edge with one nail in each stringer. The riser keeps the front edge of the tread level.Next, I use a clamp to pull the back of one end of the tread up, so it's level across it's depth. I backnail one 1 3/8" 1/4" crown staple through the riser into the tread. Level the other end of the tread, and backnail the bejeezus out of the whole shebang.I nail off the rest of the tread to the stringers using a big speed square aginst the riser as a guide.#43 Lastly, I pound all the backnails with a hammer, to draw them up tightly to the tread...time for a raise, ha!
Don't worry, we can fix that later!
#44 Shows the 1st flight from the landing.#45 I try to get the flooring folks to let me fit the landing treads...it's a lot easier to rip some off, rather than add some on<G>I back bevel them, too...#46 Fastened and blocked til the PL sets up. Don't worry, we can fix that later!
#47 The second flight needed a little jacking up<G> Don't worry, we can fix that later!
Well, here's the last of the pics I got before they threw me out of the house...I'd only been there for 3 months, don't see what the problem was, ha, ha, ha...#48 Wall rail & 1st flight#49 Landing newel, rail, shoe rail, pickets and fillets...#50 Balcony from the landing...#51 BalconyI'm sure I'll have to go back and fix something or other, before too long. I'll get some more pics without that classy carpet...and maybe I will have figured out how tiny them up, or better yet, y'all'll get DSL. Sorry about that. Don't worry, we can fix that later!
wow... you're fast !
what's it been ? three hours from start to finish ?
i'll post a couple comments from home tonite when i can attach some picsMike Smith Rhode Island : Design / Build / Repair / Restore
That's cause I can't shrink 'em...hmmm, maybe cold water<G> Don't worry, we can fix that later!
nice looking railing- fits in well with the house, both have a contemporary look.
3 months? You should have gotten your own room by then.
Thanks, I thought it ended up looking pretty nice, too. Sometimes it's hard wrapping around an architect's vision when his eyes are shut, and he's making those sweeping gestures...and then, sez, "Oh, I'm sure you'll figure something out..."ha, ha, ha!I almost had them ready to sign adoption papers, but then they realized that I am older than they are...and one of my sons was dating their daughter<G>
Don't worry, we can fix that later!
Nice- it looks like it will really dress up the area when finished. I much prefer a nice handrail over some 1/2 wall.
As far as pic# 30 goes, thats one of the few times I really wish I had a helper. Most of the time, I don't remember carrying in all those tools, but somehow they got there.
Thanks, yeah, I like that behind bars look, too<G>...ya know, I looked at that pic, and, didn't even remember using half that stuff...pixies? Don't worry, we can fix that later!
Nice post walking us through your process. I like your use of the rosin paper. My dad was a contractor in the 50's/60's when everything got hardwood except the baths and kitchens. Brought back memories. He always papered the finished floors before open houses. I caught hell lots of times for getting off the paper!!!!!!!!! Thanks.
Mike L.
I know, I thought it went quite well with the purple wall<G> Don't worry, we can fix that later!
snort... your tread / riser jig...
View Image
thought i'd elaborate on that...
i made mine out of a discarded aluminum road sign
we originally had it for standard width stairs ( 36" - 38" or so ).. but we had some 5 ft. stairs so i cut it in half and stretched it..
View Image
uses the same wing nuts for adjustment..
View Image
and the back , with the reflector surface, gives away it's origens
View Image
i've seen the store-bought ones in FHB for $85/
Mike Smith Rhode Island : Design / Build / Repair / Restore
Edited 2/21/2005 7:45 pm ET by Mike Smith
Edited 2/21/2005 7:47 pm ET by Mike Smith
Edited 2/21/2005 7:50 pm ET by Mike Smith
Nice, but you need some manly wingnuts on that gizmo<G>I kept my jig small and light, and can use it use it for a lot of overhead work, like 15' 11 3/4" ceiling beams...ughhh.I use different wings for shelving, window sills, captured wall caps...easy to screw or tack extensions on, even easier to replace...On the right wing (we'll call it the shrub side<G>) you might be able to see a screw in the wing and at the end of the pivot arm. It really does make the wing pivot when I press from the other end (that would be the left, or "light" side)...helps save a bunch of steps on 9' windows... Don't worry, we can fix that later!
ya gotta admit, we're both pretty clever..
or we copy good ideas like he*lMike Smith Rhode Island : Design / Build / Repair / Restore
You got it...'bout 15 years ago I worked on a crew with some very smart kids...this jig came from a bunch of smoke breaks...and, not the Lucky Strike kind...I know they don't remember inventin' it...ha,ha,ha Don't worry, we can fix that later!
Really nice tight work.
I wouldn't use Mike's roadside stair jig--it's full of bullet holes--looks dangerous.
c'mon,pierre... it's bulletproof....
been shot at and missed, sh*t at and hitMike Smith Rhode Island : Design / Build / Repair / Restore
Hey, ya gotta get those signs off the pole somehow<G>...& thanks... Don't worry, we can fix that later!
Hey: That is a sharp stairs. I like the cleand lines....pleasing to the eye. You can get a lot done in a short time.
Stan
Short time? He was in there three months. They had him sign a lease.
Stan, comin' from the man, I appreciate that...and I was fast, it only took me three hours to post all those pics...LOL Don't worry, we can fix that later!
Billy, I'm with you on almost everything, but I don't get one little thing in the sequence.
Your pic sequence #39. You are describing drawing the plumb line on the skirt.
What's that for? I see the pic with the skirt nailed in place, and the line drawn right in the corner.
Do you first draw a plumb line, shim behind the riser board, between it and the rough carriage face, so that the riser is aligned to the line, then nail off?
Another thing, and this concerns the rough carriages.
It looks to me like your tread bearing is 100 percent across riser top edge, then at the single highest point of carriage bearing, because it was that high point that the riser top edge was leveled to. Right?
That means that you are using cured subfloor adhesive as your shim and bearing for the treads, other that where the riser top face is providing bearing. Right?
When did you start doing wood stairs with this method, and what is your incident rate of callbacks, for stair tread squeaks?
Well Gene, site built stairs sometimes take a little persueding...SYP stringers tend to move after most of them is cut away...by the time I get there, things are usually quite curvacious...like you and Mike noticed in the small gappage between the stringer and the sheetrock...If I just nailed the risers tight to the stringers, and left them like that, they'd more than likely not be plumb or straight...so I knock them that way, then mark for plumb...remember how I said people love to climb up the risers...witness marks<G>As for the adhesive shims, I've been doing that for maybe 12 years. Sometimes I use alot, depends on the framers. The under riser's not going anywhere, so that's got the front edge, and the backnailed riser's not going anywhere either, so the back is covered. Saves a significant amount of time...and, I'm very proud to say that I have never had a call back on any set of stairs I've ever done...of course, there is that period of time I used an assumed name, and used Poly-Grip<G> Don't worry, we can fix that later!
Billy-
Thanks for the pictorial. You use many of the same methods that I've found work well for me. I like your way of marking the skirts. I've always used angle finders and measures.
I showed the missus some of the pics and was able to say "this is how I do it, too" several times.
Great work.
BTW, I also like the stair jigs you fellers have made. I broke down and bought the stair wizard jig from Tool Crib/Amazon. I had 2 jobs come up fast, figured I'd just bite the bullet. It payed for itself halfway through the first job! I haven't needed it much since, but always good to have!
ADH Carpentry & Woodwork
Quality, Craftsmanship, Detail
Thanks Hook...if I show those pics to Mrs 'Snort, she'll be sure I just goof off all day!
Don't worry, we can fix that later!
great thread BB, I had to laugh when I saw that shot of your landing with tools piled all over, that looks real familiar to me, it'll never stop the yahoos from stumbling all over yer stuff , (can I sqeeze buy ya man?) ( just one more time and I'll be done) ha ha.Have you ever tried routed stringers?How do you like your poly air hose? flex eel I think, mine's haunted, everytime I turn around it raps around my foot or something, drives me nuts!
I have tried the housed stringers, but never between walls...very few shop built stairs installed here. Don't know why"just one more time!"...I don't even budge anymore<G>...and man, if you'd ever caught an eel, you'd know how that hose got it's name, LOL. sure are light and roll up tiny, though Don't worry, we can fix that later!
Snort-
You musta had a considerable amount of time just putting together the pictorial!
Worth it though! Good job.ADH Carpentry & Woodwork
Quality, Craftsmanship, Detail
Getting good angles on stairs, that's the hard part<G>now, you got any tips to pass along? Ineed all the help I can get... Don't worry, we can fix that later!
Snort-
Ain't at all trying to hijack. I got to thinking about stair angles and looked at a job I did last summer.
I am also interested in learning about housed stringers in this sort of application. I would be receptive to any info from Allen as well!
Seems to me housed stringers need to be planned for way before I get to the site. Wonder what the ways around that are.ADH Carpentry & Woodwork
Quality, Craftsmanship, Detail
I am not the authority on this, but here are my observations and thoughts.
Stairs finished atop rough carriages (exactly like what our esteemed thread author and photographer is showing here) is a two-stage operation. Rough carriages can go in at rough frame time, and can serve as "construction" stairs when treaded with temporary lumber. At or near the end of finish trim out, they are finished as B. Billy has demonstrated.
Note in Billy's pics that the bottom side of the carriages are rocked or wrapped in some way, leaving access to the bottom side of the finish stair work impossible.
Housed-stringer stairs, with the risers and treads socketed into mortises cut in the heavy-thickness (as compared to 3/4" finish skirts) stringers, and typically glued and wedged, are almost always shop-made, then delivered and installed.
Like Stan Foster's pics show of curved work being made and installed, the fab and assembly work is done in a nice heated shop, without other distractions, and the whole thing slips into place in the staircase hole on site.
I would readily make a straight housed-stringer set of stairs, in my shop. I haven't done it, but I've built more complex things, so I would feel confident doing it. But I would never want to try it in-place on a job. In fact, now that I am thinking about the router setups for the end treads and risers, I'll bet it would be darn near impossible!
The benefit you get from a housed-stringer staircase are these. No cracks due to bad fit-ups at joints between skirts, and treads and risers. Billy's the master with his home-made stair gage, but everybody isn't as good. Tight joints, well fixed. Look at Stan's details of gluing and pocket screwing. And the biggest benefit of all . . . no visible fasteners in the treads or risers. On stain-grade work, no matter how good the putty and finish job, I haven't seen an invisible nail-hole yet.
Ha, ha ...I was talking about getting camera angles! Nice work. I like what you did with the skirts, pretty turns, and it looks like you kept the risers nice and tight after slamming the treads in. Did you use the stair wiz on that set? Here's some angles and a curveball a local architect gave me on his own home. Got to the job, no skirts, just a pantload of 1 x 8...laziness is the mother of invention...LOLYou got more pics? Don't worry, we can fix that later!
Hey! That's interesting looking. Nice execution, too. How did you deal with that curved section, 'snort?
The whole thing kind of has a "look at me" quality to it. I usually prefer more subtle details, but that looks over the top enough to look good. As a carpenter though, you'd have to know that virtually everyone who goes into that place will be putting the inspection on that staircase.
You the man.
Did I say it was for an architect?.. and that it's his own home?..a little bit of the southwest in central NC<G>That landing base is just 3 layers of yellow pine I re-sawed...nailed up a layer, glued, nailed up another layer...then there's a 1/4" x 1" cap laid flat, and the ####pc of quarter round...a little busy for my tastes, but I don't have to eat it<G>Thanks, but I was just a cog in the wheel, ha, ha, ha...Hey, you just reminded me...that was back in '93...first time I'd used Gorilla Glue...blew one of the miters apart... right down at the foot of the stairs, of course...yeah, I'm glad I fixed it...LOL.The thing the HOs like the best about the job, is the way we did the windows:grain matched all the curves by cutting each out of a single board. My bandsaw had a workout on that house...boy, that was good job! Don't worry, we can fix that later!
Ok BB, Fresh pics from todays fun fest........
opps I put #4 in twice, anyway #4 shows the rough carriage spaced 10" away from drywall so you can drop in your stringer.
Edited 2/24/2005 5:31 pm ET by ALLENSCHELL2
and some more....
wow !.. that newel is some gorgeous is that your design ?
i love the see thru.. finishing must be a bitch
View ImageMike Smith Rhode Island : Design / Build / Repair / Restore
finishing must be a bitchI'm glad I don't mess wif dat. Those types of newels are used with the Biltmore style balisters, there like 3 in one. The group is about 6 1/2" wide. ever seen em?oh no I didn't make the newel, our shop boys made it.
Edited 2/24/2005 5:42 pm ET by ALLENSCHELL2
Mike beat me to it : coowell newel<G>And do you rout your skirts on site? You did mention something about posting some pics of your jigs...time to pony up...It looks like all those flights are open at least on one side...can you use that system on a closed stair? I can see how it might work, but...And do you have time to show how you fit in a tread and riser? I know you've got a job, but just think pf all the edjimicatin you could be doing...Thanks for the pictures, that is some really tight stuff...and...ya hadda go and show a pic of that Makita slider...mine stopped turning about ywo years ago, I'm still in mourning.Again, very nice work
Don't worry, we can fix that later!
Hey, nice looking work!! Ditto on the info about installing the treads and risers into your routed stringer. I always figured the whole works to be put together then placed into position. I like your way. The finished look is soo very complete. ADH Carpentry & Woodwork
Quality, Craftsmanship, Detail
thanks Hook, I'll get some more pics when I do the back stair, it's between walls.hey thats a good looking job you did too, those are a pain wrapping around walls.
Edited 2/24/2005 6:42 pm ET by ALLENSCHELL2
BB, I don't rout them on site, our shop guys do it, once you make your jig its pretty much universal. I would prefer routing them myself on site, it would be better to get your actual overall rise in person than relying on plans and the old flooring change you didn't know about.
I'll take some pics of the back stair (between walls) but it'll be next week.ahh the LS1211, a wonderfull old friend, I had the gears rebuilt last year and the Mak repairman said its good for another 8 years. In this area they are so in demand he said if I ever wanted to sell it to let him know. If you got a broke one its worth gettin fixed.
Don't forget the pics of the jigs...I know Andy Engle showed some, but he's with FWW now, so I'd have to hold my pinky up when I used it<G>I, for one, would really appreciate some pics on the closed stringer install...maybe you can teach an old dog some new tricks...Makita pissed me off. The aluminum table rotates on steel slides...something's gotta give. 105 beans for a new table...I went to the dark side...DeWalt.So, wadda you give me for a bag of parts? Don't worry, we can fix that later!
So, wadda you give me for a bag of parts?I was gonna buy a dust bag but they said 30 someodd bucks and I said forget it I got an old sock. Do you really want to sell it?
Edited 2/24/2005 8:52 pm ET by ALLENSCHELL2
Hell no, they know I'll fork over the 105 willies...sorry, but you'll have to keep using that sock...wait a min, Makita's dust bag took two months to fill up? Don't worry, we can fix that later!
nice technique, allen..
did you cut and install the rough stringers too ?
View ImageMike Smith Rhode Island : Design / Build / Repair / Restore
Thanks Mike, sometimes I do, it just depends on the schedule. We all have to do our share of rough ins, I try to get out of em in cold weather hehehe.
forgot one, this is similar to Stans tread returns......
ah, yes.. the famous swooped returnMike Smith Rhode Island : Design / Build / Repair / Restore
I do have jigs for making "swoopies"...I'll try to dig em up... Don't worry, we can fix that later!
Thats a nice return- I've never seen that swoop style before
fixed my jig.. made the arm out of some scrap lexan i had lying around..
getting ready for those windersMike Smith Rhode Island : Design / Build / Repair / Restore
Hey, if you can't see it, it can't weigh anything...<G>I'm going to make a table saw outta that stuff...LOL Don't worry, we can fix that later!
Hey I thought you were posting nudes today?Free Sancho!
I did, where were you? They were really good. Don't worry, we can fix that later!
Enjoying my new hobby.
http://www.tnacso.net/cont/jailcam.shtml
Free Sancho!
Edited 2/24/2005 9:31 pm ET by Gunner
Quit scarin' me like that...<G> Don't worry, we can fix that later!
bucksnort billy, Mike Smith, Hook and Allen
Ya'll do such beautifull work. Thank you so much for the education.
As i am so new to doing vertical construction that i find myself looking up to a beginer. To see such works of art, by masters, is just awing.
I have found myself needing to build a simple set of stairs from the ground up to my front porch (the porch sits over the walk in basement). I have torn down the old one because i needed to get a ladder in place inorder to replace some rotted wood around the top of the porch. Also the old stairs was rotted out at the bottom and the treads were made of 2x6s that made it difficult to go up and down.
I find the task of building the new stairs a bit daunting to say the least. I bought one of those Swanson Speed Squares and read the little book that came with it. I understood the basics of building stairs but also found it to be more confusing. I also know about "A sq + B sq = C sq from my horizontal construction days and can see how it applies here.
I think the thing that is bothering me the most is the making of the stringers. To accommodate a tread made from a 2x10(Is it wide enough?) with a rise of 7''(Is that a good height?) what size board would i need to make the stringer out of?
After getting the right size board how do i use my speed square to cut the rise and tread? This was the confusing part when i read the book that came with the square.
Then there is the task of cutting the ends of the stringer to fit up to the porch at the top and to fit on a concret pad at the base. Also what is the best way to anchor it at both ends.
I am also interested in this jig thing that a couple of you have made. It is my understanding that it can be used some how in placing windows. I have already replace the wood in the frame of one window and have 7 more to go. The walls of this house is made of cinder block if that helps you in your answer.
I thank ya'll so many times over for sharing your experience and expertise with those of us who have much to learn.
Dane
dane... almost universally.... nothced stringers are cut from 2x12..
exterior stairs use PT .. you gotta go to the lumber yard and handpick your stringers.. this time of year.. they'll be soaking wet.. bring 'em home and put 'em in your garage or basement for a week.. put 'em on wome sticking so they can get air all around them
draw your stairs to scale so you can figure how long a pc. of 2x12 to buy
2x10 makes lousy treads.. it'll split and check..i prefer something like 5/4 x 6 ( two pcs )
i really like Trex for exterior stairs..
these are Alaskan Cedar 5/4 x 6
View Image
Mike Smith Rhode Island : Design / Build / Repair / Restore
Edited 2/25/2005 10:31 pm ET by Mike Smith
here's some Trex treads & risers...
View Image
and a shot of the Shope Memorial Staircase
and the stairs into the family room from the exterior
Mike Smith Rhode Island : Design / Build / Repair / Restore
Edited 2/25/2005 10:39 pm ET by Mike Smith
Mike
Thank you for the help.
I have written down the information that you gave me as it will still be a little while before i have to build them. I think i will buy some cheap 2x12'' to practice cutting the notches on before cutting the real thing. To accommodate the 5/4x6(x2) tread how wide do i need to cut that part of the notch?
Sorry for asking so many questions. But one thing i have learned is, that is the only way to learn something new.
Dane
Hey Dane-
A framing square would be of much assistance to your stair building quandry. Actually, I have never cut a set of stairs with a speed square, unless our terminologies are mixed.
With a framing square(the metal one with a 24" side and a 16" side, I forget the real definitions) you can use your rise and run figures and transfer them directly to the 2x12. You need to determine them based on the allowable space available. Let's say there is a 7" rise and a 10" run, which are very common and comfortable. The 7 will be represented on the thinner, shorter leg, while the run, the 10, on the longer, thicker part. Place the square on the lumber so that 7 and 10 line up with the edge of the board. This will make a square corner where you draw a line to represent the notch in the stringer. After pencilling the line, move the square down one "section", now placing the 7 exactly at the former 10 point. Line up the 7 and 10 same as before, draw the line and continue down the 2x12. Do this for as many steps as it will take. Remember that on the bottom, last rise, subtract the amount equivalent to the thickness of the tread material. This keeps the rises all equal heghts as you step the steps.
Wow, I've never tried to type an explanation like that before. Hope it helps. if not, just ask again. Maybe someone else may chime in to continue where I may have missed.ADH Carpentry & Woodwork
Quality, Craftsmanship, Detail
Hook thanks for taking the time to add what Mike had given me.
Jim thanks for the giggles. I think i will throw that speed square in the back of the van and see if will help me get out of here when it snows.
I know how hard it is to have to stop and think about how it is that you do something that you have done for a long time and nolonger have to think of how you do it. And then try to explan it in a way that somebody else will understand it, especialy in this type of formate. It shows just ( i hope ) how much you love your trade.
Just as i did with the information that Mike gave i have written yours down too so i don't forget it. Now where did that piece of paper go?
In my previous occupation there were forums like this but i got nothing out of them because all that went on there was one person bashing anothere person. In this one thread i met four guys who do the same type of trade admire each others work and gave each other ideas on how they do it. I have spent many hours ready many threads like this one and it is refreshing to see pro's and amateur's alike admiring each others work and exchanging ideas. Some of those ideas differ from each other, but doesn't mean that one or the other way is right or wrong.
As i build these simple stairs i will try to take some pics so ya'll can see my progress and maybe give me somemore pointers on how to do a better job of it.
Again many thanks to all of you
Dane
dane.. if you want to practise you can rip some 1/2" ply to 11 1/4 and cut your pattern out of that
also.. with the framing square... a lot of people use "button" that screw onto the edge of the square so you can repeat teh exact setting by just sliding the square along the "buttons"
mine stay clamped to my nail bags when they're not on a squareMike Smith Rhode Island : Design / Build / Repair / Restore
One time I was in a situation where my stair guides were there and ready to use, but no framing square to be found. I don't know, helping a buddy or something. Anyway, I got creative and cut a piece of ploy in a rectangle to my rise and run numbers. A 7 x 10" peice of ply. I just put the corners of the little piece on the edge of the board same as a square. Worked so slick I've used it many more times in place of a square and guides. ADH Carpentry & Woodwork
Quality, Craftsmanship, Detail
Thanks for the idea of using ply. My one problem with using it is i wouldn't have anything to throw into the wood stove (inside the house) when i am done. The glue would be a killer. Although i would have more pieces to practice on if i realy goof one up.
I'll be leaving here tomorrow and going to Richmond, VA for about a week to work on a project that the wife and i have there. When i get back i will have some pics of it. It is a house that was built at the start of the Civil War and has been moved twice since then. It needs lots of TLC but is over all in good shape. It gave me a great excuse to give the wife for my need to buy some new tools.
Many thanks and see ya'll when i get back.
Dane
dane.. my brother lives out on the northern neck... near tappahanock
have fun in VAMike Smith Rhode Island : Design / Build / Repair / Restore
well I finally got started on the back stairs, here's a few shots of what I got started on this AM.
Edited 3/5/2005 3:26 pm ET by ALLENSCHELL2
sorry I can't get these pics any smaller, I must be computerly challanged....
Allen: Thats some nice work going. I love mortised treads and risers.
Stan
Thanks Stan, have you got one of those little sanders yet? I love mine so much I bought another one just in case one breaks.
Allen: I just have a 5 inch dewalt sander....and some various foam padded sanders for my drill.
Stan
Am I missing something? How do you get risers or treads into place when you have a wall-to-wall condition? Your field assembly of stair finish with a housed stringer would only seem to work for a one-side-open condition.
Guy I know uses two routers when cutting housed stringers. Both set to same depth, his 3-1/4 HP machine has a straight bit chucked, is used to hog out. Then comes the 2 HP right behind, set up with a 7 degree dovetail bit.
Claims the undercut aids in getting an absolutely crisp look. I agree. His stairs are works of art.
He has a shaper bit that cuts a half-octagon look to the front edge of his 5/4 stringers, with a little roundover on each of the 4 sharps.
His stringer-cutting pattern is made so his tread nose cuts match the tread edge.
" How do you get risers or treads into place when you have a wall-to-wall condition? "Gene its not as hard as you think, the rout is a half inch deep. When you measure all the way in on one side to the outside of the other side it'll give you about a 1/4" bearing in each rout. Keep in mind that the glued up wedge is 1" wide so you have plenty of strength there. Monday I'll be between walls and I'll take some close up shots of the treads and risers going in.
And your skirt stock thickness? 5/4 dressed to a fat 1"? 3/4"? Or something else?
that would 3/4" thick
Thanks, nice 'n tight, sweet...Is there some room between the rough stringer and the risers and treads?...and how do you register the skirt?...and do you use any adhesives?...and what are they?...and what species are the wedges(would it make a difference?)What do you use that Metabo sander for?...ok, I know it's a sander<G>...but what are you sanding?I like learning more stair tricks, as if you couldn't tell, ha, ha, ha Don't worry, we can fix that later!
BB, thanks.......
Is there some room between the rough stringer and the risers and treads?. yes, you can see it in the tapwedge photo, I like about a half inch so I can wedge against the back of the riser to smash that rabbit nice and tight while the adhesive dries. and how do you register the skirt?..ahh thats the easy part, simply cut to the numbers (rise plus or minus flooring allowances) and drop it in.
And yes adhesive everywhere! subfloor adhesive.and what species are the wedges? any scrap you can find.What do you use that Metabo sander for? All the little places you can't get your 5"er into. Have you ever been using a 5" one and thought "I wish they made a smaller one".
I'm a little (ok, a lot) lost on the skirt registration...the shop guys rout it from some field measurements, then you cut it to fit?...how? Hey, I do stairs, and your way looks like it may have a lot of merits to me. I definitly like your results...Does your company build the rough stringers? How does that 1/2" wiggle room get in there?Do you use poly urethane stuff for adhesive? I'm starting to like it because of it's expanding properties...seems like that would be a good fit with housed stringers, ha!Do you cut the wedges on site?...have you tried an atomic wedgie?LOL Don't worry, we can fix that later!
BB,look at the top of this piece, it's cut to stand off the header 1 1/4". That is where your landing tread goes. The 1 1/4" sets the stringer the correct distance in front of the carriages. The bottom is simply cut to the correct rise and sets on the floor. The whole stringer is layed out to the rise and run. http://forums.taunton.com/n/mb/at.asp?webtag=tp-breaktime&guid=7723E091-23C4-40F3-B415-CD7FCAFF3689&frames=no
Edited 3/5/2005 10:42 pm ET by ALLENSCHELL2
allen here's your demo again..
View Image
<<<<<BB,look at the top of this piece, it's cut to stand off the header 1 1/4". That is where your landing tread goes. The 1 1/4" sets the stringer the correct distance in front of the carriages. The bottom is simply cut to the correct rise and sets on the floor. The whole stringer is layed out to the rise and run. >>>>Mike Smith Rhode Island : Design / Build / Repair / Restore
thanks for the help Mike, I'm gonna learn how to do that when I grow up.
Thanks, takes me a little while<G>...with 3/4" skirts, how much is left after dadoing?and, when you're going wall to wall, how much longer than the disatance between the skirts can you cut the treads and risers?have you done any winders this way?I'm ready...LOL Don't worry, we can fix that later!
ith 3/4" skirts, how much is left after dadoing?---about 1/4"
and, when you're going wall to wall, how much longer than the disatance between the skirts can you cut the treads and risers?---you measure in on one side and out on the other to get a 1/4" bearing on each side.have you done any winders this way?----you betchahere's some shots of today's work........the treads are cut just a little snug so a little stomp of the foot or some other appendage with ease them in place, then grease up some wedges and go for it.
Edited 3/7/2005 5:20 pm ET by ALLENSCHELL2
Allen: Very nice work. I have had a few stairs that I had to build on site like you are excellently showing here how to do it.
Our methods are similar.....I use 5/4 stringers...routing one side a tad deeper and inserting the treads on this deeper side first.
Again Allen...very nice work. Nothing beats mortised and wedged in treads.
Stan
Hey man, this is the kind of hijacking I love. I really appreciate you taking the time to show your stuff...Next set of winders, you've got to post some more pics...I am having a real hard time visualizing that<G>I wish you'd drop by for a month...I've got this set to start on...looks like it's going to be very interesting;-0...the heat's on! Don't worry, we can fix that later!
yes indeed the heat is on, those hardwood guys ain't waitin on you!!
Tell me about it!...I've got to get some closeups of the landing tread...I'm going to need it for evidence after I tear it out;-) Don't worry, we can fix that later!
Hey 'snort, Allen, in a case like what bucksnort posted there, with three stringers already in, but closer to the walls, would he be ahead removing the two side stringers so they're not fighting him? Sems like a single stringer centered, and the two housed stringers would be plenty stout...not?
Of course, maybe you want the roughed in stringers in there as backing for whatever covers the bottom of the stairs...what do you guys say?Free the Sancho!
Boy, I'd love to rip 'em out and do it housed, but like you mentioned, think it would po the GC to have to fix the ceiling underneath...course it is just closet<G>...he'd probably get a whole lot more pissed if I ripped up the winder flooring, though...hmmm, I could tell him he's getting off easy ha, ha, ha Don't worry, we can fix that later!
Jim, Yes I've ripped out a bunch of wall carriages, if the drywall is nailed to the bottom I lay a 2x4 flat on the drywall, take a power saw and plunge cut in to the carriage and slide down and rip it. Then you can just pop it out. Whats left is enough to support the drywall and get out of the way of your routed skirts.
we got back inside and started getting serious about finishing these stairs..
kind of a pain when the tile guy.. and the rug guy want to get in...
anyways.. we got the skirts in and i set a couple risers.. then i disappeared back to the office..
so Roy took over
these are all pics from **Cleaning up a mess ** thread
http://forums.taunton.com/tp-breaktime/messages?msg=53289.1
when you guys are making pie-shaped ( or worse) treads, how do you figure your cuts ? do you make a pattern? if you make a pattern.. do you make it with sticks .. or with felt paper ?
here's two different treads.. two different methods
View Image
View Image
that's the felt paper pattern.....
Mike Smith Rhode Island : Design / Build / Repair / Restore
Edited 4/7/2005 9:38 pm ET by Mike Smith
Edited 4/7/2005 9:39 pm ET by Mike Smith
Edited 4/7/2005 9:40 pm ET by Mike Smith
Edited 4/7/2005 9:52 pm ET by Mike Smith
and here's the other method .. the stick pattern....
View Image
do you guys use either one ?
if so.. which one? is there a better method for cutting irregular shaped treads ?Mike Smith Rhode Island : Design / Build / Repair / Restore
I've used sticks and scrap to do irregular shaped patterns like yours, Mike. But not having a hot-melt glue gun, I make up a small batch of 30 minute epoxy, set my contraptions late in the day, and let them harden up solid overnight.
Mine look a little different than yours, though. I check to make sure my irregular piece will have fairly straight sides, using some straight pieces of scrap, then plop a board down that covers a nice section of the middle, and glue on little wood sticks with spear points going to all the corners.
It is a connect-the-dots exercise after that.
BTW, I've sent a copy of your pics showing the EZ Smart table and straightedge in use, to my BIL, who is in need of some cutting gear. He was thinking about a small table saw, but I said a nice Bosch sidewinder and EZ gear would be far more versatile. He's a DIY guy, hasn't done much doing for a while, but is about to get into more now that his eldest son bought his first house, a fixer-upper, with a lot to fix.
yes.. one of my nephews friends bought a fixer-upper
met him for lunch the day after he bought a new table saw.. sure wish i'd got a chance to show him the EZ.. i think most should have an EZ before they have a table sawMike Smith Rhode Island : Design / Build / Repair / Restore
Mike I don't have a table saw yet. That EZ, is that the thing that you are using to guide your saw when you made your cut in that one picture? If it is where can I get it. Also can you show what that smart table looks like with out anything on it?
I haven't made those open stairs yet but it is on the schedule. Right now I am working on taking out that wall and putting in a header. Been taking pictures as I go.
Thanks to all of you guys for the lessons that you have give us in this thread.
Dane I will always be a beginner as I am always learning.
i was going to take some more pics yesterday.. but never got the chance..
here's a site where you can see all of the EZ tools, including the Smart table
http://www.eurekazone.com/products/smarttable.htmlMike Smith Rhode Island : Design / Build / Repair / Restore
Thanks Mike
DaneI will always be a beginner as I am always learning.
Mike heres a shot of the final product, I ain't goin back there no mo, ( I hope)when you cut those winders can you get them tight enough so shrinking isn't an problem?
remains to be seen... the owner is painting ( and doing the poly on the treads )
i had her seal all of the backs and edges before we installed themMike Smith Rhode Island : Design / Build / Repair / Restore
Mike, I've never had much luck with paper patterns, either makin' 'em, or tracin' off 'em. I am amazed at what you ended up with, coming from a chunk of tar paper!I use 1 1/2" strips of 1/4" ply. I set a belt sander upsidedown to do any edge tweaking...and I make sure all the pieces fit tight in the corners, and to each other (at least at the edge I need to trace). Then I hot melt 1/4" patches on the top. If it's big and floppy, I'll hot melt on some stabilizing struts, too.I can trace that off real easily, without having to connect any missing dots, or worrying about paper moving, or stretching.On another note, I've never done full tread winders for precisely the reason Allen mentioned, shrinkage. The floor guys usually lay the winders out of (you guessed it<G>) the flooring, then I add the landing tread.Here's the last progress on the winders I showed before...as you can it's going backwards. One winder step had a 7" rise, straight run has a fat 7 1/2", starter had 8 1/4. Had to rip the oak off two winders, not to mention all the landing tread around the stairwell, then jack the rest of the carriage up an inch...I'm thinking of becoming a painter...LOL
Don't worry, we can fix that later!
snort... your stick method sounds just like Roy's
View Image
i cut two of the treads from Roy's patterns and two from my 15# felt patterns.. i'm guessing the time and results were about equal
Mike Smith Rhode Island : Design / Build / Repair / Restore
I figgured my description sucked. Roy's is similar, but he's obviously a better carp than I am, especially if he get's good cuts with his jig<G>. If nothing else he's a whole bunch faster. LOLI make all my pattern sticks so they sit flat on what I'm cutting (tread, in your instance). Roy's left and right sticks (in the pic) are up in the air, way too much of a challenge for me to sribe off.Wrestling with this set of stairs is putting it mildly...you must be able to see all the pencil lines on the wall, right? LOLYou inspired me with a handrail you showed a while back...I'm trying to get the handrail and skirt to match without any goosenecks. Keeping the rail between the 30-38" code is where all the lines came in...I got totally confubulated...lucky we could get an inspector to okay a rail on the outside wall!Dang, then you hadda go and show that curvacious set, if you keep rasing the bar, I'm not going to be able to get a drink...sheeit<G>Got any more pics of that one? Don't worry, we can fix that later!
Billy,I don't think you have much room to talk about hacking.I did my first set of hardwood stairs with oak newels, balusters, etc. recently.I'll just say I'd love to get results like you get. And in the time it takes you.
Jon Blakemore
you know .. the winders we're building are on that clean-up job..
to meet their budget , one of the things i took out was the rail.. too bad.. code requires the rail be continuous and on the inside..
i put a dowel in my fist and held my fist low on my hip ... then walked down the winders with my fist against my hip ( about 34" above the nosing).. i did that about three times, tracing a continuous curve on the plaster wall...
i figure one a dese days i'll ship Roy back over there when they have some more money to build the rail
i'll see what i can do about the pics on the old lighthouse stair... remember the OLDE tv series "Death Valley Days" one of the episodes was a bout a mexican carpenter who came to stay with the nuns in a convent in (new mexico.... arizona ?)
while he was there he built a spiral stair with no center support... apparently this really exists... cause the "old ranger" who hosted the show.. showed pictures of the staircase at the end of the story..
anyways.. the lightouse stairs reminded me of that story... they were so graceful
and boy , am i rambling on Mike Smith Rhode Island : Design / Build / Repair / Restore
http://www.lorettochapel.com/stair.html
Jon Blakemore
jon... that's it !... thanks..
i especially like the thought that it could have been st. joseph..patron st. of carpenters
View ImageMike Smith Rhode Island : Design / Build / Repair / Restore
snort.. here's the rest of those pics from North Light.. hope they inspire you..
View Image
Mike Smith Rhode Island : Design / Build / Repair / Restore
Edited 4/14/2005 10:39 pm ET by Mike Smith
Wow, graceful is putting it mildly...thanks for kicking it up a notch! Don't worry, we can fix that later!
Those tread returns give a whole new meaning to "swoop"
Jon Blakemore
here's a nice pic of the North Light from the fence corner..
View Image
the owner wants us to come back in the early fall and refinish the floors
Mike Smith Rhode Island : Design / Build / Repair / Restore
Edited 4/15/2005 9:39 pm ET by Mike Smith
From the white picket fence to the gingerbread, that place is nothing but charming...here's to the good old days, and, yer a lucky guy to work on it<G> Don't worry, we can fix that later!
Neat looking house, but there must be something wrong with me, because I look at it and think: Looks like every 5th summer will be spent with a paintbrush in hand ;)
jt8
I was gratified to be able to answer promptly. I said, "I don't know." -- Mark Twain
All right, I finally got those winders licked. I was in a bit of a hurry, well actually, I was getting chased out, so I kinda fell down in the picture dept, sorry.The newels were a beeatch...framing wouldn't allow for newel pockets, so I thought I'd try these sure tights. Had to pilot in at an angle to get lag into some meat, then put a pipe over the bolt to plumb it. Then crank in a newel, see how out of plumb it was, loosen, shim, crank, loosen, shim...took forever...but then so does everything I do<G> Don't worry, we can fix that later!
All the handrail parts came in tightly wrapped bundle, unlike me, handrailing and shoe rail. So a month later, when I'm ready to put it together, I open it up... Usually the fillet strips are stapled into the shoe rail (and quite agressivily, I might add), whoa, I didn't see 'em...when I opened up the boxes of pickets, I found 4 2' pcs...hmmm...called supplier (the super was in Idaho on vacation!), I said can you get 'em quick or should I make 'em? Told me they get 'em every day, not to worry...yeah. 5 days later I made 'em...next day I get a bundle of 2' sticks. That woulda looked great in the wall rail<G>The jog in the floor above the sunken living is still supposed to get a anothe bookcase. Don't worry, we can fix that later!
We had to run a 5/4 sub-wall rail in order to give the handrail the 1 1/2" clearance(actually came out at 1 1/4" but the inspector was still happy) at the 2nd floor landing tread. I think it ended up looking pretty cool, might do it on purpose some time<G>These brackets are sweet, one big honking screw into the wall, two into the rail, plus they don't interfere with a sliding grip...a safety bonus, dang<G> Don't worry, we can fix that later!
Had to pull up the landing tread around the stairwell that the flooring guys had put in...they hadn't even cut the sheetrock back, would've made for a pretty sketchy newel connection if we had just set them on top, like the super hallucinated<G>Had to work with nosing that was there, so to make the already cut miters really fit, we had to fudge the square cuts at the newels, then make up some little 1/4 round out of shoe rail scraps to wrap the newel bases...Then the cabinet guys came in with those melamine bookcases...what ever was I thinking? Don't worry, we can fix that later!
Sweet (but, um, I think that 1/2 round window is a little out of level. man).
I offered to straighten it...no dice.Here's outside looking in...hmmm<G> Don't worry, we can fix that later!
Nice work billy
Now that you posted the outside view the window looks right!
Doug
But...it's leaning left...don't tell Sonny<G> Don't worry, we can fix that later!
snort... that perennial problem... how to run the skirt on the inside corner..
View Image
nice effort..Mike Smith Rhode Island : Design / Build / Repair / Restore
Mike, we do try hard...LOLI am real happy with the outside skirt and handrail, tip 'o the hat to you...clean and pretty easy;-) Don't worry, we can fix that later!
hey lets get this good ole thread up again. Here's a brazilian cherry and iron job I just completed...
a few more ......
Edited 10/13/2005 3:41 pm ET by allenschell
and..
hey, slick.... nice piece of work
View ImageMike Smith Rhode Island : Design / Build / Repair / Restore
Allen, that is pretty. It's slightly curved, isn't it? Same curve on both sides? I really like subtle.Do you do your baluster layout on site, and then drill the treads and rails, or is that shop stuff? And, how do those iron balusters seat in the treads?Glad you resurrected this. I've got another little winder set I might finish tomorrow, or not. I may be too embarrassed to post pics<G> "what's in a name?" d'oh!
BB,
Yes thats a left hand 5 point flair, I think its a 9' 6" radius.baluster layout and drilling all done on site, 1/8" deep on the treads set in a glob of epoxy. The boot also has a dab of epoxy under it." I may be too embarrassed to post pics" now cut that out and post those pics!!
How do the iron post work for you? Do you find that they give you enough support?Nice job!Bear
Allen: Very nice work.....
Stan
"How do the iron post work for you? Do you find that they give you enough support?"They are amazingly strong and not to hard to work with. Just drill or provide a pocket in your framing and put a healthy gob of epoxy in there and then on top the big boot that goes on with more epoxy and you better hope you got it right!
heres a shot of the landing....I finally got some cooperation with the hardwood people.sorry about the big size, I reduce the size with irfanview but there still big.
Nice looking work.
I really like the color of the wood, beautiful!
Doug
thanks Doug, that B. cherry has no stain, it just keeps getting darker and darker, really funny stuff to work with.
Love it. I like the iron newel, glad someone asked about the strength, I was wondering about using them. I like the look of Brazilian cherry - you reminded me of the builder who told us he put rosin paper on the pathways for about a month. Then when they removed it for the last coat on the hardwood, everything else had darkened considerably. I think sanding and time took care of it, but what a mess.
Do you use the Loctite gun with the mixing tips? I am looking for a cheaper source for the epoxy cartridges .
Do you use the Loctite gun with the mixing tips? I am looking for a cheaper source for the epoxy cartridges yes I use the double cartridge system but I don't always use the mixing tips. When I'm setting newels I pump out a pile on a piece of cardboard and mix it with a 16 penny nail. That way I don't waste a mixing tip for a handfull of epoxy. You do need put a goodsize application of epoxy in that pocket. I like some quick setting stuff for newels so you don't have to hold them plumb so long.
snort... i see you're wrestling with the skirts.. here's how some old timers ran their winder skirts in about 1890
View Image
they curved the skirts to follow the variance of the winders... cool , huh ?
we did the same thing with our skirts that you did with your's .... segmented them
View Image
Mike Smith Rhode Island : Design / Build / Repair / Restore
Edited 4/13/2005 9:28 pm ET by Mike Smith
wow, those boys where craftsman ! that rail transition is amazing!
Allen, nice work. That is one strange set of stairs, though. I may be tripping, but is there a kink in the skirt, under like the 7th tread?Now, that slighty curved set is cool...got more of that one?<G> Don't worry, we can fix that later!
BB, Yes theres a a change in that skirt, it goes from a 10" run to a 7"and something run, its hard to try to hide that. I don't care for stairs with kinks but they usually don't ask my opinion if ya know what I mean. Heres a couple more...sorry about that one pic, I try to reduce the size and they look like homemade monkey droppings.
Edited 4/13/2005 9:44 pm ET by ALLENSCHELL2
Hey, I like 'em big, we don't have to cater to cheap dialuppers<G> Don't worry, we can fix that later!
one more for good measure...
now that we have the pattern , i set up on my Smart Table (my new toy )
and used the EZ-guide to cut the treads
View Image
and the cut-off...
then the EZ-guide for the ends..
and finishing the inside cut with my cordless jigsaw ( best thing since sliced bread )
Mike Smith Rhode Island : Design / Build / Repair / Restore
Edited 4/7/2005 9:49 pm ET by Mike Smith
and the finished tread laid in place....
View Image
Mike Smith Rhode Island : Design / Build / Repair / Restore
Edited 4/7/2005 9:51 pm ET by Mike Smith
Here's one vote for paper patterns. I don't use 15# felt much anymore and the 30# is pretty hard to get a good crease in. Rosin paper folds truer and holds masking tape better.
Nice looking tread, Mike.
Beautiful. Nice work.
"Preach the Gospel at all times; if necessary, use words." - St. Francis of Assisi
Mike ya put me to shame with all them smart guides and stuff. I actually don't make a pattern because theres enough wiggle room in my stringer routs (bout a half inch deep) that I can get my big angle and go for it.I usually leave it long on the tread return end and scribe it off when I like it.
Edited 4/8/2005 3:25 pm ET by ALLENSCHELL2
allen... that looks like a doptical delusion
View Image
is the railing and skirt curved down.... or to the side ?
anyways , i like itMike Smith Rhode Island : Design / Build / Repair / Restore
well I'm sorry thats the wrong pic, but yes it flairs out on both sides.here's the one I was trying to post....
have you done any winders this way?the picture is kinda crappy but here's a winder.......hey by the way, I didn't mean to highjack your thread, I guess we can be hackin together :)
another thought on registering the stringer. When I have an open side( or as we call them a face stringer) I try to square the stairs off the drywall of the open side, that way my tread return is nice and tight. It bugs the heck outta me to see a black line where a tread return joins a stringer. Once you get your system down it goes very quickly. I can usually get a set like you see in the pics installed in about 7 hrs.
OK, I think I get it, but I want to see your photos.
If you are only burying 1/4" in a mortise of depth 1/2", and the mortises are oversized for the wedge profiles, I can see how you can jack those parts into place.
Pictures, please! Get a helper to show yourself angling a riser in, then its tread.
Can we presume that you are setting your riser tops to coincide with the highest elevation of rough carriage?
What do you do to shim from lows, so that there is bearing at each carriage?
Gene, I'll try to have more pics mon. PM. The risers are sized exactly to the rise. Look at the pic that titled "system". well I said exactly but they are actually 1/32" small so your tread don't bind when your installing it.Can we presume that you are setting your riser tops to coincide with the highest elevation of rough carriage?What do you do to shim from lows, so that there is bearing at each carriage?The rough carriage is dropped 1 3/8". 1" for the tread 3/8" for the wedge. This is the one thing you need to be careful about with this method, your rough in needs a few careful considerations. Carriages 10" off the wall and dropped 1 3/8" give or take, ( depending on the size off your wedges)
Pictures, please! Get a helper to show yourself angling a riser in, then its tread.Gene, I got some pics for you in http://forums.taunton.com/n/mb/message.asp?webtag=tp-breaktime&msg=54504.121
OK, I'm up to speed on skirt / stringer thickness, depth of housing cut, and angling parts into place, but here are a couple more Qs.
Are your treads and risers cut to a length so they finish out going about 1/4" into the 1/2" deep socket?
Who do you pay to stay inside the cavity and put the wedges in for the last tread before the landings? ;-)
How are you aligning your routed stringers so that they line to or are slightly proud of your rough carriage profiles? Or do you just do your best and then whack any carriage surfaces that are proud of where they should be?
What size fasteners are you getting in from backside of riser into back edge of tread?
Ditto for the face fasteners down through tread front edge into riser?
Like Billy, are you counting on hardened subfloor adhesive to provide shim and bearing between treads and rough carriages?
Other than having wedged tenoned joints at the junction of risers and treads to skirtboards, thus tight, what other benefits do you see in your arrangement, versus Billy's (and my) method of template-cut parts?
" treads and risers cut to a length"---when you measure in on one side to the out of the other side it automatically gives you 1/4" in the rout."last tread before the landings?"---I got me a midget!no I lay the wedges in first then take a pry bar and lever them in prying off the floor header."How are you aligning your routed stringers"---look at post 118 that Mike opened the pic up. At the top of the skirt it's cut at 1 1/4" wich will space the skirt forward just right, it also allows for a 3 1/2" landing tread to be fitted in at the top."What size fasteners"--- either a #6CC or a 1 1/2" ring shank, I like to hand drive those, also if the gap is small enough I drive a glued up wedge in between the carriage and the back of the riser." face fasteners down through tread front edge into riser"--I shoot a few 15 ga. 2 1/2" nails being carefull to orient the nail the right way so it don't blow out."Like Billy, are you counting on hardened subfloor adhesive to provide shim and bearing between treads and rough carriages?"--- no I'm using the glued up wedge, look at the pic I posted titled "tapwedge""what other benefits" I like the strength of those skirts glued and nailed to the wall. I have done more than one sets of stairs with NO rough carriages. You would be amazed at how solid they are. Another benefit is speed. I'm not at the mercy of a bad rough in that's all out of wack. I've done a ton of drop in skirts like you do and this is just MY opinion. When you do stairs every day as your only gig speed is a consideration. I'd like to see us get a thread going on fittings........that's a biggy on eating up time and I know some veterans that do it the slow way.
"I'd like to see us get a thread going on fittings........that's a biggy on eating up time and I know some veterans that do it the slow way."
I'd like to see that, too. I've learned a ton from you guys so far in this thread, maybe enough to try housed stringers next time. I can see how they're well suited to making up for lots of framing imperfections, in the walls and the stringers.
But mostly I just want to encourage you guys (and anyone else) to continue posting photos and explaining what you're doing. I've never done anything even close to the work you guys consider routine. It's inspiring to see. Great stuff.Free the Sancho!
...And Snort and Gene.
Yes, this is great stuff! The pics and posts you fellers have thrown out have really opened my eyes to excellent methods of stair installation. I am fascinated with built in place stairs and jump at every chance I get to do that part of the house.
I tried to start a thread about post installations on Sunday, but I think it got buried. I'd love to hear any more B.S. about the whole stair business, since it's a part of a job I take great pride in doing myself and also appreciating the work others do.
Great thread!! Quality, Craftsmanship, Detail
thank you Jim, I've been thinking about that fitting thing for awhile. When I first started doing stairs an old guy came in and watched me for a few minutes and ask if he could show me a few things. I said for sure and he gave me a 10 minute barage of fitting wisdom that I'm still using.
Nice, Allen. Real nice.
Hey, that 4 foot level wouldn't happen to be a Sand's, would it?
Hey, that 4 foot level wouldn't happen to be a Sand's, would it?Yes sir!
Thought so! Those things are he** for stout, aren't they? I'd never heard of them before a bunch of guys from the center of the country raved about them a few years ago and Ed Williams sent me one. Great sturdy tool, hard to imagine damaging one.
Make for good ballast in the back of the truck, too.
I really like the way that stair turned out with the 1x8's. So different it's cool.
The stair wiz came in very handy for that particular job. I had another that it was used on, with Brazillian Cherry treads and skirts and painted risers. Kinda boring, but I'll try to post the pics.
I used a method of fastening the treads by hiding the fasteners underneath. I fit the tread to the in the normal way. Starting at the bottom, I installed the second riser first. I placed the tread onto the rough stringer and reached behind and under to pencil scribe the stringer, which allowed me to fasten a 2x2 block with plenty of glue and a couple screws. A 2 1/2 torx works very nicely to go through the block into the tread, but not too far. I also pre-started 2 screws in each block to be fastened into the side of the stringer.
After all this, I replaced the tread "home" with plenty more glue on the top and side of the stringer. Contortionist time, I reached back behind and underneath with a right angle drill to set the screws into the stringer. The screws do nicely to hold the tread in place while the glue sets. Not to forget, I also glue and place a couple screws through the back of the riser into the tread.
This works very well, although very time consuming. A drawback is I have to work from the bottom up, risking damage to the prefinished treads. I suppose a variation could be accomplished from the top down, however.
These pics are nuttin' special. In #1, you can barely see the unfinished treads. ADH Carpentry & Woodwork
Quality, Craftsmanship, Detail
Hmmm. I always work from the bottom up, no problem there...the blocks sound pretty neat...where are the midgets when you really need them?<G> Don't worry, we can fix that later!
BB, if you ever get bored some day try making your own jig for routing wall stringers, not hard at all, they are so fast and easy.
Hey Allen, you got any pics? Would something like that work with rough stringers in place?I'm always up for better, faster ways...and a new jig would just be gravy<G> Don't worry, we can fix that later!
I'm working on one tomorrow, I'll see if I can get some pics.
Billy
Nice work there, really tight joints, I like to see that.
Billy's "how to" pictorial, coming to FHB soon!
I kinda like your jig, I made one but it doesn't look as nice as yours, I suppose you got a patent on it so I cant steel the design. <g>
Doug
Thanks man...unfortunately for me, that jig's been around so long, it's gotta be public domaine<G>...FHB said they were gonna publish it, but I haven't seen big checks yet, dang... Don't worry, we can fix that later!
"I suppose you got a patent on it so I cant steel the design. <g>"I would aluminum the design.If you steel it then it will be too heavy.
I kept skippin by this thread thinking someone was just showing some hacks work off. Little did I know it was the kind of pics I love.Free Sancho!
Nice, clean work, 'snort. Great progress shots.
Hey, do you have to have a sack for hackin' like that? (A "hackin' sack"?) <g,d+r>
Oh yeah, I almost forgot, here's a little something for the punctuation police...
Edited 2/22/2005 9:41 pm ET by jim blodgett
Thanks doode...funny you should mention "hacky sackin"...that's what we used to do on "smoke" breaks...'til too many sacks went down the heat vents<G> Don't worry, we can fix that later!
but...there was no nudity...just wait 'til the next set...ha, ha, ha... Don't worry, we can fix that later!
Is Mr. Snort still around?
I'd like to thank you for this thread, found by searchin'
I took a lot of your method and it worked great for me today.
One little tip I came across today--in shimming the skirts plumb, if you need the bottom of the skirt shimmed closer to the stringer, a drywall screw sunk in and tweaked back out to 'plumb the wall' worked great for me.
Thanks!
Don't give away all the secrets! But do show us your jigs.http://www.tvwsolar.com Now I wish I could give Brother Bill his great thrill
I would set him in chains at the top of the hill
Then send out for some pillars and Cecil B. DeMille
He could die happily ever after"
Edited 5/1/2009 9:02 pm ET by Snort
Oh I've got no more secrets... The drywall screw as shim came from a jlc article. Read that and started using them to shim jamb extensions around windows.
What jigs!?
I have a set of collins stair tread gauges and that's it when it comes to stairs.
Waters - stair pro today, and monday too...then back to whatever!
At least you're picking up more than 15 mins of fame<G>http://www.tvwsolar.com
Now I wish I could give Brother Bill his great thrill
I would set him in chains at the top of the hill
Then send out for some pillars and Cecil B. DeMille
He could die happily ever after"
hey Snort! I'm still hackin
Me too, but not nearly as much<G> Got any pics?http://www.tvwsolar.com
We'll have a kid
Or maybe we'll rent one
He's got to be straight
We don't want a bent one
He'll drink his baby brew
From a big brass cup
Someday he may be president
If things loosen up
pics? I haven't been taking them, actually I'm so sick of stairs
it doesn't even enter my pea brain anymore.