Greetings all:
I haven’t done a thread like this before. The idea is to go thorough the on-site sequence of events necessary to build this town home project. There is a lot of planning and paperwork that goes on in the background, but that doesn’t make for interesting pics… Notice I say “home” rather than house… I try and remember to use that terminology when dealing with potential home buyers and home owners. I feel the word “home” evokes a different feeling than “house”. These are considered starter homes, so don’t expect to see any exquisite wood work or anything like that.
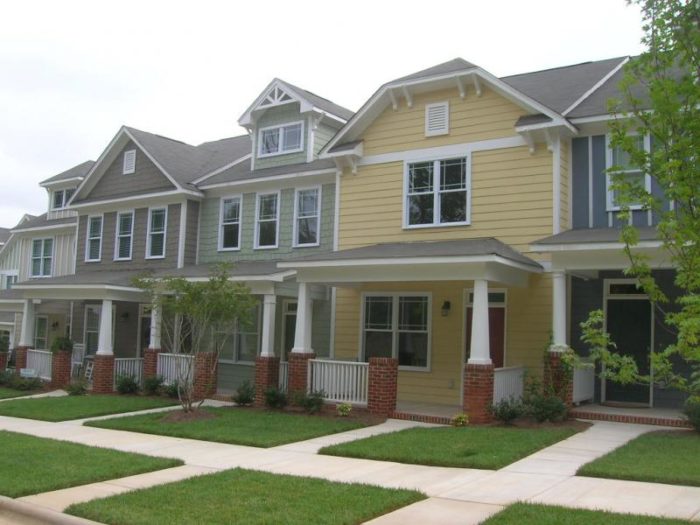
Anyway I’ll start by posting a few pics of what the end product is going to look like. Right now I am building just 1 bldg of 5 units. (I’m happy to have work) We have already built 2 bldgs, so this gives you an idea of where we are headed.
I’ll try and keep this thread up, but sometimes I’m sure I will get busy actually doing my job and forget to take pics. Also, this posting stuff can be time consuming.
Below is the first installment. Some completed homes.
BTW – re the size of the picture files, I’m not gonna optimize them. Sorry – too much time. Hopefully the size will work for everyone OK. For you IE users, if you right click on the pic and choose “open in new window” it might work better for you.
Edited 8/29/2009 8:08 am ET by Matt


Replies
Looking at the resolution on those first pics now I remember why I don't normally take pics at low res. I'm gonna keep with it though so as to get the smaller file sizes with out having to "diddle" with the pics....
Surveying
We bought the lots in "slab ready" condition, so the first step on-site is to get the surveyor out there to mark the locations of the building corners, etc.
Attached are a few "surveyor pics". I had them supply me with a "control point" elevation, that I set the slab elevations off of - since that is a field call. In the pic with the white stake in it, that is one of my slab elevations I set. I set one white stob (southern for stake) for each unit to get the concrete guys headed in the direction I want them to go. The site has a slight side to side grade, so each unit is 8" higher than the one directly adjacent.
This thing about setting the elevation is important. One thing about building slab foundation houses if you want them up out of the ground as much as possible, but at the same time you don't want to end up spending a bunch of $$$$ on extra gravel and concrete to build them up. We did take a "hit: here, but I again, I wanted to get the houses up some. The "slab ready" lots weren't as level as they could be, and of course the engineers and graders didn't really do what I told them to do way back when. I used my rotating laser level to take probably 50 different elevation "shots" and then put all the data in a spread sheet and ran different scenarios to see how to get the best result, while minimizing the purchase of extra materials. The height difference between TH units can be critical as you have to make sure the roof lines meet up properly. We have an 8" step between units.
The last pic actually spills over into the next topic, but you can see all the survey marks (there were probably 30 or 40 of them, and my grade stakes in the foreground.
Thanks for starting this.
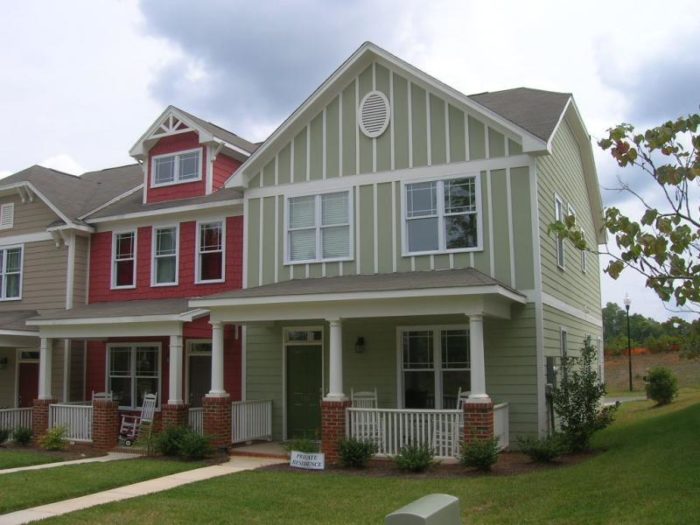
The exterior trim packages look similar to some non-attached homes you posted here previously. Are these in the same neighborhood, or just a common style where you are?
View Image
Somewhat of a common style. Some the newer neighborhoods tend to have this "quasi craftsman" look. We are a fairly small builder so it helps if we have somewhat of a different product than the nationals. The single family homes in this neighborhood are similar. There are a tital of something like 4 builders in there. Not really sure who is still in business though....
Those "city houses" I posted in another thread were in the city and were supposed to have somewhat of a historic look. When I grow up I'd like to build real new-old "historic" houses. Need someone to fund me first though.
The bright colors go over well in some neighborhoods. Other neighborhoods are all light tan, med tan, light gray, med gray, off white, etc.
The townhouses are kind of nice. I like the differences you have between them.
Yea - there was another builder in the neighborhood about 3 years ago who built a more generic looking TH. They failed. In a good economy. At lease ours are selling. although not as quickly as we need them to... I've built a bunch of generic looking vinyl siding houses. No pics here though... ;-)
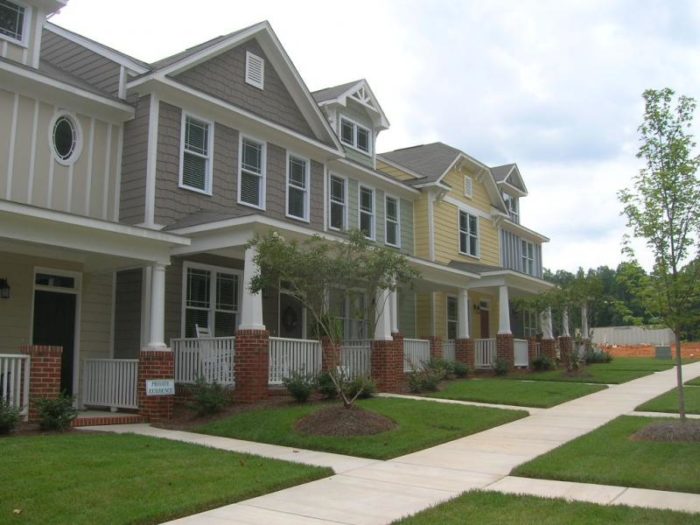
Here are some pics I took today in this neighborhood I'm working in. This will give you more of a flavor of what the neighborhood is like. These are built by other builders. It is one of these planned community that has a a variety of size houses and is supposed to have shops and services right there - we will see. There is a 10 acre town park that is right on the edge of starting. It is right across the street from the townhomes and I saw the surveyors over there the other day. The main guy showed me the plan. Looked pretty nice. They are saving some 42" and 44" oaks and similar.
When the RE agent told me that some of those "cottage" homes are only 16' wide I said "I doubt it" or similar. They really are though and actually sell OK. Some are 3 story with some kind of bonus room or whatever you want to call it on the 3rd floor.
To my eye, I like these kind of houses. The pic #8 the DW and I looked at and could almost see us living there. The neighborhood is like an hour from where we live now...
Matt,I noticed that the completed townhouses & some single family houses in other pics don't have gutters. Looks like the hip roofed porches would be dumping rain right on the neighbor's porch. Is that standard practice there? Do the townhouses or single family houses that you show have basements?Ed
check out the first post. Slab on grade!
oops!.........guess there's a reason they call me the "big dummy"........
No, typical reading on the computor. I do it all the time>G<
Basements are rare here. Gutters are very common in our area but not in that neighborhood - not sure why. Maybe something to do with the look they are trying to achieve. Every house (TH) plan has to be approved by this architect guy. There are architectural guide lines that is maybe 15 pages.
do you remember the source for your round columns seen on the front porches?
http://www.hbgcolumns.com/?gclid=CPKllb_iyZwCFR2dnAodfkQ-Kw
All the building supplies around here sell 'em.
Thanks Matt. I'm looking forward to this!
Runnerguy
We actually started this 2 weeks ago so I have some more progress to report already...
Boxing the monoslabs
In this step the concrete guy, using the surveyors marks "boxes" the slabs. What he does is installs his form boards on 3 sides to set up a reference, both horizontal and elevation, so that the plumber can come in there and install his under slab piping and get his risers where the toilet, sinks, and 2nd floor stack, etc, needs to be. The 4th side is left open so that the plumber can drive his excavator in there to dig his pipe trenches that end up under the house.
Pic 005 Eddie on his machine with his helper and the rod of the laser level. All forms are set using the laser.View Image
Bldg 4 Footprint A quick sketch of approx the building footprint - actually made for another purpose and is another building. The layout gets a little complicated - especially since the sketch doesn't show the brick pockets, which have to be built into the forms. The unit foundations will have brick on the front and the exterior sides of the bldg.View Image
Pic 004 Jumping ahead a bit, the back profile of the building boxing. They do the entire back and 2 outer sides, and then fill in the interior sides that delineate each TH unit form the adjacent one. In the pic you see the guy in white holding the rod with the laser sensor on it and you can see the laser over on the left.
Pic 003 Form board corner lined up with a surveyor's pin. Notice the expertly crafted joinery :-). BTW - you see that the form boards are re-used and pretty cruddy. They don't use any kind of form release lubricant because they strip the forms after the concrete has taken it's initial set - like maybe 3 or 4 hours into the pour, so the concrete hasn't had a chance to really get hard enough for the forms to be really stuck. Stripping the forms ASAP allows them to finish the sides of the slab and make them look nice since the sides will show in some areas.
Pic 002 More digging and dressing it up with a shovel. This concrete guy has a mini excavator, but there is still a fair amount of hand digging. Another concrete guy I have digs everything by hand as his only machine is a skid steer. I think this project might be a little beyond his capabilities. I need it in fast enough so we don't end up with footer excavations full of rain water.
Selecting subs is often a matter of getting the right guy for the job - even though most subs will say "we do it all". Sometimes this means the right sized crew. We have a much larger concrete sub that does our larger projects - but he is likely more expensive - they have an office with office help, an estimator, and all kinds of heavy equipment. Don't really need all that for this job...
Pic 006 Setting up a batter board for one of the interior sides. Should have had more of these previously, but I missed part of the process. Setting up batter boards is actually the first thing they do.
Edited to remove some extra pics - no way to do it when first typing the posting.
Edited 9/3/2009 7:13 pm ET by Matt
Edited 9/3/2009 7:15 pm ET by Matt
Plumbing underslab work
Pic 001 This is a 2 pipe system. What that means is that the upstream manhole in the street top rim is below the 1st floor finished floor elevation. So the first floor requires a backflow valve to prevent sewage from backing up into the house in case the municipal sewage system gets backed up. The 2nd floor does not need to be on the backflow valve, so it just has a test 'T' in it. in the pic there is a cleanout 'Y' in the foreground. The house foundation is toward the back of the pic. The cleanout will be in the front yard. The backflow valve and access box will be just in front of the front porch in the flower bed.
Pic 002 Another pic of the backflow valve (the larger one) and the test 'T'.
Pic 003 The waste pipes are sleeved where they go under the footer.
Pic 006 Pipe & fittings scattered around the boxed house slab area.
Pic 007 Jamie priming and gluing the PVC pipe.
Pic 011 The plumbers torpedo level is used a lot during the underslab work.
Pic 013 Ricky prepares to dig the sewer & water trench out to the street (which is behind him)
Pic 015 The completed sewer line. I was probably standing on the curb when I took this one.
Pic 018 A Blowup test ball is installed in the test 'T'. Picture doesn't show the test ball itself, it is in the pipe and is made out of the same stuff a tire intertube is made of. You see the long "valve stem hanging out out of the test 'T', and the retrieval chain which is used to pull the test ball out. The water line is toward the top of the pic.
Pic 019 Jamie wraps the toilet waste pipe where it will emerge from the slab. The wrap is later removed so the toilet flange can be installed. In the foreground the 2nd floor stack and water main are protected where the will emerge from the slab.
Pic 020 Properly bedded pipes. After the plumbing inspection they will be covered with dirt. Since the dirt at this site is fairly clean (not much rock at all) bedding the pipe in dirt is fine. On rocky sites the pipe needs to be bedded in screenings (very fine gravel) - which is just more $$$.
Pic 025 Jamie fills a test stack with water.
Pic 021 Look closely and you will see that the cheap test plugs don't always hod very well.
Pic 022 The fix for that.
Now time to wait for the plumbing inspection.... After it passes the plumber will cover his pipes and trenches with dirt.
Plumbing underslab work
Pic 001 This is a 2 pipe system. What that means is that the upstream manhole in the street top rim is below the 1st floor finished floor elevation. So the first floor requires a backflow valve to prevent sewage from backing up into the house in case the municipal sewage system gets backed up. The 2nd floor does not need to be on the backflow valve, so it just has a test 'T' in it. in the pic there is a cleanout 'Y' in the foreground. The house foundation is toward the back of the pic. The cleanout will be in the front yard. The backflow valve and access box will be just in front of the front porch in the flower bed.View Image
Pic 002 Another pic of the backflow valve (the larger one) and the test 'T'.View Image
Pic 003 The waste pipes are sleeved where they go under the footer.
View Image
Pic 006 Pipe & fittings scattered around the boxed house slab area.
View Image
Pic 007 Jamie priming and gluing the PVC pipe.
View Image
Pic 011 The plumbers torpedo level is used a lot during the underslab work.
Pic 013 Ricky prepares to dig the sewer & water trench out to the street (which is behind him)
View Image
Pic 015 The completed sewer line. I was probably standing on the curb when I took this one.
View Image
Pic 018 A Blowup test ball is installed in the test 'T'. Picture doesn't show the test ball itself, it is in the pipe and is made out of the same stuff a tire intertube is made of. You see the long "valve stem hanging out out of the test 'T', and the retrieval chain which is used to pull the test ball out. The water line is toward the top of the pic.
View Image
Pic 019 Jamie wraps the toilet waste pipe where it will emerge from the slab. The wrap is later removed so the toilet flange can be installed. In the foreground the 2nd floor stack and water main are protected where the will emerge from the slab.
View Image
Pic 020 Properly bedded pipes. After the plumbing inspection they will be covered with dirt. Since the dirt at this site is fairly clean (not much rock at all) bedding the pipe in dirt is fine. On rocky sites the pipe needs to be bedded in screenings (very fine gravel) - which is just more $$$.
View Image
Pic 025 Jamie fills a test stack with water.
View Image
Pic 021 Look closely and you will see that the cheap test plugs don't always hod very well.
View Image
Pic 022 The fix for that.
View Image
Now time to wait for the plumbing inspection.... After it passes the plumber will cover his pipes and trenches with dirt.
Jon Blakemore RappahannockINC.com Fredericksburg, VA
Thanks Jon. Do you have to post the pics on another web site to get them to show up in the post like that? Either way - what is the quickest way to get that result? Myabe the thread would gnenrate some interest If I did that?
Edited 9/2/2009 7:08 am ET by Matt
Kudos to Matt and Jon
Nice thread Matt ... nice photo formatting Jon
Hey bud - haven't seen you around for a while - or maybe I just wasn't looking... FYI, I've been to a few green building classes and got a certificate from the HBA for that, but just need to get a project that is funded to be green...
Nice thread. Man, is that real red dirt? If it is, you don't know how lucky you are. Are you going to insulate the slabs? Where have you been eating?<g>http://www.tvwsolar.com
We'll have a kid
Or maybe we'll rent one
He's got to be straight
We don't want a bent one
He'll drink his baby brew
From a big brass cup
Someday he may be president
If things loosen up
Yea... I been meaning to call ya... been busy trying to get these slabs in... Tomorrow is mostly just a materials delivery day so how about then? Come next Wednesday and I'll be slamed with the framers 12hrs a day 6 days a week for 3 weeks... can hardely wait. :-)
I'll be ready to take a break from back framing... if I haven't nailed myself to anything, I'll give you a call.http://www.tvwsolar.com
We'll have a kid
Or maybe we'll rent one
He's got to be straight
We don't want a bent one
He'll drink his baby brew
From a big brass cup
Someday he may be president
If things loosen up
Hey Matt,
I have not been around Breaktime very much... I have been obsessing as usual.
It used to be airtightness and ventilation... then Passivhaus ... and now it is Low Energy Enclosures.
I am slowly coming to my senses and trying to think more affordable and realistic....
That's what I like about your attitude.....
you tend to think in terms of the real world.
Keep up the good work.
John Brooks
It was a pain, it probably took me 20 minutes in all. Part of that was getting my batch conversion settings right with Irfanview.If you're not using Irfanview, you could really cut down on the time it takes to edit the photos. If you have them on your computer already (which you obviously do) you can create a new folder, copy & paste the photos you are going to post, and do a "batch conversion". You can resize them all so they are easy to load for the dial-up luddites.Once that's done, you just have to edit the post after you've attached everything and add the pictures to the post (that's assuming you're using Internet Explorer).Let me know if you have any questions.
Jon Blakemore RappahannockINC.com Fredericksburg, VA
OK - I didn't know about the batch editing of photos in Infraview. I need to try that. Really though, my Q was how did you imded the images right inbetween the text like that as opposed to just having the icons at the bottom?
Matt,<P>If you're using Firefox, it is a little more tricky. You have to use HTML formatting, which I'm using in this post even though I'm not clicking on the "Check here if HTML tags are in the message" box below the lower "post" button.<P>To embed a pic, you need to get the URL for that picture. It can be uploaded to Taunton's server, a photo sharing site like Flickr or Smugmug, or just an image on the web from somewhere. For instance, if I wanted to post the logo of the greatest team in baseball, I would add this to my post:<P><img src=http://upload.wikimedia.org/wikipedia/en/thumb/e/ec/NLC-CHC-Logo.png/100px-NLC-CHC-Logo.png><P>
To embed a link in Firefox, you need the following tags:<P><a href=http://en.wikipedia.org/wiki/Chicago_Cubs>Cubs link</a><P>
the "<img src=> and <a href=></a> are the HTML parts, you just add your link after the "=" sign to point to the right web page. With the embedded links, the text that goes between the two brackets (see the Cubs link above) is the text that you click on to go to the link. So I would put <a href=www.urlhere.com>This is the link that you would click on</a> to take you to urlhere.com.<P>The "<P>" just starts a new paragraph.<P>Clear as mud?
Jon Blakemore RappahannockINC.com Fredericksburg, VA
I do know some HTML and know about href tags etc, but that is a bit cumbersome. I don't want to have to think - much :-)
I use IE though. I'll tried your second suggestion above on one of my previous posts (above). It worked but I still don't have it perfected. From what I see so far it looks like I need to create the post with the pics attached on the bottom as icons. Then look at the post and open the pics in several new windows. Then edit the post and copy and paste the pics back into the post.... Seems like there would be a way to do it all in one step. I think my problem is that you said "open the pics in a new window". Open with what? When I double click on a pic in one of my file folders, the default picture viewer is M/S pic and FAX viewer. Can't copy from there.... What am I missing here? I tried just opening them in IE and it looked like it worked, but then when I went back a viewed the post I suffered from the dreaded broken picture icon blues... :-(
BTW - do you know what settings you used for the batch edits in infraview?
Edited 9/3/2009 7:51 pm ET by Matt
Hope I didn't jinx your pour<G>http://www.tvwsolar.com
We'll have a kid
Or maybe we'll rent one
He's got to be straight
We don't want a bent one
He'll drink his baby brew
From a big brass cup
Someday he may be president
If things loosen up
Nah... it was all good.... I met with the framer later and gave him an idea of the problem and he said we would work through it. I'll have the bricklayers take up some of the slack. My current prob is that my brick didn't show up today. My bad though. I didn't order until 2 days ago.
I'm writing this reply with IE.
When I right click on an attachment, I have the option to "open link in a new tab". Doing that, you can open all of the pictures that you have attached and copy & insert them one after another.
For Irfanview, I resized the pics to ~550w by whatever the proportional height would be, and the quality at somewhere ~90%. It can be a tough balance to keep the pics small in kb but not grainy and not too small to pick out the details.
Jon Blakemore RappahannockINC.com Fredericksburg, VA
OK - so, it is a 2 step process.... 1) post text and attach pics 2) edit to paste pics up with the text.
Thanks for the infraview settings.
You actually don't have to edit the post, just hit the "preview" button and you will see your post with the attachments in their normal position. You can open them in new windows or tabs, and then do the copy/paste dance.At least, that's how it works with Firefox.
Jon Blakemore RappahannockINC.com Fredericksburg, VA
OK- gotcha. Thanks for taking me through it. For doing something like this, the batch edit is awesome. All these years here and I never know you could just paste into the window. Previously I was told that I had to post on another web site and then use Href links to show the pics - which is too much trouble.
Placing the concrete<!----><!----><!---->
<!----> <!---->
024 – The footings are filled first. Pull up the wire!! Pull up the wire!!
<!----> <!---->
<!----> <!---->
003 – Front unload trucks really help – the driver can see exactly where the concrete is going and needs much less direction from the concrete finishers. The driver completely controls where the chute goes. On a rear unloader, the cute is moved manually by a concrete worker,
<!----> <!---->
<!----> <!---->
027 – Truck is empty. Someone has to climb the cute to get the last little bid of concrete down the cute since there is nothing behind it to push it down.
<!----> <!---->
<!----> <!---->
030 – Spray paint marks where the anchor bolts go.
<!----> <!---->
<!----> <!---->
032 – Slab is screeded out.
<!----> <!---->
<!----> <!---->
033 – And then bull floated.
<!----> <!---->
<!----> <!---->
034 – The bull float has a swivel head that tilts the blade depending on weather it is being pulled or pushed. The finisher controls the tilt of the head by rotating the handle.
<!----> <!---->
<!----> <!---->
004 – The edges are finished and the anchor bolts are set.
<!----> <!---->
<!----> <!---->
005 – Now it is time for the troweling machine. These are a huge labor savor. Really, for a slick finish slab, I wouldn’t hire a finisher who doesn’t have one.
<!----> <!---->
<!----> <!---->
013 – Only the most experienced crew members operate the power trowels. It is much harder than it looks.
<!----> <!---->
<!----> <!---->
035 – They go over it number of times. This is what the concrete looks like when it hasn’t been troweled enough.
<!----> <!---->
<!----> <!---->
014 after ½ hr to an hr with the power trowel the slab starts to turn a darker color and takes on a slick look. It’s done.
<!----> <!---->
<!----> <!---->
010 – Another view of the slick slab. Notice the brick pockets in the foreground. Forming these is a little complicated.
<!----> <!---->
<!----> <!---->
036 – The forms are stripped the same day, after maybe about 4 hrs.
<!----> <!---->
<!----> <!---->
038 – Not a good pic but here Raphael is finishing the sides of the slab that will show. They use a float like tool that has a sponge pad on it. They constantly dip the sponge float in a bucket of water. The water moistens the concrete surface and makes it more workable. If there are voids, “cream†from the concrete finishing process, topping compound, or even half dry concrete with the rocks removed can be used to fill the voids.
<!----> <!---->
<!----> <!---->
040 – Another not so good pic of the edge finishing also called parging.
<!----> <!---->
<!----> <!---->
015 - Saw cutting the control joints is the last step. This must be done either the same day, or the morning after to control cracking.
<!----> <!---->
017 - If a tooled type of joint is desired but it isn’t tooled in at the time the concrete is placed, this diamond grinding wheel can be used to cut in a v-grooved joint. The blade is expensive.
<!----> <!---->
022 - The results of a few weeks work by about a total of 10 guys. It took several hundred feet of pipe, a trailer load of form lumber, 3 different pieces of heavy equipment and roughly 12 concrete trucks.
<!----> <!---->
The actual pour lasted 3 days. I’ve learned the hard way not to push these guys to do more in a day then they feel comfortable with. The concrete guys had a crew of about 6 experienced guys.
Edited 9/10/2009 6:03 am ET by Matt
Keep up the good work ma man, lookin good
Thanks bud....
Looking great! BTW, were's this being built? If I had to guess it would be coastal Georgia, really red dirt and not too deep footings....
Runnerguy
Take a look at my profile...
Red dirt. I haven't had to work in this stuff for at least 5 years. I can guarantee I'll ruin $20 in sox to complete this building. What I mean is that the stuff stains your cloths particularly the whites. It gets in your shoes... I'm not a neat nick, but splotchy light orange sox just isn't my style. Maybe change to wearing black sox once shorts weather is over?
Oh ok, Raleigh. I wasn't too far off unless some readers thought I was refering to the country Georgia!
Runnerguy
Next step.... BTW - I'm cutting down some on the content to make better use of my time.
Surveyors set brick points
This project has some brick veneer on the foundations and the front porches are masonry (on top of concrete footings) and then later they get concrete floors.
002 The site data is all loaded into the instrument. Not sure why, but it seems to usually be the helper who runs the instrument. Clue: I asked the guy "what is the name of that instrument" him: "I don't know". :-) View Image
003 The crew leader holds a plum bob from a string to check the brick point he just set as the instrument operator verifies.View Image
001 This is what an actual brick point looks like. It is a masonry nail with a piece of flagging, and is driven into the concrete footer.View Image
004 After they set the points they checked back behind themselves with a tape measure. BTW - generally, surveying is always done in 10th and 100ths of a foot.View Image
Edited 9/14/2009 6:10 am ET by Matt
"Not sure why, but it seems to usually be the helper who runs the instrument. Clue: I asked the guy "what is the name of that instrument" him: "I don't know". :-)"
Tom from Texas could shed more light on this, but I have a very good friend that I grew up with in the Chicago area who has been surveying for 10+ years. He once told me that people always think that the instrument man is the guy in charge and the rod man is just some gorilla who walks through the weeds. He said that, in reality, the rod man is the one who has the big picture in mind and has to know where the points are needed to be efficient and accurate.I guess the instrument man is like the guy who holds the end of the tape that always says 0.
Jon Blakemore RappahannockINC.com Fredericksburg, VA
>> I guess the instrument man is like the guy who holds the end of the tape that always says 0. <<
Me (holding the dumb end): "Hey!!! I'm burning 9 and 13/16ths!!!" :-)
10 Backfill and rough grade<!----><!----><!---->
<!----> <!---->
It’s always seems hard to fit this step in, and it actually can be eliminated but it may cause problems later. Everyone (including me) wants to start framing… But if you don’t get it graded right now, it may never happen, especially once the concrete guy put their flatwork in the way. It makes it easier on the framers and everyone else too because everyone isn’t tripping around in mud holes around the foundations as they work on the houses. Also, when I call for the underground power install and the lady says “Has final grade been established?†I can say “Yes†and not be lying about it. J They usually don’t like the “It’s close enough†answer…
<!----> <!---->
<!----> <!---->
001 The operator has mostly backfilled this area and is now scraping backwards with his 8 way bucket to get a nice smooth grade that will allow water to run away from the foundations. Track skid steers are really nice for certain operations, especially if any ‘cutting’ is required – which in this case, there was. Framers stand by watching and chomping at the bit waiting for their lumber delivery. Once the lumber is offloaded no grading can take place for probably a month and a half, which would be after all the exterior work is done.
<!----> <!---->
<!----> <!---->
002 Cutting out the front yard a little more. He had a labor with him who goes around the edges with a shovel. This operator was good though – no corner bricks knocked off today!
<!----> <!---->
<!----> <!---->
I forgot to get a final pic but it looked good. Perfect drainage. They had it a litter higher than I would have liked though, but they coulda spent another 3 hrs cutting (and charging me). Of course the concrete guys will likely mess it all up later…
<!----> <!---->
<!----> <!---->
BTW Jon - thanks for the primer on posting pics. I guess I got it now!
11 Framing 1 Going vertical!!!<!----><!----><!---->
<!----> <!---->
001 - The framers pop Chalk lines. All the sins of the concrete guys and bricklayers are revealed. This is where I say “Do the best you canâ€, “split the differenceâ€, etc.
<!----> <!---->
<!----> <!---->
002 – end of first day of framing – the started at <!----><!---->2:00<!----> as the lumber was not there yet and I had the backfill going on in the morning.
<!----> <!---->
<!----> <!---->
003 - Assembling the shaftwall 2 hour rated fire wall between each unit. Basically it is 2 one inch layers of Dense glass sheetrock in a metal track frame, with a studded and insulated 2x4 wall on either side, and then 5/8†sheetrock either side.
<!----> <!---->
<!----> <!---->
004 - String lining a wall.
<!----> <!---->
<!----> <!---->
007 - Juan with the plate to plate adjustable height level. He was worried because he didn’t want his pic take without his “bags†on. J
<!----> <!---->
<!----> <!---->
010, 011 - Two days into the process. The pink plywood is fire rated. Fire rated plywood, + 5/8 rock on other side = 1 hr rated wall.
<!----> <!---->
<!----> <!---->
015 – Assembling a girder truss with Simpson SDS Screws.
<!----> <!---->
<!----> <!---->
016 – Muscle is used to install floor trusses.
<!----> <!---->
<!----> <!---->
020 – Cross bracing is good!
<!----> <!---->
<!----> <!---->
<!---->021 - The compressor is stashed behind the dumptster to reduce the noise.<!---->
Edited 9/22/2009 7:55 pm ET by Matt
Hey man, lookin' good... you slip and slid down there today?http://www.tvwsolar.com
We'll have a kid
Or maybe we'll rent one
He's got to be straight
We don't want a bent one
He'll drink his baby brew
From a big brass cup
Someday he may be president
If things loosen up
Yes, it was a mud hole... :-( Really looking forward to it today too with all the rain in the weather forecast.
Matt, threads looking good and the building is coming along.Thanks for the time you're putting in to do this. It is enjoyable (reminds me of my years spent in SC).
Jon Blakemore RappahannockINC.com Fredericksburg, VA
Jon:
Do you think that putting in a lot of pics in one post excludes people without high speed internet access?
I don't know how many it would exclude. I would be inclined to say that the vast majority have broadband access (this is 2009, after all) but I could be wrong.
Jon Blakemore RappahannockINC.com Fredericksburg, VA
Nice. Real nice. I'm enjoying this.
Runnerguy
The instrument is a "total station." Full 3D capability for setting points, and with the memory and processing power on board, the capacity for loading and using an entire site's worth of data.
A long long way from the days of a transit, level, and chain.
I went hiking with a friend recently, and we parked right near where this photo was taken of Giant Mountain, in upstate NY's Adirondack Park. I clipped the photo from a public website.
After the Revolutionary War, the government commissioned a surveyor to plat out the huge region here called the old military tract, so lots could be given as compensation to veterans who were owed back pay.
The 3-man party, in 1797, began by doing a line east to west, that took them directly over Giant's top, from the other side, and then straight down the rockslide cliffs seen in the center here. That approach and descent combination has never been duplicated. Compass, transit, axes, and chain. Wow!
View Image
View Image
"A stripe is just as real as a dadgummed flower."
Gene Davis 1920-1985
The plumbing inspection passed and underslab and sewer pipes have been back filled.
Finishing the underslab prep.
012 The footers are dug out the rest of the way, mostly by machine, but some of the way by hand.View Image
008 These are "cut lots" which means that no dirt was placed on the lots - rather dirt was removed, leaving only the subsoil. This ground is very hard. It is kind of a granular clay. When it gets wet in doesn't get all mucky and plastic. We have a soil engineering letter stating that is is suitable to support at least 2000 PSF.View Image
024 None the less, I used this soil probe to check all footings after they were dug. I found no place that the rod would penetrate more than about 1/5". This is actually a utilities probe - specifically made for looking for underground utilities (without getting "plugged in" but I like it because it doesn't get bent up in the back of my truck when who knows what gets put on top of it.View Image
013 Now the gravel (#57 washed stone) is placed (min 4") in the under the slab areas with a skid steer using a laser level, which is pretty much used throughout the whole process. After that I had them "stringline" the forms of each unit in a few places while I checked with a tape measure, so that I could see there was at least 4" of concrete everywhere - no pic of that.View Image
014 The underslab bug spray is now applied to the area.View Image
019 Foam insulation is applied around the perimeter. We don't have a frostline here so really the insulation isn't much.View Image
021 The plastic and wire is applied and we wait for the building inspector.View Image
023 We had a little wind storm - just to keep things interesting. The plastic was held down with some gravel, but apparently it wasn't enough.View Image
Edited 9/5/2009 8:18 am ET by Matt
We've been working but I haven't been posting....
12 Plumbing Rough-in<!----><!----><!---->
<!----> <!---->
001 – shower valves are assembled, mass production
<!----> <!---->
002 – water main cutoff and pressure reducing valves are assembled
<!----> <!---->
003 – a pedestal sink in a powder room requires mounting blocks in wall
<!----> <!---->
006 – supply system is tested with ~ 180 psi pressure
<!----> <!---->
008 – a blow up test ball is inserted in a test T in the sewer main in prep for the DWV test
<!----> <!---->
009 – test stack is full of water and DWV test is under way
Edited 10/26/2009 10:02 pm ET by Matt
13 HVAC rough-in<!----><!----><!---->
<!----> <!---->
002 - Flex duct is run through a “chase†in the open web floor trusses
<!----> <!---->
003 – Ceiling is getting a little full
<!----> <!---->
<!----> <!---->
14 electrical rough-in<!----><!---->
<!----> <!---->
001 the SWB (smart wiring box) is used as a junction for low voltage wiring
<!----> <!---->
003 – A box with TV, Data, & phone
<!----> <!---->
15 pre-insulate<!----><!----><!---->
<!----> <!---->
002 – Electrical boxes, etc have insulation put behind them
<!----> <!---->
003 – fire-stop foam is placed around pipes, wires etc
<!----> <!---->
004 – Insulation baffles are installed at the eaves
<!----> <!---->
005 – 007 – more firestop foam
<!----> <!---->
Matt,
Unfortunately, I posted these out of sequence.
If you're using Internet Explorer, just attach the picture, open the picture in a new window, copy the picture (not the URL, the actual pic on the screen), and paste it in your message.
View Image
Jon Blakemore RappahannockINC.com Fredericksburg, VA
Each unit on it's own legal tax lot?
What is the construction method/materials of the common walls between units?
Yes, each unit is on a fee simple lot - I think that is the right term.
The unit separation wall is rated wall assembly UL rated U336. It utilizes a shaftwall system whose core is a product called DensGlass. If you Google "densglass shaftwall" it will come right up.
Starting in one unit going through the wall to the next is: 5/8 type x sheetrock, 2x4 studded wall with R-13 fiberglass, 1" airgap that is fire stopped at each floor level, a 2" think metal studded wall with two 1" layers of DensGlass (2" total) 1" air gap, 2x4 studded wall with R-13 and finally another 5/8 sheetrock. The total thickness of the assembly is around 12".
We are getting a little ahead, but here is a few pics:
Edited 9/2/2009 9:42 pm ET by Matt
Thanks.
Been awhile but last time I built one here the "common wall" centered on the property line had to be masonry construction, poured full right up to the bottom of the roofing material.
Only thing the city would accept as the 4 hr fire resistive construction they required.
They can't get your Goat if you don't tell them where it is hidden.
This is a 2 hr rated assembly.
Edited 9/2/2009 9:40 pm ET by Matt
Do you have regs for sound suppression rated common walls? Roxul is used in pretty much all common cavities here for that reason (and also fire suppression as well obviously). All the new rowhouse developments I've seen (lived next to two 1/2 block developments during their construction) basically had daily deliveries of Roxul for a while. Is the fireblocking decoupled from the assembly at all?Z
>> Do you have regs for sound suppression rated common walls? << Not that I know of unless it is included in the UL rated walls. And, I never heard of Roxul.
>> Is the fireblocking decoupled from the assembly at all? << From which assembly? The passage of air has to be blocked so I don't see how anything can be decoupled.
11 Framing – Black is paper on!
023 – Mounting some hangers for some face mount floor trusses. I always make sure they put glue in the “saddle†to prevent squeaks.
025 – Floor framing done – walking the plate.
027 – A "few" trusses being delivered. The purchase from the truss company included over 300 trusses; Three of these roll off tractor trailer loads.
028 - Oversized bath tub being delivered via air mail.
029 – A gable end truss being flown into place. You can’t see it here but it has the house wrap, dead wood and most of the overhangs already installed.
030 – Another gable end going on.
031 – Moving quickly on the roof trusses. They were all set in about 5 hours. Crane time is expensive, although in my contract with the framers they supplied and paid for it.
032 – Two weeks in and the black paper is on. I gotta give it to these guys – they worked their a$$es off, especially considering it a rained at least a little each day for a week of the time. Around 8k sq ft under roof.

Since my last update the following has been completed:
siding, roofing, exterior paint, underground dry utilities install, insulation, inspections, sheetrock, cabinets, interior trim, prime interior, drywall point-up, paint interior, HVAC trim. Probably missed a few - hopefully not on site though... :-) In process are finished flooring, electrical trim, plumb trim.
I had the pleasure of having Holly from here at BT do the interior trim. This project isn't up to his normal caliper of work, however in this economy he needs to put food on the table same as the rest of us. At least I know things got done right... He has his son and another guy working with him all of who have a great attitude. So, not only is Holly the man but he's brought some others up as well.
Hey Matt, it wasn't nearly as bad as you make it out... unless the painters are laying an ambush for us<G>http://www.tvwsolar.com
We'll have a kid
Or maybe we'll rent one
He's got to be straight
We don't want a bent one
He'll drink his baby brew
From a big brass cup
Someday he may be president
If things loosen up
I sent you an E-mail.
Just to close the loop...
~17 weeks and a bunch of blood, sweat, and tears and it's all COed - all 7k+ sq ft. Some punch and then I'll be done. First home buyers in this bldg moved in this weekend. Got another moving in end of the month and another end of January.
Dangit! I missed every bit of it. My computer stopped showing pictures right after the plumber's slab-work.
What I saw looked good, though.
One question: where are the hard hats? In my area (East Tennessee) no steps foot on a job site with out one. OSHA maintains a strong presence.
RE the broken picture icons, I don't know what is up with that. Seems to be no rhyme or reason. I guess they didn't make it through the data export/import form the old system to the new.
Also, after framing time, I stopped posting the pics because no one seemed interested. Got tired of posting to myself. Time is too valuable to waste. And resizing and imbeding all those pics is time consuming. With the new board - I'm not a masicist or anything....
Re hard hats - we wear them when necessary - whenever there is danger of something falling on some one. During the entire framing stage, and while anyone is working overhead like roofers, siders, etc. We don't wear them for ground work (like concrete) or interior work.
Yes we do very occaisionally get OSHA visits, but they only cite us for immenant dangers.
I am totally interested, re-post away! These posts are the real reason I keep coming to breaktime.
Hey Matt,
I am not asking you to do any new work...
I just wanted you to know that I enjoyed all of your photos and comments.
JB