I’ve installed lots of crown as a homeowner and have gotten pretty good at it. I enjoy coping and can get it done very quickly with my jigsaw and a couple of files, especially with the basic profiles. I’m currently installing a 3 piece crown (first time normally I just us crown alone) which consists of upside down base on the wall and a ripped piece of 3/4″ stock on the ceiling. The crown sits between both. The issue I’m having is I’m noticing that I need to shim out the pieces of crown that go straight into the wall almost 1/4″ so that the cope will be nice and tight. if I don’t there is almost a 1/4″ gap between the bottom of the coped cut and the intersecting moulding. It’s as if the coped piece is too short at the bottom. According to my Starret gauge the corners are all 90*.
Has as anyone else had this issue? I almost feel like if I cut it at 48* it should leave the bottom a little longer and maybe I wouldn’t have to shim?


Replies
Sandking
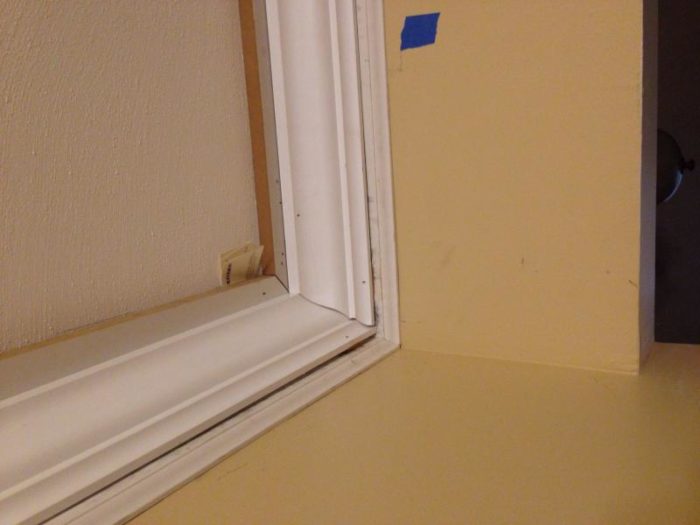
are you cutting this by placing upside down and backwards on your mitre saw? If yes, the registration is probably not right at the saw or on the ceiling/wall. Might be the picture, but it looks like the reveal from crown to base on wall and to flat stock isn't consistent.
Thanks for the help. Yes I build a jig for my miter saw when cutting crown. Upside down and backwards and I make sure the crown sits properly as I have a guide screwed to the bottom of the jig that locks everything in place. I'm a little confused about the reveal question. I use a piece of wood cut to the proper length to get how far down from the ceiling the base needs to be and draw a line around the room so the base is relatively level (with the exception of some dips on the ceiling but nothing more thank a 1/2") and do the same for the flat stock on the ceiling. Does that help at all?
Sand
The waves in the wall and ceiling can really mess with the fit, especially when coming into a corner. So does a change in level around that corner. If the crown nesting on the saw and the mitre settings are correct, there's only one other thing that I'd check.
Are these pcs of crown from the same manufacturer and run? Differences are subtle but can alter the quality of the finished product.
doing crown professionally for over 40 yrs-never mundane, often an adventure.
Calvin
Thanks. Unfortunately I don't know if they are from the same run. Same store, but not necessarily the same batch. I believe my saw is setup correctly. I make sure to check for square every couple of months (5 cut method) and my stops at on as well. That is also the nice thing about he jig the saw kerf is the same each pass, it isn't any wider than the blade. I'll have to check out the ceiling to wall joint on the next room to see if they are out.
sand
Cut butt joints on two different pcs., if they match exactly, probably the same manufactuer and run. On occasion, relief marks on the backside can signify same stuff. Even good quality yards sometimes have bottom of the bundle pcs. that hang in stock for years. If it gets mixed in with new, not good.
The spring angle of the crown has to match up with the jig you make. Any deviation from that will open up the top or bottom of the crown damn near equidistant each side.
I'm running out of possibilities.
remember, it's nice to know the cause of problems, but sometimes it's just cut to fit. Use a nicely coped "fitter" piece to check for any cut adjustment and then cut the one you're installing. Fitter piece should be at least 3-4' to catch goofiness in the wall or ceiling.
Sand
The waves in the wall and ceiling can really mess with the fit, especially when coming into a corner. So does a change in level around that corner. If the crown nesting on the saw and the mitre settings are correct, there's only one other thing that I'd check.
Are these pcs of crown from the same manufacturer and run? Differences are subtle but can alter the quality of the finished product.
doing crown professionally for over 40 yrs-never mundane, often an adventure.
Here's a picture of my jig and setup.
If this is happening consistently the problem is in the way the jig is set up. Tweak the stop until you get the right angle off of the wall.
Yeah, my vote would be that the wall isn't plumb and flat near the ceiling.
The beauty of coping is that for the most part it'll eliminate tweaking required due to non-square corners.
I'd recheck your spring angle. If you have a framing square, hold a piece of crown against the inside "L" of the framing square, orient is so the body is the "wall" and the tongue is the "ceiling". See what the measurement is on the tongue. Make sure you have that correct measurement on the bed (ceiling) of your miter saw when you cut upside down and backwards.
Recheck to make sure that the layout of the 3/4" rip on the ceiling is positioned properly in comparison to the backer molding on the wall. Example, you nail the upside-down backer on the wall. THEN use your framing square (or a block of wood) to make registration marks on the ceiling to install your 3/4" rip on the ceiling.
The line at the top edge where the two crowns meet (right below the unpainted 3/4" rip) looks a little funky to me in the photo. Can't make out the detail. But it looks unnatural.
I'll also tag on with what Calvin wrote. It might just be the photo, but the profiles of the two pieces look inconsitent. Sure, they might both be 3-1/2" ogee crown. But the reveals look larger on one piece than they look on the other. Could just be the photo...but it does look odd.
Good luck with it.