Got a call a while ago to come talk about a new house for one of my Mother’s friends
she lives in an old Victorian that is all up and down…. owned the buildable lot behind her house.. anyways, we developed a couple of concepts and settled on a single floor with no steps
from that the Radiant Floor Heat seemed like a no-brainer
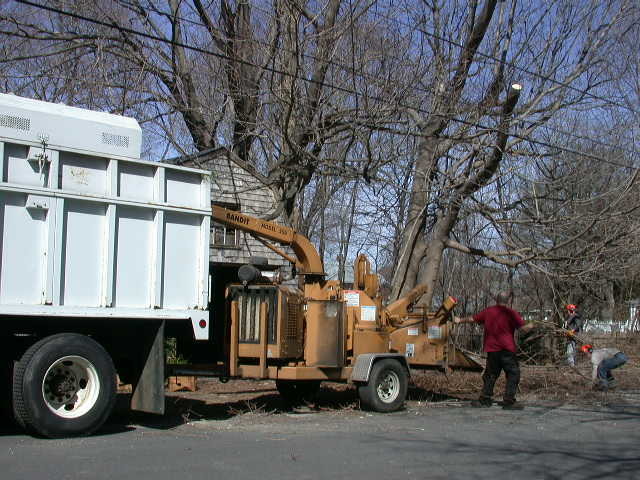
in late April we got the Tree Service guys in to take out the huge Norway Maples, that is her old house in the background
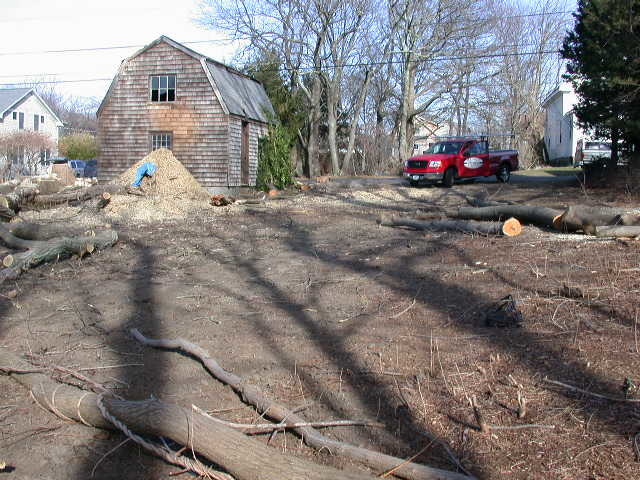
when they got done chipping , there were logs lying all over the lot
turns out they send a separate “log truck” just to handle them
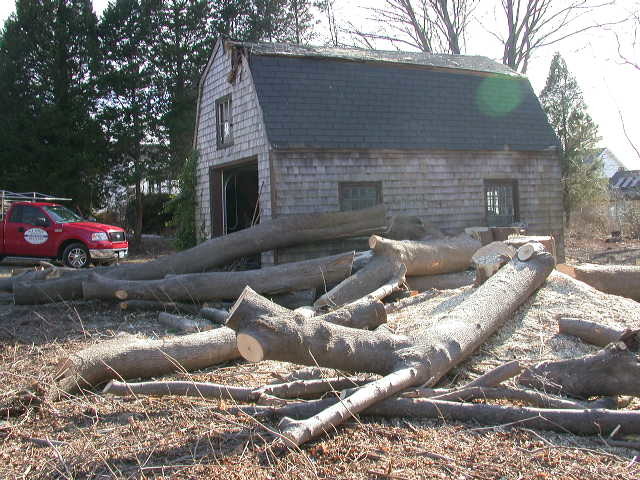
this shed was smack in the middle of the new garage
so something had to give
Mike Smith Rhode Island : Design / Build / Repair / Restore
Edited 7/28/2007 8:32 am ET by MikeSmith
Edited 7/28/2007 8:34 am ET by MikeSmith
Edited 7/28/2007 8:35 am ET by MikeSmith
Edited 7/28/2007 8:36 am ET by MikeSmith
Edited 7/28/2007 8:38 am ET by MikeSmith


Replies
the shed on the property was pretty nice and i hated the idea of demolishing it...14 x 20 with a 2d floor... had a guy lined up who was going to move it to his backyard
but that finally fell thru
Randy made short work of the demo
View Image
got it all in (3) 20-yard dumpsters
View Image
next thing was to get the red cabin moved in... no bushes on this lot
View Image
the topography required one step in the footing..
here they are forming for an 8x16 patio in the back
View Image
Edited 7/28/2007 8:38 am ET by MikeSmith
Edited 7/28/2007 8:40 am ET by MikeSmith
Edited 7/28/2007 8:41 am ET by MikeSmith
Edited 7/28/2007 8:43 am ET by MikeSmith
formed and poured the house first... then the garage & front entry
here Mike is putting the keyway in the footing with a wooden sled
View Image
i picked up the 6x6 WWM for the slab
View Image
Randy built us a ramp so Joe would get enough elevation to hit the back wall
View Image
here's the front.. the garage & entry will tuck into the setback area
View Image
Mike Smith Rhode Island : Design / Build / Repair / Restore
Edited 7/28/2007 8:47 am ET by MikeSmith
Edited 7/28/2007 8:48 am ET by MikeSmith
Edited 7/28/2007 8:49 am ET by MikeSmith
Edited 7/28/2007 8:51 am ET by MikeSmith
How wide's them footings? What's presumed bearing capacity of the dirt?
from memory.. 2000 lb..we've scratched the loam off and the footings are going on the subsoil... which is why we had to step the foundation down in the back... the loam was a little deeper than i expected
the footings are typically 10 x 20 with (2) #4 bars the walls are 10" 3000 lb
by code, we can also pour a 12" wall with no footings... but most form companies are set up for 10" walls nowadays
Mike Smith Rhode Island : Design / Build / Repair / Restore
Edited 7/28/2007 10:12 am ET by MikeSmith
A single story here would be a 12" wide x 6" thick footing with a 6" thick stemwall. Pretty much everything is a monopour. Wouldn't your sub rather set up and pour once?
no way , jose'....
the form companies around here are not set up for monopours....
some of the tracts used to get built that way... but i haven't seen any in years....
the bottom of our foundations have to be 40" below finish grade
you're talking about walls & slab in one pour , right ?
which means ... all compacted fill, all utilities, all RFH tubes.. everything in place with only forms to hold them.... yeepers !Mike Smith Rhode Island : Design / Build / Repair / Restore
Mike, we are 12-18" below grade, much easier than you have it, although on my current project I had to spend ~$12K removing rock to get that deep and to get a utility trench.
By monopour I mean footing and walls. 2x8 is used for footing forms, and it's held in place with steel stakes and spreaders made out of 1x4 PT. Once the footings are formed and staked, lines for the wall forms are snapped on those 1x4 cleats. Then, metal cleats are nailed along those snapped lines, and panels are stacked using snap ties. Rebar is of course added at the appropriate times during all of this.
Bottom line, you get a single pour foundation and for better or worse the 1x4 is left embedded. I was aghast the first time I saw that, but it's de rigeur around here... so be it.
I'll attach a photo... it's probably too big... can't resize it on this machine...
Are those spreaders as hard to remove as I think they would be?
Do you just drive them out with a sledge?
You don't remove them. I guess the positive news is that I dug some up last year in the process of putting an addition on a 20-year-old house, and they were still there good as new.
is that imported stone or native soil ?
which one are you ?
View Image
where is this ?
Mike Smith Rhode Island : Design / Build / Repair / Restore
Edited 7/28/2007 5:53 pm ET by MikeSmith
Thanks for the resize. I took the pic, I'm not in it. The rock laying right around the footing is what we hammered out. They piled it against the bottom of the forms to avoid too much squeeze-out. When it started to set they scraped it away with a flat shovel and then we scraped even more when we put the footing drains down. The large pile of rock to the right is a load of 2" minus for some sand-set pavers that will eventually go back there. I had it dumped when it was still possible to get a dump truck right there. Once we started forming the access got a lot worse. All further landscaping at the sides or rear will be by hand or mini-track.
From the new show, John from Cincinnati.
"I got my eye on you"
Meant as Oh cool another great thread.
Clicking is so much easier then sweating.
is that anything like W K R P in Cincinnati ?
i loved that oneMike Smith Rhode Island : Design / Build / Repair / Restore
Wayyyyyy wackier It"s on HBO on Sunday nights.
http://www.hbo.com/johnfromcincinnati/
meanwhile.... back at the ranch...
Brad came over and trenched for the drain lines and potable water
View Image
the kitchen sink
View Image
the 4x6 PT sill will have a 3/4 PT plywood top so we have a total depth of 6 1/4"....
that will allow us 2" of foam and a minimum of 4 1/4" of slab
View Image
Roy & I drove up to Smithfield to pick up the the 2" Performguard foam
View Image
Mike Smith Rhode Island : Design / Build / Repair / Restore
Edited 8/5/2007 12:25 pm ET by MikeSmith
Edited 8/5/2007 12:26 pm ET by MikeSmith
Edited 8/5/2007 12:26 pm ET by MikeSmith
Edited 8/5/2007 12:30 pm ET by MikeSmith
we did the finegrade so the foam would have a good base and did some more compacting with a waterhose.... those are potable water lines running from the utility room inn the garage to various locations
View Image
this shows the 3/4" PT cap to raise the sill to 6 1/4"
View Image
this shows the 2" foam liner around the perimeter... so we not only have 2" under the slab, we also have the 3 1/2" of PT & 2" of foam at the edge of the slab
View Image
ready for the PEX... .. I already gave Sam a heads-up that we'd be ready for him
View Image
Mike Smith Rhode Island : Design / Build / Repair / Restore
Edited 8/5/2007 12:34 pm ET by MikeSmith
Edited 8/5/2007 12:35 pm ET by MikeSmith
Edited 8/5/2007 12:36 pm ET by MikeSmith
Edited 8/5/2007 12:39 pm ET by MikeSmith
Edited 8/5/2007 12:40 pm ET by MikeSmith
Edited 8/5/2007 12:42 pm ET by MikeSmith
http://i116.photobucket.com/albums/o10/TurkanaDK/animated/eye2.gif
Sam brought the PEX
View Image
and started laying his pattern...
View Image
basically two zones, each supplied by an Electric HW heater..
View Image
here's the test manifold Sam designed from various fittings
View Image
meanwhile.... we got the Plumbing OK, so it's ready for concrete
View Image
Mike Smith Rhode Island : Design / Build / Repair / Restore
Edited 8/5/2007 1:50 pm ET by MikeSmith
Edited 8/5/2007 1:51 pm ET by MikeSmith
Edited 8/5/2007 1:52 pm ET by MikeSmith
Edited 8/5/2007 1:53 pm ET by MikeSmith
Edited 8/5/2007 1:54 pm ET by MikeSmith
here's the floor plan
View Image
and the front elevation
View Image
Mike Smith Rhode Island : Design / Build / Repair / Restore
Edited 8/5/2007 1:59 pm ET by MikeSmith
Edited 8/5/2007 2:00 pm ET by MikeSmith
Mike, I like your 4x6 "rim joist" detail. I've seen the 2" foam liner on Lstiburek's site, but with a concrete stem wall. Will you do anyting to finish the 4x6 on the outside?
the plywood sheathing will cover it just like it would on a 2x6 sill..... it's part of the tie-down required for wind uplift designMike Smith Rhode Island : Design / Build / Repair / Restore
brought in Hathaway to pour the slab...
View Image
they've got that neat gas powered jitterbug with an 8' straightedge
View Image
Heritage is pouring this job.... that's the Owner of the concrete company driving that truck..... nice guy
View Image
Ken & I put his initials in the garage slab... he wants his workshop in this corner
View Image
Mike Smith Rhode Island : Design / Build / Repair / Restore
Edited 8/5/2007 7:44 pm ET by MikeSmith
Edited 8/5/2007 7:44 pm ET by MikeSmith
Edited 8/5/2007 7:46 pm ET by MikeSmith
Edited 8/5/2007 7:47 pm ET by MikeSmith
the front entry & the 8' x 16' rear patio are both going to be stamped concrete......
I had to build the slab forms so I put a 3.5 x 3.5 nosing all around.. using some 4x4 I salvaged out of the shed.. these are those Simpson bolts i've used on other concrete work... they work some slick
View Image
i added a cant strip to the forms with my new Grex pin nailer ( SS ).. first chance I had to use my new toy
View Image
i also saw cut the new slabs for control joints
View Image
Mike Smith Rhode Island : Design / Build / Repair / Restore
Edited 8/5/2007 7:53 pm ET by MikeSmith
Edited 8/5/2007 7:54 pm ET by MikeSmith
Edited 8/5/2007 7:55 pm ET by MikeSmith
this is the first time we've used any stamped concrete, but i knew Hathaway had a lot of experience in it
here's the front entry
View Image
and some of the rubber stamp molds being laid in place on the rear patio
View Image
with another view of the layout......
View Image
and a closer look at the back
View Image
and the finished job...... John will come back to seal this tomorrow
View Image
Mike Smith Rhode Island : Design / Build / Repair / Restore
Edited 8/5/2007 7:59 pm ET by MikeSmith
Edited 8/5/2007 8:00 pm ET by MikeSmith
Edited 8/5/2007 8:02 pm ET by MikeSmith
Edited 8/5/2007 8:02 pm ET by MikeSmith
Edited 8/5/2007 8:03 pm ET by MikeSmith
Mike, I didn't notice a VB under your insulation. Did I miss that, or is it not required? Here the minimum would be 6 mil poly. I just used a product called Stego Wrap, which is 15 mil and comes 14'x140'--it's an incredibly heavy roll. Also comes with 4" tape that I used to seal all the pipe penetrations thru the material before laying the 2" foam down.
dave.. we have almost 4' of gravel... and it was open to the weather for about two months
i felt the poly would just trap water trying to work it's way down and the 2" EPS would be enough of a vapor retarder to satisfyMike Smith Rhode Island : Design / Build / Repair / Restore
Looks good,
How will you protect the stamped concrete during construction?
I like to cover it with an inch of sharp sand, then compactible soil 'till final grading.
We mostly build SOG in this part of Georgia.
Chuck Slive, work, build, ...better with wood
so far i covered them with 1/2" cdx.....Mike Smith Rhode Island : Design / Build / Repair / Restore
time to start framing...Roy & Chuck are still working on Change Orders so i'll stand the walls up
start with some insulated box headers, cutting up the 2" EPS foam with the EZ Guide and my 8 1/4"
View Image
i glued the foam in with a can of spray foam, then glued and nailed the headers
View Image
once i had all the headers assembled......
View Image
i had to figure some way of anchoring the Proctor Wall jacks ... we have a least 3" of concrete over the RFH tubes & potable water.. so i decided on 1" of ply held in place with 1.5" positive placement nails
View Image
Mike Smith Rhode Island : Design / Build / Repair / Restore
Edited 8/9/2007 10:19 pm ET by MikeSmith
Edited 8/9/2007 10:19 pm ET by MikeSmith
Edited 8/9/2007 10:20 pm ET by MikeSmith
Edited 8/9/2007 10:20 pm ET by MikeSmith
i devised a strap hinge to rotate the wall and hold the shoe on the sill.. just shoved a piece of metal strapping between the foam and the 4x6
View Image
the walls had quite a few places where i had to leave the sheathing off due to plumbing risers
View Image
the plywood extends below the shoe to act as a tie to the 6x4 sill
View Image
here's the south wall (kitchen ) up & braced
View Image
the Airshow was practising for the weekend.. kept making their turns over the job
View Image
Mike Smith Rhode Island : Design / Build / Repair / Restore
Edited 8/9/2007 10:27 pm ET by MikeSmith
Edited 8/9/2007 10:29 pm ET by MikeSmith
Edited 8/9/2007 10:29 pm ET by MikeSmith
Edited 8/9/2007 10:31 pm ET by MikeSmith
Edited 8/9/2007 10:31 pm ET by MikeSmith
the garage was a little trickier.. but not much.... on the main house i used 92 5/8 studs in the garage i added an extra shoe & swithced to 96" studs so my top plate height will wind up the same
View Image
i used a continuous header from corner to corner to give me some shear
View Image
here's the garage door wall
View Image
and a close-up of the Proctor Wall jacks
View Image
Mike Smith Rhode Island : Design / Build / Repair / Restore
Edited 8/9/2007 10:36 pm ET by MikeSmith
Edited 8/9/2007 10:39 pm ET by MikeSmith
Edited 8/9/2007 10:40 pm ET by MikeSmith
Edited 8/9/2007 10:40 pm ET by MikeSmith
with the last of the walls in place ...
View Image
it was time for some trusses.. drop shipped
View Image
View Image
and scheduled the crane , and Roy & Chuck
View Image
Mike Smith Rhode Island : Design / Build / Repair / Restore
Edited 8/9/2007 10:45 pm ET by MikeSmith
Edited 8/9/2007 10:46 pm ET by MikeSmith
Edited 8/9/2007 10:46 pm ET by MikeSmith
Edited 8/9/2007 10:47 pm ET by MikeSmith
Edited 8/9/2007 10:47 pm ET by MikeSmith
This pic cracks me up:
View Image
I have a mental picture of this pic with a caption saying "Who would you bet on?".
Jon Blakemore RappahannockINC.com Fredericksburg, VA
cracks me up too... the jet jockey must have all flaps and almost stalled trying not to overrun the bi-planeMike Smith Rhode Island : Design / Build / Repair / Restore
so we set trusses....
View Image
and
View Image
here's the notch we made to slip the top chord in....these ahve a 12" energy heel
View Image
by the end of the day we had everything set except the layons
View Image
Mike Smith Rhode Island : Design / Build / Repair / Restore
Edited 8/9/2007 11:31 pm ET by MikeSmith
Edited 8/9/2007 11:31 pm ET by MikeSmith
Edited 8/9/2007 11:33 pm ET by MikeSmith
Edited 8/9/2007 11:34 pm ET by MikeSmith
we only sheathed what we needed for the lay-ons... then Roy & Chuck went back to the other job
View Image
i set up the string lines and braced the gable ends so i could start the rake lookouts
View Image
and the inspectors showed up... two from North Carolina & one of the locals
View Image
the roof over the front of the entry is all overframed
View Image
Mike Smith Rhode Island : Design / Build / Repair / Restore
Edited 8/9/2007 11:39 pm ET by MikeSmith
Edited 8/9/2007 11:39 pm ET by MikeSmith
Edited 8/9/2007 11:40 pm ET by MikeSmith
Edited 8/9/2007 11:40 pm ET by MikeSmith
Was that all the same day? Setting up the walls by yourself and then trussing and partially sheathing the roof and then sending the guys off to work on the OTHER house?jt8
"Democracy is two wolves and a lamb deciding what to have for dinner, liberty is a well armed lamb protesting the vote." -- Benjamin Franklin
yes, but i went to bed early... and got up lateMike Smith Rhode Island : Design / Build / Repair / Restore
I am curious as to why you use a 4x6 pt sill. Do you find it's just easier than forming the slab?
nate.. if i form the slab, i still need a PT sill.. AND the edge of my slab is uninsulated
am i missing something ?
do you have a way of forming the slab, insulating the edge, and providing the tie-down i need for 110 MPH wind design ?Mike Smith Rhode Island : Design / Build / Repair / Restore
mmmm... i forgot to show you something slick the crane operator had..
a pneumatic hook for the truss lift, just pull the cord and it slams open to release the truss
View Image
anyways i got the overlay trusses on for the front gable
View Image
this 5/8 T&G Advantech is heavy... but it eliminates a lot of required blocking in our 110 mph windzone
View Image
Randy came back to sawcut the street & install the sewer
View Image
these 3x5 rocks came out of the sewer excavation.... be interesting to see what the Town hits when they try to punch the water line across
View Image
Mike Smith Rhode Island : Design / Build / Repair / Restore
Edited 8/10/2007 9:28 pm ET by MikeSmith
Edited 8/10/2007 9:29 pm ET by MikeSmith
Edited 8/10/2007 9:30 pm ET by MikeSmith
Edited 8/10/2007 9:31 pm ET by MikeSmith
Edited 8/10/2007 9:33 pm ET by MikeSmith
Randy bought a new diamond saw to cut the donut in the clay sewer line.. nice clean cut... and a very expensive Fernco Tee
View Image
the sewer line comes out about 3' below the slab .... to a cleanout... then transitions from 4" to 6"
View Image
i decided on hipped cornice returns 8/12 pitch , same as the main roofs
View Image
and cut the main roof so the shingles can go right under
View Image
Mike Smith Rhode Island : Design / Build / Repair / Restore
Edited 8/10/2007 9:38 pm ET by MikeSmith
Edited 8/10/2007 9:39 pm ET by MikeSmith
Edited 8/10/2007 9:40 pm ET by MikeSmith
Edited 8/10/2007 9:40 pm ET by MikeSmith
working the fascia & rake framing
View Image
and decided to pull the cornice return into a pent roof to protect the 2 kitchen windows
View Image
view from the SW corner ( patio corner ) looking East
View Image
the sheathing layout left us about 14" short at the peak.. since we are required to either solid block or use t&G ply.... i had to cut new grooves on the final pieces
View Image
Mike Smith Rhode Island : Design / Build / Repair / Restore
Edited 8/10/2007 9:44 pm ET by MikeSmith
Edited 8/10/2007 9:45 pm ET by MikeSmith
Edited 8/10/2007 9:47 pm ET by MikeSmith
Edited 8/10/2007 9:49 pm ET by MikeSmith
Edited 8/10/2007 9:49 pm ET by MikeSmith
i used a T&G bit
View Image
and the clamping EZ guide
View Image
my company... the CD player makes a nice change from the sports talk radio
View Image
and ready for trim
View Image
Mike Smith Rhode Island : Design / Build / Repair / Restore
Edited 8/10/2007 9:52 pm ET by MikeSmith
Edited 8/10/2007 9:53 pm ET by MikeSmith
Edited 8/10/2007 9:55 pm ET by MikeSmith
Edited 8/10/2007 9:57 pm ET by MikeSmith
Edited 8/10/2007 9:57 pm ET by MikeSmith
oops .. not quite.. still had to put the solid blocking in at the ridge vent
View Image
each side of the ridge vent slot
View Image
then on to the trim... 1x8 Miratech, primed plus one coat finish
View Image
out on the NW corner... a volunteer appeared.... one stalk of corn.... haven't a clue how that got planted.... might fit in with the Creationism vs. Evolution debate , no ?
View Image
Mike Smith Rhode Island : Design / Build / Repair / Restore
Edited 8/10/2007 10:03 pm ET by MikeSmith
Edited 8/10/2007 10:04 pm ET by MikeSmith
Edited 8/10/2007 10:06 pm ET by MikeSmith
Edited 8/10/2007 10:06 pm ET by MikeSmith
the trim : the rakes have a 14" projection and the eaves have an 18"
we left the tails on the sub-rake 3 1/2" above the returns to allow for furring & vinyl soffit, and the finish rake boards have 1 1/2" clearance to allow for roofing / flashing
View Image
this notch is supposed to accomodate the Hardie siding.... we'll see if I got it right
View Image
this was yesterday.. i finished painting the trim so the roofers could start this morning
View Image
Mike Smith Rhode Island : Design / Build / Repair / Restore
Edited 8/10/2007 10:13 pm ET by MikeSmith
Edited 8/10/2007 10:14 pm ET by MikeSmith
Edited 8/10/2007 10:16 pm ET by MikeSmith
Nice job Mike.
Perfect timing for going up north.
You are the quinticential (sp) contractor.
Here's to you!A great place for Information, Comraderie, and a sucker punch.
Remodeling Contractor just outside the Glass City.
http://www.quittintime.com/
Cal... got the shock troops comming on Monday... Wicklund !... then we convoy outta here on Wednesday ( if i get a sub for the League ) or Thursday am if i stay to play golfMike Smith Rhode Island : Design / Build / Repair / Restore
Please convey our greetings to Ralph, Kathy, Dino, Ryan and the rest of the hooligans you run into.
How bout this Central Division-he who loses last might just win it.
A great place for Information, Comraderie, and a sucker punch.
Remodeling Contractor just outside the Glass City.
http://www.quittintime.com/
had great plans for today... roofing , windows & doors...
someone else had other plans........ like BIG RAIN
anyways .. got a good start
the roofers got one side of the garage done
View Image
but by 11am , it was pretty hopeless
View Image
we resorted to cleaning up , setting up our circus lights, and getting ready for tomorrow
View Image
the doors & windows will still be there, waiting
View Image
Mike Smith Rhode Island : Design / Build / Repair / Restore
Edited 8/10/2007 10:29 pm ET by MikeSmith
Edited 8/10/2007 10:30 pm ET by MikeSmith
Edited 8/10/2007 10:30 pm ET by MikeSmith
Edited 8/10/2007 10:31 pm ET by MikeSmith
A basic question for you.
When you're framing a pent roof, how do you do it?View Image
It looks like there may be a 1x ledger? Or was that just a stop you tacked up to keep everything flat? Have you ever set up a few stop blocks and made truss pieces that you can just nail on?
Jon Blakemore RappahannockINC.com Fredericksburg, VA
i'll see if i can dig those outMike Smith Rhode Island : Design / Build / Repair / Restore
jon.. originally i was going to have the South elev. look like this.....
View Image
but in 12" scale i realized how unprotected those two windows were , especially the casement on the left
and it started thinking about turning the rake frame/trim into eave frame/trim and decided to just pull the roof
View Image
i used a 2x6 ledger, and framed little trusses.... as you suggested... then i hipped the end to be consistent with the other returns.... but no pics of that process
Mike Smith Rhode Island : Design / Build / Repair / Restore
Edited 8/10/2007 10:41 pm ET by MikeSmith
Edited 8/10/2007 10:41 pm ET by MikeSmith
here's the return you were looking for
http://forums.taunton.com/tp-breaktime/messages?msg=92880.68Mike Hussein Smith Rhode Island : Design / Build / Repair / Restore
Thanks Mike. Excellent photos! I'll be "borrowing" that design, along with numerous other ideas of yours, to use on my next house.
<"Who would you bet on?".>
Yeah! I called the kids over and said - "look, these would never occur naturally together in nature!"
Forrest
Mike, does the 8-1/4" saw on the EZ Guide let you get all the way through the 2" foam?
no.. it left about 1/16"...... but for all intents... yesMike Smith Rhode Island : Design / Build / Repair / Restore
Hey that's my nail gun!
Mike,
As always very impressive work. How did you like the pin nailer? And if you don't mind, where did you get it? I could really use one, and I'm out shopping around for one now.
ThanksBarney
barney... this is a sweet pinner
Grex.. i got mine at JLC Live in Providence
but it came from a California dealer... Jerry Carter Air Tools
760.868.1904
grex has a web site....http://www.grexusa.com
the model i bought is the P645 and i bought a lot of various length SS pinsMike Smith Rhode Island : Design / Build / Repair / Restore
Thanks Mike for getting back to me so quickly. I'll have to check out the website and see what the have. I borrowed my father's Stanley and was impressed with it.
I like the fact that I could do detailed work without having to go back and fill holes.
Thanks again. I look forward to seeing more pictures.
My wife wished you built homes in New Jersey. She's very impressed with your work.
ThanksBarney
Mike: Very impressive!
here's the other one she wanted to look atMike Hussein Smith Rhode Island : Design / Build / Repair / Restore
Thanks Mike,
I'm making a folder for all these threads.
ok.... that'll make u the "go-to guy "Mike Hussein Smith Rhode Island : Design / Build / Repair / Restore
ok.... that'll make u the "go-to guy "
A librarian I ain't. I can't even find that great thread we had on super insulated homes last winter/spring. Almost 300 posts and it seems to have disappeared.
I don't suppose anyone else bookmarked it? Maybe?
sure...it's near the top over in "energy"Mike Hussein Smith Rhode Island : Design / Build / Repair / Restore
Well duh... I mistook that one for something else. Thanks for keeping me in the game, coach.
Barney,
I bought mine from Jerry also when he rolled through Indy with The Woodworking Shows. Heck of a guy. Here is his online website:
http://jerrycarterairtoolsupply.com/About%20US.htmJohn
J.R. Lazaro Builders, Inc.
Indianapolis, In.
jon... i took some pics of the underside.. shows the little trusses i made.. just a top chord & bottom chord, with a plywood gusset on the face
View Image
nailed on the ledger with the roof pitch bevel cut... then nailed on a bottom ledger...
and nailed the mini-trusses to that
View Image
Mike Smith Rhode Island : Design / Build / Repair / Restore
Edited 8/11/2007 9:04 pm ET by MikeSmith
Edited 8/11/2007 9:05 pm ET by MikeSmith
Roy & Chuck got all but one window installed this morning (Saturday )
View Image
here's a typical install... we put our Grace on the sill pan.. install the window & cover the flange with more Grace
View Image
the roofers got the other side of the garage done
View Image
Mike Smith Rhode Island : Design / Build / Repair / Restore
Edited 8/11/2007 9:10 pm ET by MikeSmith
Edited 8/11/2007 9:11 pm ET by MikeSmith
Edited 8/11/2007 9:12 pm ET by MikeSmith
What is your sill pan comprised of? Do you use a copper or PVC pan, or just lap the grace on the sill?
Jon Blakemore RappahannockINC.com Fredericksburg, VA
we use Grace: sill , corners, sidesMike Smith Rhode Island : Design / Build / Repair / Restore
Mike, do you pitch your sill pan?
We used Jam-sill on the last house and had a terrible time with the amount it pushes out the bottom of the windows and doors.
It looks like at least one of those valley shingles is awfully close to the valley line--you ok with that?
I like your big folding sawhorses for staging--
mike... you mean this one ?
View Image
not too worried.. talked my roofer into trying a Stilletto valley... see if'n i can document the deal
sides... i got the whole world keeping an eye on this project.. nothing gets by youse guys
on the sill .. we just use a level subsill and a level pan... we also turn our grace up on the inside.... so far no problems
but i do have a Sliding door we're getting ready to take out and reinstall for the third time... i think that one is some kind of wind pressure problem ( 50 yards from the beach )..... thiking of using an expanding low volume foam as we reinstall it
unless i find evidence of something we just plain missedMike Smith Rhode Island : Design / Build / Repair / Restore
Ooh! I'm excited to try a Stilletto valley on the next one.
What brand is the slider? I'm having trouble with three Marvin patio doors. Something somebody said here makes me think the weep holes are plugged up with grit.
i've got two Andersen sliders.. one used to leak.. we fixed that one
the other one still leaks
it only leaks in storms like this...
View Image
Mike Smith Rhode Island : Design / Build / Repair / Restore
Edited 8/12/2007 10:42 am ET by MikeSmith
I think there's an echo in here....
That the Patriot's Day storm?
Hey, some friends of ours are getting married in Jamestown soon. I told them to say hello to you.
Mike,
Your picture might be a little misleading but about four or five courses up on the through valley, the shingles look a little short. Or is it the ice and water overlaps the shingles? I can't really tell.
Another great photo thread Mike. Keep it up.
Matt
stilletto... this pic ?
View Image
i went back this am.... what we see is a lap of the ice & water over some of the lower valley shingles
anyways.. i explained to my roofer that i wanted to try a new valley called a "Stilletto valley"
needless to say they were rolling their eyeballs.. we decided to try it and we could always rip it out if they didn't like it
Mike Smith Rhode Island : Design / Build / Repair / Restore
anyways... we decided to keep the line 1" out of the valley.. Dan always likes to do 2" at the top & 3" at the bottom.. but i hate the way it looks..
so .. here's the first attempt at a "Stilletto valley"
View Image
and the other valley .. in sequence
View Image
and a longer look
View Image
we're using Certainteed Landmark 50's , with Berger UDL underlayment on this job
View Image
but by 2pm the sun was on this roof and they bailed until tomorrow
Mike Smith Rhode Island : Design / Build / Repair / Restore
Edited 8/13/2007 9:08 pm ET by MikeSmith
Edited 8/13/2007 9:08 pm ET by MikeSmith
Edited 8/13/2007 9:08 pm ET by MikeSmith
Edited 8/13/2007 9:10 pm ET by MikeSmith
Roy & Chuck finished the doors and moved on to strapping the ceiling so we can start partitions... i wanted the insulmesh first to help support the 20" of cellulose we'll put in the attic
View Image
and Ralph and I were doing the final framing for the garage doors
View Image
Mike Smith Rhode Island : Design / Build / Repair / Restore
Edited 8/13/2007 9:13 pm ET by MikeSmith
Edited 8/13/2007 9:13 pm ET by MikeSmith
That's two years in a row that Ralhs been able to help on a house your building. You've got your timing down perfect. LOL
.
"Everything is under control. I'M gonna go make some pies now." Dinosaur 07
http://www.youtube.com/watch?v=JPONTneuaF4
not really... i just wait until Ralph is due ... then i save all the tough jobs for himMike Smith Rhode Island : Design / Build / Repair / Restore
ATTA BOY!
.
"Everything is under control. I'M gonna go make some pies now." Dinosaur 07
http://www.youtube.com/watch?v=JPONTneuaF4
The valley turned out good. Looks just like the ones I do.
What did the roofers say after they had tried it? With 50 yr shingles I would welcome the no cut option.
Matt
the roofers liked it and said they'd be doing it again..
i'll put some pics up of the finishMike Smith Rhode Island : Design / Build / Repair / Restore
Good deal, the few people I have shown it to were skeptical at first too.
Matt
What is the purpose of the full diagonal shingle going up the valley? as shown in this picture. My thought is twofold-no trim the under filler and a straight line.
But I don't like the extra layer/ bulge If you snap a line for the straight and no filler for the under short angle piece. It would give 2 layers with random at the first layer. So 2 at the most. Don't jump me to hard just saying.
View Image
i really like the "no-cut".. most roofers can snap a straight line, but they can't seem to cut one.. and a lot let their hook knives score the layer below
anyways.. here's some more roofing shots... the main valley
View Image
a picture of the pent roof / rake over the kitchen
View Image
and one of the cornice returns
View Image
and one of the trim guys ( Ralph ) working the garage door
View Image
Mike Smith Rhode Island : Design / Build / Repair / Restore
Edited 8/14/2007 8:43 pm ET by MikeSmith
Edited 8/14/2007 8:44 pm ET by MikeSmith
Edited 8/14/2007 8:45 pm ET by MikeSmith
Edited 8/14/2007 8:46 pm ET by MikeSmith
the guys finished the door install yesterday
three ThermaTru steel :
front entry
View Image
garage side
View Image
and patio center swing
View Image
and a view of the inside of the patio door
View Image
Mike Smith Rhode Island : Design / Build / Repair / Restore
Edited 8/14/2007 8:50 pm ET by MikeSmith
Edited 8/14/2007 8:50 pm ET by MikeSmith
Edited 8/14/2007 8:51 pm ET by MikeSmith
Edited 8/14/2007 8:52 pm ET by MikeSmith
Edited 8/14/2007 8:52 pm ET by MikeSmith
The diagonal shingle gives you the straight line up your valley. No cutting and no knives in the valley like Mike said.
I am not concerned with the overlapping side as much as the through side, thats the side that provides the protection. I get a dead straight valley without the risk of an accidental puncture wound.
It does put a small bulge in the roof, it's noticable if you are looking for it. Otherwise you notice how staight the valley line is.
It also gives you a tar line on the bottom of the valley shingle. Which helps in anything backing up under the overlap side.
Matt
Don't get me wrong I like the look of the valley nice and straight and clean and crisp.
But other then the straight edge could you not just use the shingle that would be normally 3rd layer and bulge and use just the top(2nd) shingle if you could get a good straight alignment? eliminating the under diagonal going up the valley. That's just the thought.
Are you talking about snapping a line then running the points of the shingles to that line? Without the valley shingle?
Never tried it so I can't tell you if it works or not.
Mike,
Sorry for the hijack.
Matt
Yep that's what I was thinking, kinda like the only function of the diagonal is to provide the strait edge. Then one less shingle thickness lowering the bulge.
And that's the only visual defect with the original. The bulge Not a big one but you can see it.
I'm sorry, I obviously missed something here. How is this a "no cut" situation when the right side of the roof has clearly been trimmed at the proper angle???
Is the angle pre-cut (prior to nailing) or something???
BTW, I cut most all my shingles with a pair of Wiss V-19's. Haven't bought a hook blade in years. Give 'em a try; the colder it is, the better they cut...just the opposite of a blade.
That valley sure does look great!!!!!!!!!
Live in the solution, not the problem.
Edited 8/21/2007 10:24 pm ET by davidhawks
david.. there is no cut whatsoever
View Image
the minor roof runs thru the valley and turns up the major roof...
you snap a line in the valley ( in this case i chose 1" above the valley ) and lay an whole shingle butt to the line....
then you start your courses with the lower corner just touching the butt line (snap line )... it looks like a cut valley , but it isn'tMike Smith Rhode Island : Design / Build / Repair / Restore
yesterday i started installing the propa-vent for the soffit portion of the vented roof system
here's the Propa-vent extending into the soffit area
View Image
and inside a pic of the 12" energy heel area with the sheathing extending above the plate line as a base for the insulation dam
View Image
the pattern for the insulation dams
View Image
and the finished installation.. the only thing left is to spray gun foam around the gaps..
View Image
eventually we'll have 20" of settled density cellulose in the attic
Mike Smith Rhode Island : Design / Build / Repair / Restore
Edited 8/23/2007 8:18 pm ET by MikeSmith
Edited 8/23/2007 8:18 pm ET by MikeSmith
Edited 8/23/2007 8:18 pm ET by MikeSmith
Edited 8/23/2007 8:19 pm ET by MikeSmith
here's how we typically flash our window with nailing flanges..
we wrap the opening with Ice & water, wrap the sill area, and install the window
View Image
then we install another strip over the nailing flange, and a head piece over the side strips
View Image
the bottom has a strip of releas paper left on so we can tuck our felt underlayment and siding under the sill flash
View Image
the corn is comming along nicely
View Image
Mike Smith Rhode Island : Design / Build / Repair / Restore
Edited 8/23/2007 8:25 pm ET by MikeSmith
Edited 8/23/2007 8:25 pm ET by MikeSmith
Edited 8/23/2007 8:26 pm ET by MikeSmith
Edited 8/23/2007 8:26 pm ET by MikeSmith
we were supposed to get a framing inspection today....but the BI is involved with his daughter's wedding arrangements... PRIORITIES ! next week is soon enough..
Fagan Door arrived right on time to install the 7 x 9 overhead doors
View Image
by mid-afternoon he was done..
View Image
this is the first automatic door openers the Owner has ever has... she's really looking forward to this convenience
View Image
Mike Smith Rhode Island : Design / Build / Repair / Restore
Edited 8/23/2007 8:33 pm ET by MikeSmith
Edited 8/23/2007 8:33 pm ET by MikeSmith
Edited 8/23/2007 8:34 pm ET by MikeSmith
It's amazing how easy those doors go in when you do them every day.
And nothing goes wrong........
Joe H
Hey Mike, if you don't mind me asking. What did those 9x7 run
Just wondering what they were in your area
-Lou
I was looking at your flying project (the way back post of the planes were the metphor of the speed at which you were going on this project) and at first I saw the # you gave on the doors and I was -head scratching and looking and thinking they didn't look 9' and I was thinking-kinda and than I saw a follow up of question on price and 9x7 and ahhh ok.
But here is where I'm trying to think again, and that's a problem sometimes, so let me start off to put the light on this. Not as a criticism or such. I know where on the pecking pole I reach.
But I was looking at the detail of the vent template and thinking about high performance. Bear with me on this. If you look at the point of attachment of the osb template at what looks like maybe a blocking on top of the top plate, it is producing a point at the ceiling and template of almost 0 R. Or the 2x material if it's on the flat then 1.5" of wood is the only R.
So I'm not sure but I think this is correct ? Like you say your heading to 20" of insulation and the wall is blown in and double plates at that top, but at that transition there is only the template and the block. Any way tell me what you think or where I'm missing something.
I can chicken scratch something up in paint but I think you see where I'm looking at the 90 degree ceiling wall transition point and go out at a ? 45 degree angle to the free air.
clay.... we do have a double plate... and a piece of Mooney blocking at the top plate
our dam ( template ) is on the outside at the sheathing line.. from the apex of that point ( the top of the 12" energy heel ) to the outside corner of the heated space is about 13"
13" x R 3.7 = R 48
or , if you use the derated value of the Mooney wall ( R18 ) ( 5" ).... anyways, I don't follow your point... i think you are mis-interpreting the location of the dam...
it is on the OUTSIDE of the wall...not the inside.... check out the following post Mike Smith Rhode Island : Design / Build / Repair / Restore
Roy & Chuck continued putting up the Insul Web and furring the ceiling
View Image
and i started ripping Mooney blocking out of all the old 2x material i could find... we need about 1600 lf. for this job.. started with my 8 1/4" worm.... but the blade was dull so i switched back to my 7 1/4
View Image
got about 1/3 of what we need...
View Image
here's the north wall pretty much done... we'll spot some insulweb in the partition intersection areas
View Image
notice the double row of Mooney block at the bottom to give us nailing for our baseboard
Mike Smith Rhode Island : Design / Build / Repair / Restore
Edited 8/24/2007 6:32 pm ET by MikeSmith
Edited 8/24/2007 6:32 pm ET by MikeSmith
Edited 8/24/2007 6:33 pm ET by MikeSmith
Edited 8/24/2007 6:34 pm ET by MikeSmith
the insulation dams are nailed to the extended sheathing.. so the dams go on the outside of the plate line.... they are cut loose & sloppy on purpose.. so you don't have to fight with them to get them in...
View Image
these look like they are on the warm side of the plate line, but they are not.... they're on the outside of the plate line , nailed to the extended wall sheathing
then the gaps are all filled with gun foam
View Image
the ouside soffit area looks like this....
View Image
and this...
View Image
Mike Smith Rhode Island : Design / Build / Repair / Restore
Edited 8/24/2007 6:41 pm ET by MikeSmith
Edited 8/24/2007 6:42 pm ET by MikeSmith
Edited 8/24/2007 6:42 pm ET by MikeSmith
Edited 8/24/2007 6:43 pm ET by MikeSmith
I just realized that i went all the way to Northfest and forgot to ask you a key question. And now I must ask it in front of everyone and suffer the humiliation.
What, exactly, is a Mooney Wall? I'm sorry Mike, but I have to know.
stay tuned ,Mike...... you're about to find out in spades..
or you could google "Mooney Wall "
or do a search on BT...
or go to this link...
http://forums.taunton.com/tp-breaktime/messages?msg=65624.1
Mike Smith Rhode Island : Design / Build / Repair / Restore
Edited 8/24/2007 11:05 pm ET by MikeSmith
Oh ya Sorry bout that-As I was adjusting my first post cable went out for a couple hours.
This answers it xactly, I was looking at this picture originally and seeing it on the inside but but but. With a little closer look it's obvious.
Thanks for the detailed answer, and yes I was gonna go hunting to look at the other thread but Damn you bill gates struck.
View Image
Why not use the premade cardboard baffles made for such application. You might have still wanted to use foam but the baffs allow for more air, quicker to install and you sure wouldn't have had to cut and mount all those plywood baffles, however I must admit they do look nice but aren't we considering labor cost here? Respectfully, with enclosed eaves and using the baffs with cellulose, I can't justify the foam even on a custom home. Oh well, to each their own!
i saw the composite combo ones you're talking about at a golf outing our insulation distributor hosted
next time we'll probably try them... but they do like like they may have a few problems that will need some field fixesMike Smith Rhode Island : Design / Build / Repair / Restore
I'm referring to perforated cardboard with each designed to fit 16" o.c. or 24" o.c. They ship flat and you fold at perfs to fit attaching with staples. 59 cents each, 25 pkg. As long as installed with enclosed eave they'll last the life of the home. Common in some areas, not so in others. We ship'em all the time.
and just how do you go about getting the "closed eave " ?
ie: we use vents like that but you still need a dam to keep the soffits from filling with insulation
the ones i saw come in two styles... for regular roof framing ( stick or truss)
and for energy heels ( we use a 12" energy heel )Mike Smith Rhode Island : Design / Build / Repair / Restore
My ref. was to enclosed eaves that would protect the baffles from the weather. Again, the baffles are designed to provide ventilation while blocking the insulation from falling into the soffit/eave area.
Mike, in" North wall pretty much done", I don't see any Electric yet..do you Moony -ise before the ele does his stuff?Spheramid Enterprises Architectural Woodworks
"If you want something you've never had, do something you've never done"
no.. we have to leave the Insul Web off until the plumbing & electrical are roughed
we will put some IW in the areas where the partitions intersect the exterior wallMike Smith Rhode Island : Design / Build / Repair / Restore
Sorry for a stupid question, but COULD the ele NOT drill the studs and just staple to the studs face? The 2x2 should be enough space that Sheetrock screws don't get to them?
That would make the ele fast and easy, and no nail plates?Spheramid Enterprises Architectural Woodworks
"If you want something you've never had, do something you've never done"
yeeeesssss.... but there is some other sequence involved also
i need a special box ( side strap to bring it out with the mooney )... and all the wiring has to be in place before we staple 7 glue the meshMike Smith Rhode Island : Design / Build / Repair / Restore
I though I remembered that from adverse thread..DUH, of course the mesh can't be on before wires!
Tell that Ele. to get crackin', you gots pics to post dammit.Spheramid Enterprises Architectural Woodworks
"If you want something you've never had, do something you've never done"
we moved the trailer over from the old job.. so we finally have all our tools back in one location
View Image
Roy trimmed out one of the windows so we can set up our story pole for the siding
to anchor the 2x4 partition plates we're using a 3" ramset with a washer.. but we used a 3/4" plywood pad so we'll only get about 1" of penetration ( always mindful tof the RFH tubing )
View Image
here's another pic of the bottom of the mooney blocking.. we hold the bottom one 3/4" off the subfloor... and an extra one so we'll have nailing for our baseboard
View Image
we got about half of the partitions up today..
View Image
Mike Smith Rhode Island : Design / Build / Repair / Restore
Edited 8/28/2007 8:30 pm ET by MikeSmith
Edited 8/28/2007 8:30 pm ET by MikeSmith
Edited 8/28/2007 8:32 pm ET by MikeSmith
Edited 8/28/2007 8:33 pm ET by MikeSmith
Edited 8/28/2007 8:33 pm ET by MikeSmith
finished the partitions....
View Image
and mounted a block for the electric service
View Image
just in time for the electricians
View Image
also... in this pic you can see the window we added ( CO # 1) ... Ken was complaining about not having a window in his workshop.. and we had a brand new extra window from a previous job
View Image
and we studded the utility room in the garage.. for the 3 HW heaters and the water meter
View Image
Mike Smith Rhode Island : Design / Build / Repair / Restore
Edited 9/3/2007 5:37 pm ET by MikeSmith
Edited 9/3/2007 5:39 pm ET by MikeSmith
Edited 9/3/2007 5:39 pm ET by MikeSmith
Edited 9/3/2007 5:41 pm ET by MikeSmith
Edited 9/3/2007 5:41 pm ET by MikeSmith
we've finished putting the 2x furring on the exterior walls ( step 1 in our Mooney Wall )
next is to install all of the rough-in that goes in the exterior walls.... mostly this means electric devices and bath/shower units...first thing is to reverse the nails in the fiber boxes so they will fasten securely to the 1 1/2" Mooney block
View Image
Chuck is mass producing the electric box / blocks...
View Image
then i cut them off on the chop saw so they will fit in the appropriate bay
View Image
here it is , ready to be nailed up
View Image
and , nailed in place
View Image
Mike Smith Rhode Island : Design / Build / Repair / Restore
Edited 9/3/2007 5:53 pm ET by MikeSmith
Edited 9/3/2007 5:54 pm ET by MikeSmith
Edited 9/3/2007 5:55 pm ET by MikeSmith
Edited 9/3/2007 5:58 pm ET by MikeSmith
Edited 9/3/2007 5:59 pm ET by MikeSmith
Edited 9/3/2007 6:00 pm ET by MikeSmith
next are the 2 wall areas where the 5' shower and the 5' tub/shower will go.. they have to be insulated before we put them in place..we added some Mooney blocking for the top of the units
we stapled and glued our InsulWeb , we're still using Elmer's white glue.....
View Image
then we blew our cells in
View Image
View Image
one last thing for the partitions.... the kitchen/Dining Room wall has a pocket door.. in the past we've thrown away the metal / wood studs that come with the Johnson kit .. framed it with a 2x6 shoe & plate and used flat 2x studs on each side.. but we had a lot of trouble with the studs warping and bowing
now we use the Johnson kit but we cover each side of the wall with a layer of 1/2" plywood... this gives us lot's of areas to help in the installation of kitchen cabinets / grab bars/ elec devices... and it keeps the sheet rock screws another 1/2" aways from our pocket door
View Image
Mike Smith Rhode Island : Design / Build / Repair / Restore
Edited 9/3/2007 6:06 pm ET by MikeSmith
Edited 9/3/2007 6:06 pm ET by MikeSmith
Edited 9/3/2007 6:07 pm ET by MikeSmith
Edited 9/3/2007 6:12 pm ET by MikeSmith
Edited 9/3/2007 6:12 pm ET by MikeSmith
we got all the partitions up and the electrician & plumber have started rough-in..
so Roy & Chuck furred the entry area and put up the rest of the 24" high insulation dams
View Image
i ran the piping & wire for the central vacumn system
View Image
i installed two clean-outs in the piping & used 3 wire for "just-in-case"..
View Image
we mounted the 2 bath fans so we can run the vents
View Image
Mike Smith Rhode Island : Design / Build / Repair / Restore
Edited 9/10/2007 10:46 pm ET by MikeSmith
Edited 9/10/2007 10:46 pm ET by MikeSmith
Edited 9/10/2007 10:47 pm ET by MikeSmith
Edited 9/10/2007 10:47 pm ET by MikeSmith
Edited 9/10/2007 10:48 pm ET by MikeSmith
the attic will get 20" of cellulose... so future access has to be arranged now.. we built a 2' catwalk 24" above the ceiling from one gable end to the other
View Image
we have 2 bath vents and a dryer vent thru the roof....here's the dryer rough-in
View Image
i managed to keep all of the vent boots on the back roof except for the dryer
View Image
and kitchen range hood 6"vent lso went to the rear roof
View Image
Mike Smith Rhode Island : Design / Build / Repair / Restore
Edited 9/10/2007 10:55 pm ET by MikeSmith
Edited 9/10/2007 10:57 pm ET by MikeSmith
Edited 9/10/2007 10:58 pm ET by MikeSmith
Edited 9/10/2007 10:59 pm ET by MikeSmith
trying to make sure we are ready for insulation as soon as the rough-ins are inspected... which means a lot of little details
like bathroom grab bar blocking
View Image
and behind the shower
View Image
since the sink has a disposal, the vent has to go thru the roof.. luckily , most of the pipe wil fit in the 1 1/2" Mooney block area
View Image
the washer rough-in
View Image
today the door salesman came and measured for the interior doors and the plasterer measured for the skim-coat plaster..... maybe we can have it plastered in 2 weeks
we'll see.........
Mike Smith Rhode Island : Design / Build / Repair / Restore
Edited 9/10/2007 11:04 pm ET by MikeSmith
Edited 9/10/2007 11:05 pm ET by MikeSmith
Edited 9/10/2007 11:06 pm ET by MikeSmith
Edited 9/10/2007 11:09 pm ET by MikeSmith
"since the sink has a disposal, the vent has to go thru the roof.."What does a disposal have to do with the way it is vented?And except where air admitance valves are used all vents endup going through the roof.
.
.
A-holes. Hey every group has to have one. And I have been elected to be the one. I should make that my tagline.
well.... i guess you answered your own question...
with no dispose-all the air admittance valve would have been fine.. with the dispose-all the vent has to be 6" above the sink rim....give 'em 6" nd they take a mile.. so.. thru the roof
other than that.. i usually rely on my plumber to be current on his codesMike Smith Rhode Island : Design / Build / Repair / Restore
Heck, that's a beautiful pic right there! Looks like that church in the woods built only of hand-carried lumber.
View Image
Forrest - still wanting to live in sculpture
it doesn't sound like church when guys are up there trying to do something.. more like the 4th circle of hellMike Smith Rhode Island : Design / Build / Repair / Restore
Mike, for your dryer roughin check out http://www.dryerbox.com
just added it to my next " must have " for future use... thanksMike Smith Rhode Island : Design / Build / Repair / Restore
I'll second David's recommendation. The Dryer Boxes are well worth the money.
Jon Blakemore RappahannockINC.com Fredericksburg, VA
Gonna need another one for the plug on an electric dryer.
jt8
"I was gratified to be able to answer promptly.
I said 'I don't know.'"
-- Mark Twain
Edited 9/11/2007 6:05 pm by JohnT8
Looks like that church in the woods built only of hand-carried lumber
They got the pews going the wrong direction.
jt8
"I was gratified to be able to answer promptly.
I said 'I don't know.'"
-- Mark Twain
after we left yesterday the utility company came and hooked up the permanent service
View Image
John says they'll be done with the rough tomorrow and we should be on the schedule for inspection on Thursday
View Image
when the door salesman walks thru, he's getting his information from the description written on the hinge jamb jack... makes it easy to keep track and less confusing when the doors finally arrive
View Image
Mike Smith Rhode Island : Design / Build / Repair / Restore
Edited 9/11/2007 9:08 pm ET by MikeSmith
Edited 9/11/2007 9:11 pm ET by MikeSmith
Edited 9/11/2007 9:12 pm ET by MikeSmith
this is how the A/C unit looks on the interior... we used standard window units and made sleeves out of Azek
View Image
in anticipation of the rough-in approvals i ordered the cellulose.. 240 bales ( 25 lb. )... the truck showed up about 2:30 in the middle of a rain storm
View Image
a lift tailgate and a pallet truck simplified the operation
View Image
Mike Smith Rhode Island : Design / Build / Repair / Restore
Edited 9/11/2007 9:17 pm ET by MikeSmith
Edited 9/11/2007 9:17 pm ET by MikeSmith
Edited 9/11/2007 9:18 pm ET by MikeSmith
Mike,
Why the window AC units and not central air?
John
J.R. Lazaro Builders, Inc.
Indianapolis, In.
Window A/C?
What was the reason for those instead of a split system?Troy Sprout
"A free people ought not only to be armed and disciplined, but they should also have sufficient arms and ammunition to maintain a status of independence from any who might attempt to abuse them, which would include their own government." -- George Washington
tight budget... small cooling loadMike Smith Rhode Island : Design / Build / Repair / Restore
the rain finally came.. must be two weeks or more
View Image
so it was a good time to make up some more Trex sill stock
View Image
part of building this house involved selling some of the land to the abuttor.. and now it was time to move the old fence to the new property line
View Image
but that put my corn on the wrong side of the fence....not to worry..
everyone is taking a lot of pains to protect this stalk
View Image
up close it looks to be indian corn ( maize )
View Image
Mike Smith Rhode Island : Design / Build / Repair / Restore
Edited 9/14/2007 11:28 pm ET by MikeSmith
Edited 9/14/2007 11:28 pm ET by MikeSmith
Edited 9/14/2007 11:30 pm ET by MikeSmith
Edited 9/14/2007 11:30 pm ET by MikeSmith
Edited 9/14/2007 11:31 pm ET by MikeSmith
the town arrived this morning to install the water line..right off the bat they hit ledge
View Image
so they got another backhoe with a hydraulic ram and went back to work
View Image
by the end of the day.. we had our new service.. so we'll have water for the plasterers
View Image
and all that rock ended up in the back of my truck for my stone wall
View Image
Mike Smith Rhode Island : Design / Build / Repair / Restore
Edited 9/14/2007 11:39 pm ET by MikeSmith
Edited 9/14/2007 11:39 pm ET by MikeSmith
Edited 9/14/2007 11:39 pm ET by MikeSmith
Edited 9/14/2007 11:40 pm ET by MikeSmith
while the guys are inside getting ready for blowing cells.. i was scratching my head figuring out the coursing for the Hardie.... we want to hit the bottom of the window sill & the top of the window casing.. at least on the front
View Image
i set up the story pole ( with only a few extra lines ).. you can see the red reference line with the diamond that we snap all the way around the house and use to orient our story pole
View Image
and i ripped the starter strip for the bottom course our of some old PT we salvaged from another job
View Image
i used the Malco shears to cut my pieces for the mockup.. they fit on any drill...
View Image
right at lunch time the Hardie arrived in three pallets.... the portable forklift managed to place them on the two corners so we won't have to hump it too far
View Image
Mike Smith Rhode Island : Design / Build / Repair / Restore
Edited 9/14/2007 11:48 pm ET by MikeSmith
Edited 9/14/2007 11:49 pm ET by MikeSmith
Edited 9/14/2007 11:50 pm ET by MikeSmith
Edited 9/14/2007 11:51 pm ET by MikeSmith
Edited 9/14/2007 11:53 pm ET by MikeSmith
ripping that starter strip makes quite a mess
View Image
meanwhile.. we got our rough inspections. so we could proceed with the insulation..
first step ... stapling up the rest of the Insulweb.... on the inside corners we use a temporary corner board to hold the corners until the gypsum is installed
View Image
View Image
and then all of the Insulweb has to be glued so the cells can't get between the fabric and the mooney strips.. a 2" roller and Elmer's white glue are our choice
View Image
the glue will dry overnite and tomorrow ( Saturday ) we can start blowing the walls
Mike Smith Rhode Island : Design / Build / Repair / Restore
Edited 9/15/2007 12:00 am ET by MikeSmith
Edited 9/15/2007 12:01 am ET by MikeSmith
Edited 9/15/2007 12:03 am ET by MikeSmith
Edited 9/15/2007 12:04 am ET by MikeSmith
Edited 9/15/2007 12:05 am ET by MikeSmith
about 4 years ago.. i had a guy ( named Shope ) working for us who made a box.. it was a crude box.. but it was just the right size for standing on and putting planks on for working on 8' ceilings.. anyways.. we kept it until the last job and a backhoe ate it
here are the replacements . i made 3 of them this time and i modified one dimension so you could pass the box thru a stud bay.. these are made from 5/8 Advantech
14" wide
View Image
and 16" high
View Image
and 24" long.... inside some corner reinforcement
View Image
Mike Smith Rhode Island : Design / Build / Repair / Restore
Edited 9/15/2007 12:11 am ET by MikeSmith
Edited 9/15/2007 12:13 am ET by MikeSmith
Edited 9/15/2007 12:14 am ET by MikeSmith
Mike,
I really enjoy your posts here. Great work. I keep wondering how this journalist type guy picked up all these construction skills???
Anyway, I was wondering, if you weren't doing the mooney wall, what would be your next choice for a insulation system ( in the same RI coastal climate).
Thanks, Harry
well.. i do like the thermal break.. the spray on foams are great but they don't address the thermal break problem
i guess if i were trying to IMPROVE the R-value i'd do a mooney wall and change the cells to spray foam.. but i'd have to look at the pro's & con't a lot more
run some heat loss calcs and see where the losses areMike Smith Rhode Island : Design / Build / Repair / Restore
"I keep wondering how this journalist type guy picked up all these construction skills???"
prison work release.
don't laugh ...
your tax dollars paid for his digital cam and laptop.
Jeff Buck Construction
Artistry In Carpentry
Pittsburgh Pa
Sam came & installed his manifolds for the RFH
View Image
and Roy finished blowing the walls... here's the 1 1/2" nozzle we use
View Image
and the nozzle in action
View Image
tomorrow we should finish blowing the attic... 20" so figure settled to 18"
Mike Smith Rhode Island : Design / Build / Repair / Restore
Edited 9/17/2007 10:16 pm ET by MikeSmith
Edited 9/17/2007 10:17 pm ET by MikeSmith
Edited 9/17/2007 10:18 pm ET by MikeSmith
Mike,
How much settelling do you get with the blown in insulation?
ThanksBarney
in the walls, none.. we blow it at a density above it's settled density rate
in the attic we're blowing 20" and expect the settled depth to eventually be 18" ( with an R-value between 65 & 70 )Mike Smith Rhode Island : Design / Build / Repair / Restore
Thanks Mike for getting back to me. I'm looking at adding the insulation in my existing house and was concerned that it would settle at the bottom of the walls and would not be effective.
Appreciate the answer as well as all of our posts.
ThanksBarney
the last walls were the utility room in the garage
View Image
while the guys were blowing the attic..
View Image
to keep control of the depth in the attic we buy these cardboard rulers and staple them to the trusses all ove the attic.. here we're blowing 20" depth
View Image
notice that the rulers are calibrated for Certainteed Fiberglass insulation... 20" is not quite R-55 or so... but with the cellulose we're blowing the R-value will be closer to R-70
while they were blowing the attic i started forming the front walk
View Image
Mike Smith Rhode Island : Design / Build / Repair / Restore
Edited 9/19/2007 9:06 pm ET by MikeSmith
Edited 9/19/2007 9:07 pm ET by MikeSmith
Edited 9/19/2007 9:09 pm ET by MikeSmith
Edited 9/19/2007 9:12 pm ET by MikeSmith
here's the blower we use.. an old US Fiber machine with a Hurricane blower
View Image
yesterday they ran out of cellulose, so this morning i went to Insul Mart for another pallet ( 40 bales of 25 lb. each )
View Image
Mike Smith Rhode Island : Design / Build / Repair / Restore
Edited 9/19/2007 9:27 pm ET by MikeSmith
Edited 9/19/2007 9:28 pm ET by MikeSmith
Edited 9/19/2007 9:29 pm ET by MikeSmith
Edited 9/19/2007 9:29 pm ET by MikeSmith
and Roy & Chuck continued with the formwork
i got back about 11 to help after we unloaded the cellulose
and at noon the concrete truck arrived with a short pour ( 2 cy. )
View Image
Mike Smith Rhode Island : Design / Build / Repair / Restore
Edited 9/19/2007 9:34 pm ET by MikeSmith
Mike,
If you don't mind, what kind of pricing are you seeing in your area for bales? Not asking you to divulge any special pricing you may receive.
ThanksBarney
i think i'm paying $8 for a 25 lb. bale
these are 100% borates.. none of the urea -formaldihyde ( sic ? ) most of the cheaper cellulose mfr's use
259 bales in this job.. including 53 in the wallsMike Smith Rhode Island : Design / Build / Repair / Restore
Mike, how far will the blower shoot the fluff? I have a hard spot to get to, would need to 'shoot' about 10'-15' ...I was thinking cels, if I can get it there.Spheramid Enterprises Architectural Woodworks
"If you want something you've never had, do something you've never done"
you really want to keep it blowing about 4' - 5' or you get too much dust
if you want to blow it 15' away.. just tape some plastic pipe on and push the pipe into the area
or..
forget the pipe.. just tape the hose to a stick and push the hose into the area
Mike Smith Rhode Island : Design / Build / Repair / Restore
Edited 9/20/2007 7:49 pm ET by MikeSmith
Cool. Just what I needed to hear..fixing to get the blower from Lowes, if Iget the insul from them. Bad dead area upstairs between new and old shared attic space..impossible to crawl into.Spheramid Enterprises Architectural Woodworks
"If you want something you've never had, do something you've never done"
As always, thank you for sharing. My wife and I are in the beginning planning stages of an addition to our house.
We are going to add a master bedroom/bath/walk-in closet, additional space on the kitchen below, office area, laundry room. Just trying to get some ideas about what to do and what to add/subtract.
Your posts are always great to read and very helpful.
ThanksBarney
Maybe a dumb question but where do you get those rulers?
probably any insulation distributor... mine is Insul Mart
http://maps.google.com/maps?hl=en&um=1&ie=UTF-8&q=insul+mart&near=Swansea,+MA&fb=1&view=text&latlng=41805793,-71332708,8939144419379533032Mike Smith Rhode Island : Design / Build / Repair / Restore
I figured it was a dumb question (I guess maybe some actually are). I get mine at Lowes. I dont suppose they would carry something like that.
You could make your own out of a cardboard box. Cut strips, mark your depth needed with heavy red marker.
Quantum materiae materietur marmota monax si marmota monax materiam possit materiari?
You mean do some work?! :>)
Well, ask the magic genie who is blowin the cells to mark up some cardboard strips too.
Quantum materiae materietur marmota monax si marmota monax materiam possit materiari?
lessee..... front walk..... short list of things i wanted to do before they delivered the blueboard
here's the grate drain that will take the driveway runoff
View Image
and the walk is stripped... ready to be covered with poly to help the concrete cure
View Image
final cleanup
View Image
Roy is gunning around the windows with low-expansion foam
View Image
i went to get a roll of sticky plastic sheeting we use to protect things like shower stalls.. seems a garter snake tried to crawl across it and couldn't get loose.. this is his mummified remains
View Image
Mike Smith Rhode Island : Design / Build / Repair / Restore
Edited 9/23/2007 8:33 pm ET by MikeSmith
Edited 9/23/2007 8:34 pm ET by MikeSmith
Edited 9/23/2007 8:34 pm ET by MikeSmith
Edited 9/23/2007 8:35 pm ET by MikeSmith
Edited 9/23/2007 8:36 pm ET by MikeSmith
Edited 9/23/2007 8:37 pm ET by MikeSmith
Edited 9/23/2007 10:37 pm ET by MikeSmith
right on time Friday AM the boom truck showed up with our blueboard & plaster
View Image
even with 1-story houses the delivery guys still prefer bringing it thru the windows to the respective rooms.. these are all 12' sheets
View Image
still takes 2 strong guys to hump double sheets
View Image
stacks all over the house
View Image
and the plaster ( Diamond ) and a couple rolls of 15 lb. felt to protect the floors
View Image
Mike Smith Rhode Island : Design / Build / Repair / Restore
Edited 9/23/2007 8:59 pm ET by MikeSmith
Edited 9/23/2007 9:00 pm ET by MikeSmith
Edited 9/23/2007 9:01 pm ET by MikeSmith
Edited 9/23/2007 9:02 pm ET by MikeSmith
Edited 9/23/2007 9:03 pm ET by MikeSmith
Only in southern New England would a "budget" job get blueboard and skim coat.
(I read a bit about those autumn olives...don't have any right here, but I'll look for them.)
yes.... skim-coat arrived in RI from Connecticut in the early '80's.. now it's almost impossible to find drywall guys except in commercial workMike Smith Rhode Island : Design / Build / Repair / Restore
so we move outside until the plasterer's are done next week..
first is to nail the 3/8" x 1 1/2" PT starter strip i ripped last week.. we use SS nails for this in our coil guns
View Image
then the 15 lb. felt goes over the starter strip
View Image
here's a close up of the corner board / Grace ice & water / felt
View Image
any place we have to keep the siding up ( decks, roofs, patios, etc ) we like to run a piece of black aluminum coil stock.. so the viewer will see BLACK to give a shadow detail... one of my pet peeves is seeing bright aluminum peeking out all over new work
View Image
Mike Smith Rhode Island : Design / Build / Repair / Restore
Edited 9/23/2007 9:10 pm ET by MikeSmith
Edited 9/23/2007 9:12 pm ET by MikeSmith
Edited 9/23/2007 9:13 pm ET by MikeSmith
Edited 9/23/2007 9:15 pm ET by MikeSmith
Edited 9/23/2007 9:21 pm ET by MikeSmith
all our splice joints get a painted coil stock spline .. with a little 1/4 bend so it will hang in place
View Image
i laid out the coursing to hit the bottom of the sills and the top of the casings on the front windows ( the "hollywood side " )
so .. under the sills we have a strip about 1" wide
View Image
these strips get caulked in place with some of the Geo-Cell colored caulk.. i jamb a straight edge under them to keep them in alignment with the adjoining pieces
View Image
here's the jamb stick holding the straight edge against the Hardie strip
you can also see the new walk covered with poly and some loose gravel to hold it down for curing
View Image
Mike Smith Rhode Island : Design / Build / Repair / Restore
Edited 9/23/2007 9:22 pm ET by MikeSmith
Edited 9/23/2007 9:23 pm ET by MikeSmith
Edited 9/23/2007 9:25 pm ET by MikeSmith
Edited 9/23/2007 9:26 pm ET by MikeSmith
we worked Saturday to try to keep up with the schedule (? ) and keep things moving along
some more siding
View Image
and Sam was working on the heat.. i told him i want the heat on when they start plastering
View Image
remember the catwalk in the attic ?
View Image
well this is what it looks like with 20" of cellulose blown in place
View Image
Mike Smith Rhode Island : Design / Build / Repair / Restore
Edited 9/23/2007 9:32 pm ET by MikeSmith
Edited 9/23/2007 9:33 pm ET by MikeSmith
Edited 9/23/2007 9:33 pm ET by MikeSmith
Edited 9/23/2007 9:34 pm ET by MikeSmith
Mike,
This is THE best whole house photo series I have seen.
John B
Yeah, but that attic catwalk photo was beautiful and light before. Now it's dark and lumpy.
Forrest
i 'm contemplating putting in floating seats adjacent to the runway
with the right lighting i think i could rent the catwalk to Vogue for their Spring CollectionMike Smith Rhode Island : Design / Build / Repair / Restore
Mike is that the sticky plastic the same as the carpet sheild we use or is it something different?
If it's carpet sheild I never though of using it for anything but carpet, we use a lot of 6 mill and 1 mill plastic for site protection, I'm also partial to rolls of single faced corragated cardboard & double sided 4x8 sheets...
If it's something different from carpet sheild, can you give me a link?
I'm BIG on site protection, we spend a fair amount of money on it, but clean up & "whoops" cost are down.
Edit, Glue down floor...... NEVER AGAIN
Edited 10/11/2007 11:46 pm ET by CAGIV
no... not plastic ... YET .... it was just the light on the tile
we will put down red rosin paper & tape the seams .. use the cardboard from the cabinets over that and drop cloths over that
now... you gonna leave us hanging on the "glue down- never again ! " ????Mike Smith Rhode Island : Design / Build / Repair / Restore
I hate glue down flooring, glue down vinyl or VCT is one thing, a glue down strip floor.
Nadda, no way Jose....
We did a job with a glue down last year or so, one of those,
"sure we can do that kind of things" for a client.
deal was her husband was a purchase agent for a shoe retailer, so he had access to a bunch of this stuff that the company had already and was no longer going to use for a real good price.
Anyway the local flooring companies are real hesitant to install something they do not sell so that's where we came in. I blew the labor estimate and it was fixed price contract, so the company took it in the shorts.
Worse then that, I was all caught up in the office and not a lot going on that week so I jumped into help, Now the application itself wasn't horrible, but the mess and BS with the glue was enough to make we want to either cry or hit something.
We did the whole first floor and second floor hallway, probably around 1800 sqft.
The product itself was #### to begin with which made the whole deal worse b/c the T&G's didn't always line up correctly so we were constantly taking out a "bad" piece and having to replace it with a new one, which made the mess worse. I had glue on my hands and arms for a week after, what ever the glue was, it was stronger then any other floor glue I've seen.
plus they had a dog, and at least one, maybe two cats, who didn't seem to want to stay contained. On one occasion the dog broke loose, ran over a section of flooring, knocking it all to heck and then proceeded to run across the new section of glue we had just placed..... Think about holding down a 80lb dog and trying to clean his paws....
Not quite as bad marty's blue poodle story I imagine, but all the same, I'll never glue down a strip floor again.....ever....
In reality it probably wasn't all that bad, there's just some things I've learned are best left to others.
Thank you. Been there myself ONCE. Never again. I thought it was just me being an idiot.Spheramid Enterprises Architectural Woodworks
"If you want something you've never had, do something you've never done"
I'm sure while we both have our idiot moments, we have the market far from cornered lol.
I'l sell my corner in that market..cheap.
I too "feel" that hollow on a floater, but ...man, the clamps I got ( truckers straps) are still goobered with f**ing glue..never again..nope.Spheramid Enterprises Architectural Woodworks
"If you want something you've never had, do something you've never done"
well.. in this case the choices were "floating floor" Kahr's (5/8" )
or a "glue down " Mannington " Jamestown Winchester ( 3/8" )
i hate floating floors and all their complications with edge trim
and i was not reassured that a floating floor was a good choice for RFH
anyways.. .... job went real smooth.. Mike has all the right tools and lot's of experience
the glue-down feels like a real traditional oak floor.. the floating floors always sound and feel like they're ,well, .... floatingMike Smith Rhode Island : Design / Build / Repair / Restore
I'm not a big fan of floating floors myself so I understand the neccessity of the glue down.
I'm sure your guy Mike could have had half the problems we had.
I've been buying from these guys for probably about 15 years. Their Carpet Protect and hardwood runners are great.
http://protectiveproducts.com/John
J.R. Lazaro Builders, Inc.
Indianapolis, In.
painters are inside ... all over
Roy & Chuck are installing the kitchen..... north wall
View Image
and south wall
View Image
and a view from the Dining Room thru the kitchen pocket door
View Image
Mike Smith Rhode Island : Design / Build / Repair / Restore
Edited 10/15/2007 5:48 pm ET by MikeSmith
Edited 10/15/2007 5:49 pm ET by MikeSmith
Edited 10/15/2007 5:49 pm ET by MikeSmith
i finished the siding on the set-back gable
View Image
so now the front looks like this
View Image
Mike Smith Rhode Island : Design / Build / Repair / Restore
Edited 10/15/2007 5:50 pm ET by MikeSmith
Edited 10/15/2007 5:50 pm ET by MikeSmith
Your dehumidifier needs a Mike Smith sticker.
Nice thread Mike.
Looking forward to JLC allready![email protected]
is that a vent above the cabinet for the range hood? what are your plans for that?
Chuck made a box for it out of some of the 12" shelving the cabinet company sent...
we usually hide it in the soffit.. but i don't want a soffit on this job..
i'll show you a pic when we get the crown mold onMike Smith Rhode Island : Design / Build / Repair / Restore
we're using a laminate backsplash so that has to go on first before the final placement of the wall cabinets
View Image
here's the Advantech counter... strips of 3/4 glued to the 3/4 top for a 1 1/2" total
View Image
the toe kicks are just open holes... so...
we glued and pinned 2x6 solid blocking to mount our toe-kicks to
View Image
we use a lot of BLACK in our designs.. like our roof flashings..
for the toe kicks we use 1/4" luan painted flat black.. here's the 4 1/2" luan strips with a coat of oil primer..
View Image
the counter edge will be 1x2 red oak ( 3/4" x 1 1/2" ) with a rounded over bottom..
I pickled the oak with an exterior latex ( Navajo White.. the same as the trim )..
and, so far, one coat of satin poly
View Image
Mike Smith Rhode Island : Design / Build / Repair / Restore
Edited 10/17/2007 9:32 pm ET by MikeSmith
Edited 10/17/2007 9:33 pm ET by MikeSmith
Edited 10/17/2007 9:35 pm ET by MikeSmith
Edited 10/17/2007 9:38 pm ET by MikeSmith
Edited 10/17/2007 9:39 pm ET by MikeSmith
By the term "pickled", you just mean a transparent white stain, right?? Also, when you say you pinned the 2x6 for the toe kicks, did you use the Grex?
Dustin
Grex & the Gorilla glue
and the pickled finish was one coat of exterior soaked in , then wiped off... followed by several coats of exterior polyMike Smith Rhode Island : Design / Build / Repair / Restore
the gutter guy arrived in a rain storm.. the "eggshell" turns out to be a perfect match for our fascia trim ( navaho white )
View Image
he also left us some of his 2007 calendars... better late than never !
View Image
we used a laminate edge on the inside of the stove area
View Image
and put a 1/8" chamfer on the pickled oak..... here the nail holes & edge have a coat of navaho white before it gets wiped again
View Image
Mike Smith Rhode Island : Design / Build / Repair / Restore
Edited 10/23/2007 8:17 pm ET by MikeSmith
Edited 10/23/2007 8:18 pm ET by MikeSmith
Edited 10/23/2007 8:19 pm ET by MikeSmith
Edited 10/23/2007 8:20 pm ET by MikeSmith
finished the cabinet install.. and the counters..
ran the ductwork for the microwave /hood..
View Image
and Roy is running the crown... and he's using my new favorite toy.. the Grex pinner
View Image
Brad and Niles came today and installed the sink, DW & Ref. ice maker line
View Image
View Image
Mike Smith Rhode Island : Design / Build / Repair / Restore
Edited 10/23/2007 8:27 pm ET by MikeSmith
Edited 10/23/2007 8:27 pm ET by MikeSmith
Edited 10/23/2007 8:28 pm ET by MikeSmith
Edited 10/23/2007 8:29 pm ET by MikeSmith
Edited 10/23/2007 8:29 pm ET by MikeSmith
here's the washer / dryer.. but one of the pantry cabinets was damaged so ...
View Image
and the grab bars and towel racks are all in
View Image
View Image
Mike Smith Rhode Island : Design / Build / Repair / Restore
Edited 10/23/2007 8:33 pm ET by MikeSmith
Edited 10/23/2007 8:34 pm ET by MikeSmith
Edited 10/23/2007 8:34 pm ET by MikeSmith
Mike is that toilet alcove 36"? Was that the optimum size for use, or just the size that fit the space?
jt8
"God is a comedian playing to an audience too afraid to laugh." --Voltaire
john ... i was looking for optimum in handicap planning.. i laid it out for 36" ... i'll take a tape and see what we gotMike Smith Rhode Island : Design / Build / Repair / Restore
john.... i didn't need a tape.. the tile is 12"... so...here's the toilet alcove
View Image
and the turning radius between the shower and the vanity... in front of the toilet
View Image
the movers arrived at 9 am...... the old house is in back of the new house.. so everything came out the old back door
View Image
across the lot ... up the 40" sidewalk we built for them...
and in the new back door
View Image
Mike Smith Rhode Island : Design / Build / Repair / Restore
Edited 10/26/2007 9:11 pm ET by MikeSmith
Edited 10/26/2007 9:11 pm ET by MikeSmith
Edited 10/26/2007 9:13 pm ET by MikeSmith
Edited 10/26/2007 9:14 pm ET by MikeSmith
everything got moved in about 5 hours...
kitchen
View Image
kitchen table
View Image
Dining Room
View Image
Living Room
View Image
Mike Smith Rhode Island : Design / Build / Repair / Restore
Edited 10/26/2007 9:18 pm ET by MikeSmith
Edited 10/26/2007 9:19 pm ET by MikeSmith
Edited 10/26/2007 9:20 pm ET by MikeSmith
Edited 10/26/2007 9:20 pm ET by MikeSmith
Front entry hall
View Image
Bedrooms
View Image
and the car is in the garage
View Image
Roy & Chuck went on with the siding
View Image
while I was taking care of things like.. the hot water heating element that got burned out before we filled the tank..... or the shelves in the laundry
Mike Smith Rhode Island : Design / Build / Repair / Restore
Edited 10/26/2007 9:26 pm ET by MikeSmith
Edited 10/26/2007 9:27 pm ET by MikeSmith
Edited 10/26/2007 9:29 pm ET by MikeSmith
Edited 10/26/2007 9:31 pm ET by MikeSmith
Have you already gotten your final inspection and CO? I don't think we could get our final inspection with siding missing and I know moving the Owner's belongings in will draw the ire of the inspector.
Jon Blakemore RappahannockINC.com Fredericksburg, VA
yeah.... small town... the BI, Fire Marshall, & Elec Insp. were all here yesterday....
he won't issue a CO until we're done.... but everything is cool
Mike Smith Rhode Island : Design / Build / Repair / Restore
Edited 10/27/2007 7:06 am ET by MikeSmith
Out here we would just need a kitchen sink, some form of countertops (plywood subtop would qualify), one toilet installed, maybe a couple of other minor items... but this is a county with a separate owner/builder permit process that lets you build almost anything as long as it's on your land.
here's the inside of the microwave cabinet...
View Image
Mike Smith Rhode Island : Design / Build / Repair / Restore
Edited 10/25/2007 11:22 pm ET by MikeSmith
all the touch-up painting is done...
all the windows, tubs & floors are cleaned...
View Image
kitchen has all it's appliances & handles... got an early arrival... rug & sofa
View Image
the closets have all their shelves
View Image
the A/C units have their winter insulated covers
View Image
the inside is ready for the movers tomorrow... hopefully , the Owner will be sleeping in her new house tomorrow nite
Mike Smith Rhode Island : Design / Build / Repair / Restore
Edited 10/25/2007 11:27 pm ET by MikeSmith
Edited 10/25/2007 11:28 pm ET by MikeSmith
Edited 10/25/2007 11:29 pm ET by MikeSmith
Edited 10/25/2007 11:30 pm ET by MikeSmith
Mike, are you using ADA standards? I understand doing the best you can w/ what you have to work with, but I thought that all doors had to be 36" with a 60" diameter of clear floor in a bathroom.
Maybe I'm wrong, been awhile
This is a great looking house by the way and I appreciate the updates here
sarison... my understanding is ADA calls for 32" clear... so all the doors have to be 34".. which these are
our standard door has been 2' - 10" for quite some time now
and the master bath has a 5' turning radius.. with the 36" toilet alcoveMike Smith Rhode Island : Design / Build / Repair / Restore
You all do nice work.
>> my understanding is ADA calls for 32" clear... so all the doors have to be 34".. which these are
our standard door has been 2' - 10" for quite some time now
and the master bath has a 5' turning radius.. with the 36" toilet alcove <<
32" clear is what is required here too but for ADA projects we use 3-0 doors because 2-10 is special order. Are they special order for you?
Our ADA specs don't allow the toilet to be in an alcove like that. One side has to be open and there are 2 grab bars - one on the back wall and one on a side wall. Look at this link for an example. We are given almost zero variance with respect to the positioning of the toilet and grab bars.
Also, our ADA bathrooms have to have a roll-under vanity.
I'm guessing your project isn't actually going to be inspected for accessibility. I'd rate your project as reasonably accessible though but I'm not disabled... I once had a 3rd party disabled person go in and give me feed back on one of our accessible apartment units. It was interesting to hear it from his perspective rather than just some state inspector.
I just finished up a presale house for this guy. It is a 1 story similar to your project here in this thread. At the final walkthrough he shows up with his wife who, although not in a wheelchair was not far from it. I had not met her before. I was shocked and felt sorry that the guy didn't tell me about this. I could have made some modifications to the house for very little $s that would have made her life easier.
no , this is not ADA.. i just designed it to be easily adaptable
2/10 doors ( interior ) are easy to come by here and since they give the clear passage , we much prefer them to 3/0
the Owner is no spring chicken , but she is in good health and does not use a walker or a wheelchair
the only barriers are a 4" rise from the walk to the entry.. and a 5 " rise from the entry thru the front door
and a 6" rise from the garage to the kitchen entry
the halls are 42" minimum..
all-in-all.. it's what i would have designed for us as a retirement homeMike Smith Rhode Island : Design / Build / Repair / Restore
I just sat through all 280+ posts in one sitting.Excellent pics, great techniques, great descriptions.Nice!Mongo
thanks....
meanwhile back at the ranch..
Chuck & Roy finished the back and the North gable end
View Image
here's a pic showing the retaining wall that Randy built with the on-site rocks... in both these pics you can see dull spots on the siding.. that's from cleaning the caulk joints with mineral spirits.. that will disappear in a couple days
View Image
anyways , Chuck left for a week in Orlando, so i got drafted as the #2 man on the siding crew..
so Friday morning we moved around to the last side the garage / kitchen end
View Image
here's my weapon of choice for cutting ... a Malco shear mounted on my Panasonic lithium drill
View Image
Mike Smith Rhode Island : Design / Build / Repair / Restore
Edited 11/3/2007 9:17 pm ET by MikeSmith
Edited 11/3/2007 9:17 pm ET by MikeSmith
Edited 11/3/2007 9:18 pm ET by MikeSmith
Edited 11/3/2007 9:18 pm ET by MikeSmith
Edited 11/3/2007 9:22 pm ET by MikeSmith
this first part has a lot of fitting .. so the progress is slow...
all the cutting is done from the back , which leaves a nice clean edge on the front
View Image
we mark all stud locations on the felt so we know where we want to place our nail.. you can also see the blue chalk line we snap on each course for the bottom edge
View Image
here, we're fitting around one of the A/C sleeves... as with all the trim, we leave a 1/8" gap for caulk
View Image
here's a long shot of the A/C
View Image
Mike Smith Rhode Island : Design / Build / Repair / Restore
Edited 11/3/2007 9:23 pm ET by MikeSmith
Edited 11/3/2007 9:25 pm ET by MikeSmith
Edited 11/3/2007 9:26 pm ET by MikeSmith
Edited 11/3/2007 9:27 pm ET by MikeSmith
for guns we need something that will drive a 1 3/4" Hot-dipped galvanized roofer...since we blind nail all our FC
so far my Bostich roofers won't do it on a consistent basis.. so i bought a Max.. and it works great ... we still prefer the Bostich for regular roofing.. but this is our tool of choice for the FC siding.. you can see the aluminum spline we insert at each joint in this pic
View Image
the only place i've been able to find Hot-dipped galv. roofers is from Maize.. and not all guns will hold a 1 3/4", never mind shoot it flush thru FC and into a stud
View Image
every couple of courses we'll check our chalk line for level with a 6' level
View Image
for face nail situations we need a strong SS nail.... our siding guns ( Bostich cn66) don't always drive .. sometimes they bend
this gun uses a larger shank nail and it's got a lot more force
View Image
Mike Smith Rhode Island : Design / Build / Repair / Restore
Edited 11/3/2007 9:33 pm ET by MikeSmith
Edited 11/3/2007 9:35 pm ET by MikeSmith
Edited 11/3/2007 9:36 pm ET by MikeSmith
Edited 11/3/2007 9:38 pm ET by MikeSmith
that AL spline, do you make those or can they be bought pre-fabbed?
we make a batch from 8" strips on our brake.. then cut them upMike Smith Rhode Island : Design / Build / Repair / Restore
here's the break flash over the extended roof return ( pent roof ? )
we make this flashing from 8" strips we slit off a 24" coil (bought a brake from a homeowner once, and he threw the slitter in for free )...... the starter strip for this course is that 3/16 x 1.5" pt i ripped from those old pt rails we salvaged from our last job
View Image
here's the soffit detail at one of the rake / cornice intersections.. the soffit is Alcoa ProBead (3/8" ) the outside is the Alcoa ProBead F-channel ( 5/8" ) and the inside is a genneric 5/8" J-mold that the FC goes up iinside
View Image
and a shot of the blind nail / end joint gap
View Image
Friday afternoon we secured the site for the remnants of Hurricane Noel ( should be 55 mph gusts .. not too bad )
View Image
Mike Smith Rhode Island : Design / Build / Repair / Restore
Edited 11/3/2007 9:55 pm ET by MikeSmith
Edited 11/3/2007 9:59 pm ET by MikeSmith
Edited 11/3/2007 10:00 pm ET by MikeSmith
Edited 11/3/2007 10:01 pm ET by MikeSmith
Mike, do you find the Max nailer hard to "aim"? We used to use them for shooting Miratec on, but man, I always had the hardest time getting two side by side nails to line up. Of course, I was the only one who ever noticed....
no.. but we're talking about the Max roofer, right ?
for Miratech we use the Hitachi and those SS nailsMike Smith Rhode Island : Design / Build / Repair / Restore
No, I guess it was a Max siding nailer since the nails were pretty long, I want to say we used 2.5" for the Miratech, with Maize nails. Hated my ability to not be able to aim precisely. In any case, it's been a few years since I've installed any siding.
Mike,
A few questions concerning tools. Do you like the Malco shears better than a dedicated tool? Also why use the roofers for nailing the siding vs. the siding nails? We used the Maize galvies before and had issues with the guns jamming. Also the Maize nails were not available locally. I had to special order them from Maize. I ended up buying a Bostitch coil siding nailer after those ran out and no complaints yet. Just curious since you were using a siding nailer and a roofer. BTW I enjoyed following your thread and appreciate your attention to detail.
Thanks,John
J.R. Lazaro Builders, Inc.
Indianapolis, In.
the Malco shears fit on any drill... corded or battery.. i've never used any other shears on FC.. but these work so great and they go on or off a drill in about 30 seconds... i see no reason to buy dedicated ones
we have two Malcos
as for the guns.. couple things made my decision.. first we blind nail as much as possible.. we get good clamping action with a roofing nail and almost never get an overdrive.. with siding nails we don't get the same action.. so far we used 6 1/4 FC at 4" exposure ( 1670 colonial ), we've used 5 1/4 at 4" exposure... and mostly we've used the 7 1/4 at 6 " exposure... i wouldn't want to do any siding with an exposure greater than 6"... so the blind nailing works for us
2d... i think FC is going to last forever.. there are lots of houses around here that have the old asbestos cement siding... not as good a product .. not as attractive.. breaks easily.. but it sure holds paint.. and it is going to last until somebody gets sick of it
FC is going to be the same .. only it will always be attractive.. like the wood clapboards it is emulating
so....... if the FC is going to last forever, then the fasteners should last just as long.. doing business in coastal RI since the '60's .... i trust only two things... (well 4... if you include copper & bronze )... and that is SS & Hot-dipped galvanize
the specs i've seen call for a 1 3/4 roofer... and we want HDG so that leaves only Maize.. i think by this time we've shot our 4th job with Maize HDG roofers.. and the Max gun drives them fine... i'd guess we get one misfire a day... usually a broken wire on a coil
so the Max & Maize HDG for our blind nail...
and the Hitachi & SS thick shank nails for any face nail we do.... we use the same nail & gun for our Miratech trim too
hope that makes it clearer than mud
hey, you wouldn't be a Colt's fan , would you ?Mike Smith Rhode Island : Design / Build / Repair / Restore
Mike,
Clear as mud. Thanks. I agree with your observation on the Malco. I may have to look into a set. We typically use the 8-1/4" Certainteed FC. It's the first FC we used and liked it. We still have a bunch of western red cedar to get rid of somehow. I really like the FC and agree that it is here to stay. We don't have the coastal considerations like you but want to use a nail that lasts as long as the siding.
Sure am a Colts fan....you wouldn't happen to be a Patriots fan?
John
J.R. Lazaro Builders, Inc.
Indianapolis, In.
oh boy, here we go again.
Leading the lambs to slaughter.
You'd think Mike would be ro-tund by now, what with all the victories.A great place for Information, Comraderie, and a sucker punch.
Remodeling Contractor just outside the Glass City.
http://www.quittintime.com/
you had your chance , sweetheart.... but the tribe broke your heart
how about them Celtics ?Mike Smith Rhode Island : Design / Build / Repair / Restore
jeezus,
you don't have indoor soccer there do you?A great place for Information, Comraderie, and a sucker punch.
Remodeling Contractor just outside the Glass City.
http://www.quittintime.com/
john ... i am indeed...
do you want the Colts & 5 ?... i got a hankering for some Outback bucksMike Smith Rhode Island : Design / Build / Repair / Restore
It was a good game! Next time.....next time. See you at the Superbowl!John
J.R. Lazaro Builders, Inc.
Indianapolis, In.
we had to go install a skylight yesterday.. but today we finished the siding
View Image
and the gutters & downspouts.. we have gutters only along the walk & front ... and in the rear , over the patio..
View Image
Mike Smith Rhode Island : Design / Build / Repair / Restore
Edited 11/8/2007 11:22 pm ET by MikeSmith
Edited 11/8/2007 11:23 pm ET by MikeSmith
we are piping the gutters to drywells in the rear... luckily my electrician was kind enough to lend me his small Deere for the trenching
View Image
in the rear we have just the gutter over the patio.. which leads to a drywell
View Image
and along the side we dug another drywell which will leach thru the stone retaining wall
View Image
that picks up the 2 downspouts from all the gutters in the front
View Image
we also got the dumpster, staging , and our trailer out of here.. ready for seeding next week
View Image
Mike Smith Rhode Island : Design / Build / Repair / Restore
Edited 11/9/2007 11:16 pm ET by MikeSmith
Edited 11/9/2007 11:17 pm ET by MikeSmith
Edited 11/9/2007 11:17 pm ET by MikeSmith
Edited 11/9/2007 11:18 pm ET by MikeSmith
Edited 11/9/2007 11:18 pm ET by MikeSmith
Mike,What's your material of choice for the sub-grade gutter drainage?
Jon Blakemore RappahannockINC.com Fredericksburg, VA
the usual thin-wall rigid pvc .. you can check level easily
i don't like the corrugated black stuff... it follows the contours and winds up with dips that don't drain.... also if you have to flush the system, it's harder to flush corrugated than the smooth pipeMike Smith Rhode Island : Design / Build / Repair / Restore
Sweet project Mike.
Does your advertising include the disclaimer no aspirin included?
Guaranteed no Headaches
Great post Mike, the big question is, what is the next one?
Dustin
don't know yet... might be a big deck... or a kitchen.... or 40 windows... or ?????
Mike Smith Rhode Island : Design / Build / Repair / Restore
Veteran's Day... so the guys are off..
i called Laurel Hill Turf to order some South County sod...South County ( no such place , but that's what they call it ) used to be potatoe country... but URI convinced the farmers there was more money and better use of the soil in growing sod..
a lot of the sod on the east coast comes from Rhode Island
here's a typical view along Route 2
View Image
and here's Jennifer & her husband cutting to order..... 1000 sf for a Connecticut mason .... and 500 sf for me
View Image
the strips come off in 18" x 6ft rolls and he stacks them on the pallet
View Image
so.. 500 sf on a pallet , ready for placing tomorrow ( weather permitting )... we'll use the sod in the high erosion areas and seed the rest
View Image
Mike Smith Rhode Island : Design / Build / Repair / Restore
Edited 11/12/2007 4:08 pm ET by MikeSmith
Edited 11/12/2007 4:08 pm ET by MikeSmith
Edited 11/12/2007 4:09 pm ET by MikeSmith
Edited 11/12/2007 4:09 pm ET by MikeSmith
yesterday was rain.. off & on... got a pair of "honey-do" list jobs done ( scratch 2 off the rainy day list )
today was kinda perfect..... high 50's
good day to rake, sod & seed.. but my muscles didn't think so.. i just kept quiet and let Roy do all the bitchin'
we used the 500 sf of sod in the erosion and drip areas... and to picture frame the front walk
View Image
my little Wheel Horse pulls a nice 4' york rake that makes quick work of raking and moving material... the big deal is picking up all the roots & stones it kicks up
View Image
set the mailbox post.. and watered the sod in by 1700..... i'm tired
View Image
Mike Smith Rhode Island : Design / Build / Repair / Restore
Edited 11/14/2007 6:43 pm ET by MikeSmith
Edited 11/14/2007 6:44 pm ET by MikeSmith
Edited 11/14/2007 6:44 pm ET by MikeSmith
"I'm tired"
Good,
there's still hope.A great place for Information, Comraderie, and a sucker punch.
Remodeling Contractor just outside the Glass City.
http://www.quittintime.com/
Mike,
Great thread.
Are there different varieties of sod available from that farm? What did you use?
What was the price for the 500 you bought?
Do you and your guys often handle the seeding/sod or was this a once-in-a-blue-moon thing.
Thanks,
Aaron
it was .21/sf ..... $100 for that pallet
seed , fertilizer, lime, and soil pellets was another $125
we often mix sod & seed .. sodding the hard to grow areas & seeding the rest...
most of the time i leave it to my excavator, this was such a small lot decided we'd do it
sometimes the Owner wants to do it.. but this is an elderly lady.. so that wasn't going to happenMike Smith Rhode Island : Design / Build / Repair / Restore
Jennifer told me her sod is a mix of Kentucky bluesMike Smith Rhode Island : Design / Build / Repair / Restore
Mike,
Thanks for taking the time and making the effort to advance our trade by sharing your methods with this boards readers. Your photos and descriptions are first rate, just like the home which is their subject.
I've enjoyed this thread a lot and I've learned a bit as well.
BTW, what town is this home in? The proximity to the ocean has me guessing.
same town i grew up in.... Jamestown... thanks for the kind wordsMike Smith Rhode Island : Design / Build / Repair / Restore
I'd like to add my thanks also, Mike.I'm not a builder (mostly I make furniture and stuff like that); most of my construction knowledge came from re-habbing a 1925 house some time ago.Granddad was a carp, my son's a Marine combat engineer, so I guess it's in the genes, eh?Thanks again, keep up the great work.
Leon
Well all the hard work you did I wouldn't want this slipping away.
So where is the sign up for the next class Teach?
after New Years.... i think we'll do a kitchen remodelMike Smith Rhode Island : Design / Build / Repair / Restore
Have you ever asked the EPA to give you an insulation rating (infrared)?
I'd like to know your score.
Gotta be high.Liberty = Freedom from unjust or undue governmental control.
American Heritage Dictionary
no , no yet... it's on my "to-do" list though
a friend has the full set up for blower door testing
we got some excellent results, but i had the fan duct work disconnected and we were getting false readings
maybe i can lure him back for a final testMike Smith Rhode Island : Design / Build / Repair / Restore
yesterday in the snow....
View Image
Mike Smith Rhode Island : Design / Build / Repair / Restore
Edited 1/15/2008 7:48 pm ET by MikeSmith
Did they move out? Winterlude, Winterlude, my little daisy,
Winterlude by the telephone wire,
Winterlude, it's makin' me lazy,
Come on, sit by the logs in the fire.
The moonlight reflects from the window
Where the snowflakes, they cover the sand.
Come out tonight, ev'rything will be tight,
Winterlude, this dude thinks you're grand.
no... it's nice & warm inside... no reason to be out and about in that stuff....except for me, that isMike Smith Rhode Island : Design / Build / Repair / Restore
Ya coulda at least cleared the walk (G)Spheramid Enterprises Architectural Woodworks
"Success is not spontaneous combustion, you have to set yourself on Fire"
Maybe a dumb question but where do you get those rulers?
Or you could spend 5 mins walking around with your tape measure and a can of orange (or whatever color stands out to you) spray paint. Shooting a spot of orange at the desired height on the various truss/rafter/etc surfaces.
jt8
"I was gratified to be able to answer promptly.
I said 'I don't know.'"
-- Mark Twain
here are the replacements . i made 3 of them this time and i modified one dimension so you could pass the box thru a stud bay.. these are made from 5/8 Advantech
Mine is only 10-11" tall, but probably gets me to the same height as yours. I think Ma picked it up at a garage sale for 25 cents. The old boy had made it as a step for his motor home. Handle on both ends. Solid as a rock.
View Image
View Image
The other one is a plastic work-bucket type stool that I think she paid 50 cents for. About an inch taller. jt8
"Those who wish to sing always find a song." -- Swedish Proverb
tileman came by and we reviewed the tile selections from my notes of meetings with the Owner...... i keep notes like these in a 3-ring binder on the job
View Image
we furred the soffits in the area we are working the siding
View Image
here's the eave soffit area.. this gets ventilated soffit
View Image
the rakes and the entry area get solid soffit... all of this is Alcoa ProBead
View Image
Mike Smith Rhode Island : Design / Build / Repair / Restore
Edited 9/28/2007 10:49 pm ET by MikeSmith
Edited 9/28/2007 10:50 pm ET by MikeSmith
Edited 9/28/2007 10:51 pm ET by MikeSmith
Edited 9/28/2007 10:52 pm ET by MikeSmith
the outer edge of the 3/8 ProBead gets the colonial 5/8 F-channel
View Image
and the inner edge is supported on a regular 5/8 J-channel
View Image
the J-channel also receives and flashes the top course of the Hardie siding
View Image
the corn is as ripe as it's ever going to get .. so i picked the one mature ear and opened it up....... looks like indian corn to me..... should grind to a good cornmeal
but it sure ain't sweetcorn.. if i get ambitious i'll dry and save the kernels for seed corn next year
View Image
Mike Smith Rhode Island : Design / Build / Repair / Restore
Edited 9/28/2007 10:57 pm ET by MikeSmith
Edited 9/28/2007 10:58 pm ET by MikeSmith
Edited 9/28/2007 10:58 pm ET by MikeSmith
Edited 9/28/2007 11:00 pm ET by MikeSmith
Edited 9/28/2007 11:01 pm ET by MikeSmith
the blueboard was delivered last Friday... started board on Monday....they finished hanging on Tuesday
View Image
Wednesday there were 5 plasterers and 2 laborers here.... and Thursday there were 3 plasterers and 1 laborer.....
each plasterer has his own box of trowels
View Image
they cover all the floors with 15lb. felt
View Image
all done
View Image
and they roll up the mess and throw it in the dumpster
Mike Smith Rhode Island : Design / Build / Repair / Restore
Edited 9/28/2007 11:17 pm ET by MikeSmith
Edited 9/28/2007 11:18 pm ET by MikeSmith
Edited 9/28/2007 11:19 pm ET by MikeSmith
Edited 9/28/2007 11:20 pm ET by MikeSmith
we have scuttles to the main roof area and the garage roof area... so both of them need an insulated plug....
View Image
Roy is gluing one up with the gun foam and a plywood base
View Image
and 3 layers of the 2" PerformGuard with blueboard screwed to the plywood base
View Image
then the plasterers give the blueboard a skimcoat
View Image
Mike Smith Rhode Island : Design / Build / Repair / Restore
Edited 9/28/2007 11:27 pm ET by MikeSmith
Edited 9/28/2007 11:28 pm ET by MikeSmith
Edited 9/28/2007 11:28 pm ET by MikeSmith
Edited 9/28/2007 11:29 pm ET by MikeSmith
the doors were delivered on Wednesday and stored in the garage... now that the plaster is done we've moved them all into the kitchen
View Image
and set up a dehumidifier over a 50 gal trash can to help speed the removal of all the plaster water
View Image
Mike Smith Rhode Island : Design / Build / Repair / Restore
Edited 9/28/2007 11:33 pm ET by MikeSmith
Edited 9/28/2007 11:33 pm ET by MikeSmith
while the plastering was going on inside .. we continued outside with the trim / soffits / siding / painting
here's the three columns defining the entry
View Image
and the half-column at the wall
View Image
and the corner board (colum )
View Image
viewed from the front walkway
View Image
Mike Smith Rhode Island : Design / Build / Repair / Restore
Edited 9/28/2007 11:42 pm ET by MikeSmith
Edited 9/28/2007 11:43 pm ET by MikeSmith
Edited 9/28/2007 11:44 pm ET by MikeSmith
Edited 9/28/2007 11:45 pm ET by MikeSmith
the sidedoor of the garage
View Image
and a closeup of the lightblock ( two layers of 3/4 Miratech )
View Image
lightblock & outlet block on the front of the garage... also showing the switch to 5/4 x 8 Miratech for the head casing over the garage doors so the coursing would work out and to add mass to the door casing over the 9' doors
View Image
Thursday nite ... ready for the forecasted rain
View Image
Mike Smith Rhode Island : Design / Build / Repair / Restore
Edited 9/28/2007 11:59 pm ET by MikeSmith
Edited 9/28/2007 11:59 pm ET by MikeSmith
Edited 9/29/2007 12:00 am ET by MikeSmith
Edited 9/29/2007 12:01 am ET by MikeSmith
Edited 9/29/2007 12:02 am ET by MikeSmith
here's some of the window detail
View Image
and a closeup of the caulk joint between the Hardie & the Miratech trim
View Image
Mike Smith Rhode Island : Design / Build / Repair / Restore
Edited 9/29/2007 12:04 am ET by MikeSmith
Edited 9/29/2007 12:05 am ET by MikeSmith
Edited 9/29/2007 12:23 am ET by MikeSmith
Edited 9/29/2007 12:24 am ET by MikeSmith
and the capital parts on those columns... the upper part is from some old red cedar rail parts, and the cove is some left over Azek
the new Grex pin nailer makes assembly pretty easy.. but you do have to watch those 1 3/4" pins... they'll bite you if you get a little careless
View Image
Mike Smith Rhode Island : Design / Build / Repair / Restore
Edited 9/29/2007 12:27 am ET by MikeSmith
I have no idea what you mean about them pins "biting" you if you get careless, nope, none, nada...LOL
At least the pins are stainless steel. I got 10K for 79.00$. Thats a lot of finger pricks.
Great looking stuff.Spheramid Enterprises Architectural Woodworks
"If you want something you've never had, do something you've never done"
well , one of my guys told me about the bite... of course it never happened to meMike Smith Rhode Island : Design / Build / Repair / Restore
That Grex has a safety trigger, right? My Senco is gonna bite somebody in the eye one of these days...no safety at all.
You may have gone over this before...can you tell me a bit about Miratek? Is it PVC?
I like your light block system. I usually use 5/4 and rabbet the bottom, but what's left is small...stacking 3/4" looks faster and easier.
Are you using these http://www.aifittings.com/whnew74_retrofit.htm for your outlets?
mike ... i missed your question last month... but it popped up again tonite ????
glad you had a good time with Luka & Jim
anyways..
Miratech.. same as GP PrimeTrim.. it's a composite material ( dirt board ) very fine pressed fibers
loves paint, more decay resistant than redwood, 4/4 & 5/4 thicknesses
16' lengths, 4,6,8,10 & 12" widths..
we use it for most of our trim.. sometimes in special situations we switch to pvc ( like Azek )
we started with GP PrimeTrim in '95 , then switched to Miratech when our lumber yard switched
i bookmarked your http://www.aifittings.com/whnew74_retrofit.htm link.. thanks
go Sox !Mike Smith Rhode Island : Design / Build / Repair / Restore
Mike,
Congrats on another job well done. As usual, I was inspired by several things ya'll did. In fact, it's a sure bet that the 600 sq. ft. addition that I'll be putting on our flip house this winter will have RFH AND Stilleto Valleys.
Thanks Again
David
Live in the solution, not the problem.
edit: 93 days and only 274 posts...a modern day BT record????
Edited 10/26/2007 2:41 pm ET by davidhawks
<guys told me about the bite>
Yeah, I've used that -
"No, really - people talk - I hear things"
Forrest
Mike,
What a sweet, sweet job your doing on that place. You guys are the real deal!!
I grew up in MA,,, love that skim coat plaster. I'm in southern Ontario now,,,, not at all common up here. I ordered some Diamond in a couple years ago, had my drywall guy help me with a mudroom ( for durability, and the experience ). It came out passable. There's a real art to that,,,, and a lot of hard work.
So,,,, not to nit pick, but you seem to always have sound reason for your methods. Your caulking the joint between the claps and the window casing, but no caulk between the casing and the window flange ( window rib? ). Is this more for the paint than the weather??
Thanks for the great posts,
Harry
Harry.. there is caulk between the casing and the window flange .. i just didn't take a pic of it
the rule of thumb i follow is what one of my painters told me about 20 years ago..
"you can't paint air... cracks and joints are air and air is an unpaintable surface"
so if you want to cut in, you have to have something to cut in ON, which means we caulk all joints..
i'll get you a picMike Smith Rhode Island : Design / Build / Repair / Restore
harry.. here's a couple pics of the casing/jamb caulk
the sequence we try to use is .... prime all 6 sides... prefinish if possible
install trim.....
caulk.. finish paint
here's the joint between the Andersen sill and our Trex sill.. these are the two types of caulk we're using on this job..
View Image
for the trim.... the DAP is one of our favorites.. it's a 50 year caulk with water clean-up... this is gunning a little too runny .. the last job we used DAP DynaFlex.. but they seem to have replaced it with this
View Image
the other caulk is the color-matched caulk for the Hardie... this requires a mineral oil ( paint thinner ) clean-up.. we tool ( with a finger ) and wipe all our caulk joints
Mike Smith Rhode Island : Design / Build / Repair / Restore
Edited 9/30/2007 10:26 pm ET by MikeSmith
Edited 9/30/2007 10:27 pm ET by MikeSmith
Roy & Chuck continued with the garage gable end..Friday....
View Image
cornice returns..... notice the small triangle at the bottom... blanked off with white coil stock
soffits...
View Image
and the whole gable
View Image
Mike Smith Rhode Island : Design / Build / Repair / Restore
Edited 9/30/2007 10:32 pm ET by MikeSmith
Edited 9/30/2007 10:32 pm ET by MikeSmith
Edited 9/30/2007 10:33 pm ET by MikeSmith
Saturday we moved back inside to concentrate on the interior finish... trying to get ahead of the painter and the floor guys... we have to hang & case all the doors,
trim the windows... and run the base in the carpet areas
Roy & Chuck started on the doors
View Image
we're using double doors on the closets instead of our usual bi-folds
View Image
I installed the central vac unit and tested the system
View Image
Mike Smith Rhode Island : Design / Build / Repair / Restore
Edited 9/30/2007 10:39 pm ET by MikeSmith
Edited 9/30/2007 10:39 pm ET by MikeSmith
Edited 9/30/2007 10:40 pm ET by MikeSmith
one of the potential weak points in our envelope is the sill / stud plate area...if you do a blower door test you will see a lot of leakage at this joint
remember when we installed the Mooney furring, we held the bottm mooney 1/2" off the floor
View Image
well that left us an area we can fill with gun foam to get a better seal at that joint
we scrape out the debris... and blow the joint with an air gun... then gun foam it
View Image
Mike Smith Rhode Island : Design / Build / Repair / Restore
Edited 9/30/2007 10:44 pm ET by MikeSmith
Edited 9/30/2007 10:45 pm ET by MikeSmith
Mike,
I see you are using roofing felt behind the siding. Do you not like to use Tyvek house wrap?
ThanksBarney
i used it once... went back to the tried and true..
some of the building science guys have run tests and say that felt is the equal to the best fo the house wraps.. and superior to most Mike Smith Rhode Island : Design / Build / Repair / Restore
the sequence now is : get the rooms that are going to have tile , ready to tile ...
so... hang doors, case windows & doors and get the painter in to prime the walls/trim
anyways here's one of our standard window trim details
we let the Grace Ice & water hang inside the window opening with the release paper still attached to the part that goes inside
View Image
then we foam around the jambs/ sill.... cut off the excess foam .. and turn the ice & water up to form a dam
we usually use a 5/4 x 6 sill ripped so we have about 2" of projection beyond the plaster.. we use the rips for blocking the sill ... here Roy is showing the Ice & water turned up and held in place by the blocking... and the 5/4 sill.... the apron
View Image
the extension jamb and the 5/4 sill are all primed finger joint pine.... the extension jamb is apx. 1 1/2" ( because of the Mooney )
View Image
before the blueboard was installed we foamed around the window with low-expansion.. after the extension jambs are installed we add more foam
Mike Smith Rhode Island : Design / Build / Repair / Restore
Edited 10/2/2007 9:38 pm ET by MikeSmith
Edited 10/2/2007 9:41 pm ET by MikeSmith
Edited 10/2/2007 9:44 pm ET by MikeSmith
the plumber is back to hook up the water supply so we can turn the heat on
here Niles is working on the potable water manifold
View Image
each fixture has a home -run and it's own shut-off
View Image
Mike Smith Rhode Island : Design / Build / Repair / Restore
Edited 10/2/2007 9:48 pm ET by MikeSmith
Edited 10/2/2007 9:48 pm ET by MikeSmith
Hey Gunner, here is at least part of how Mike does windows.IMHO I wouldn't care as much about what the code says on windows, as what Mikie says...Were I you, I'd shoot him an email and ask for some tutelage.Him, or Jim Blodgett.You'll notice Mike uses tarpaper instead-o-tyvek too... ;o)
Yeh... That'll work.
thanks
.
"I tell you, We are here on earth to fart around, and don't let anybody tell you any different." Kurt Vonnegut jr.
http://www.youtube.com/watch?v=e5MG1ZfFiZ8&mode=related&search= Mercy now
Thank you as always for getting back to me.
I'm about to start a remodel on my house, including an addition. Just trying to get all the advice I can from the obvious experts.
ThanksBarney
i turned on the electric water heaters & Sam came back and turned on the RFH circulators......the temp. guages say the water into the slab is 100 deg........ we'll see what we got tomorrow morning.. the slab started at ambient of about 72 deg,
View Image
finished all the casing & baseboard in the carpet rooms.... those are some of Jim Chestnut's "clam clamps"
View Image
all the closet doors are double doors ..
View Image
the painter is going to finish priming tonite ( while he listens to his Yankees go down ) and the tile starts tomorrow...
the exterior doors were standard 6 5/8 jambs .. which is a little wide for the Mooney wall.. so all the exterior casing got padded about 1/4"
View Image
Mike Smith Rhode Island : Design / Build / Repair / Restore
Edited 10/4/2007 10:05 pm ET by MikeSmith
Edited 10/4/2007 10:06 pm ET by MikeSmith
Edited 10/4/2007 10:07 pm ET by MikeSmith
Edited 10/4/2007 10:09 pm ET by MikeSmith
Edited 10/4/2007 10:12 pm ET by MikeSmith
i raised both vanities 3 1/2" so i can keep the sink higher.. and the cheap particle board up off the floor
View Image
this vanity is located at the end of the sanitary drain.. so we have a clean-out located in the bottom
View Image
Mike Smith Rhode Island : Design / Build / Repair / Restore
Edited 10/4/2007 10:21 pm ET by MikeSmith
Edited 10/4/2007 10:21 pm ET by MikeSmith
You didn't have to fire tape the wall behind the plumbing tree?Spheramid Enterprises Architectural Woodworks
"If you want something you've never had, do something you've never done"
no.... all we are required now is 1/2" gypsum
we used 5/8 type x.. but no fire tapeMike Smith Rhode Island : Design / Build / Repair / Restore
this morning we finished up the interior trim by setting the 2 vanities..
the 48" one needed a box-out in the bottom drawer to clear the floor pipes
View Image
and inside
View Image
Mike Smith Rhode Island : Design / Build / Repair / Restore
Edited 10/5/2007 9:26 pm ET by MikeSmith
Edited 10/5/2007 9:26 pm ET by MikeSmith
back outside, we're finishing the garage gable end.. which requires a decorative louvre.. we used an inexpensive Fypon as our base
View Image
and trimed it out with a Trex sill and 5/4 Miratech casing....
View Image
the capital is 3/4 Azek which will get some Azek scotia for detail
View Image
Mike Smith Rhode Island : Design / Build / Repair / Restore
Edited 10/5/2007 9:31 pm ET by MikeSmith
Edited 10/5/2007 9:31 pm ET by MikeSmith
Edited 10/5/2007 9:32 pm ET by MikeSmith
that drawer ...
next time ...
instead of adding one long back ...
add two more "sides ... front to back ...
with a little "back ... in between.
would make for 3 compartments ... and much more usable space.
and fer that smaller center section .... measure a roll of TP ...
size it around that ... then leave one in to show off yer genius!
Jeff Buck Construction
Artistry In Carpentry
Pittsburgh Pa
nah... i thought of that, but the drawer would tend to "fold" without the full back, since it hangs on the side slides
View Image
Mike Smith Rhode Island : Design / Build / Repair / Restore
Edited 10/6/2007 7:09 am ET by MikeSmith
at least yer way they have 2 secret places to stash all their extra money ...
Jeff Buck Construction
Artistry In Carpentry
Pittsburgh Pa
here's that drawer installed.. this is the fully extended position
View Image
and the tile guy got started
View Image
my painter has a Wobble Junior.... i didn't know there was such a thing..
we have the full sized one.. i think i like Junior better than ours
View Image
Mike Smith Rhode Island : Design / Build / Repair / Restore
Edited 10/7/2007 10:04 pm ET by MikeSmith
Edited 10/7/2007 10:04 pm ET by MikeSmith
Edited 10/7/2007 10:05 pm ET by MikeSmith
finished trimming the gable end "vent" and caulked the Hardie....needed a 1/2" Hardie trim piece under the sill.. the Malco shears made the rip very easy
View Image
the spring board under the sill is holding the trim in place until the caulk sets
View Image
tomorrow i'll put the finish paint on the louvre so we can take the staging down on Tuesday... Wednesday the paver will be here to asphalt the driveway
View Image
Roy & Chuck started around the corner
View Image
Mike Smith Rhode Island : Design / Build / Repair / Restore
Edited 10/7/2007 10:11 pm ET by MikeSmith
Edited 10/7/2007 10:11 pm ET by MikeSmith
Edited 10/7/2007 10:12 pm ET by MikeSmith
Edited 10/7/2007 10:13 pm ET by MikeSmith
Edited 10/7/2007 10:14 pm ET by MikeSmith
hubcap and dante have the full wobble ...
Y U like the Jr better?
I'm thinking I'll someday be in the market.
Jeff Buck Construction
Artistry In Carpentry
Pittsburgh Pa
wobble senior is like carrying Corey around
wobble junior is more like Hanna..... as i get older , i get lazierMike Smith Rhode Island : Design / Build / Repair / Restore
how the light?
I used Hub's wobble to light a jack and jill bath in the basement of his build ...
worked great for one room at a time.
can ya still light a big dark room with the Jr by itself?
or is it better siuted to lighting corners?
btw ... Corey weighs around 50lbs ...
Hannah just clocked in at 19.5 ... 27" tall.
I gotta get a pic of Corey carrying her around the house.
kid can carry a baby almost half his weight ... but has trouble helping with the groceries ...
Jeff Buck Construction
Artistry In Carpentry
Pittsburgh Pa
the pavers showed up per schedule..... we also had 2 painters, 2 tile guys, 2 floor guys & 2 carpenters.... we had vehicles parked all over the place
View Image
fine grade....
View Image
and all done in two lifts... 1 1/2 base & 1 1/2 finish
View Image
Mike Smith Rhode Island : Design / Build / Repair / Restore
Edited 10/11/2007 10:17 pm ET by MikeSmith
Edited 10/11/2007 10:18 pm ET by MikeSmith
Edited 10/11/2007 10:18 pm ET by MikeSmith
got the first coat on the entry door
View Image
and Pete finished his tile... just going to seal it tonite
View Image
Mike is just about done with the Mannington glue-down......
View Image
deliver kitchen cabinets tomorrow !
Mike Smith Rhode Island : Design / Build / Repair / Restore
Edited 10/11/2007 10:22 pm ET by MikeSmith
Edited 10/11/2007 10:22 pm ET by MikeSmith
Edited 10/11/2007 10:23 pm ET by MikeSmith
we also had 2 painters, 2 tile guys, 2 floor guys & 2 carpenters....
"There went in two and two unto Mike into the ark, ......... "
Sorry, couldn't help thinking that! My appologies to anyone offended by my sacrilege.
Quantum materiae materietur marmota monax si marmota monax materiam possit materiari?
Hi Mike
On that side casing around the windows, do you route out a groove on the backside for the nailing flange so the casing sits flat? Or is that a bit of an angle I see at the trex sill joint?
Seems your clients like that color of Hardie!
Quantum materiae materietur marmota monax si marmota monax materiam possit materiari?
i was just talking to Dan about the shims.. maybe this will help
http://forums.taunton.com/tp-breaktime/messages?msg=95226.3Mike Smith Rhode Island : Design / Build / Repair / Restore
Musta been reading minds!
Maybe there's an optical "delusion" created by the caulk at the casing to sill area? Makes it look like there is no shim.
View Image
Quantum materiae materietur marmota monax si marmota monax materiam possit materiari?
Hi Mike
Is that regular duct tape on the dryer vent and the range hood vent? View Image
I thought I read that duct tape is not good on ducts since it dries out, crumbles and leaks. Foil tape is supposed to be better.
Quantum materiae materietur marmota monax si marmota monax materiam possit materiari?
phil... that's the new "heavy duty" duct tape... a noticeable difference.. but check back in 20 yearsMike Smith Rhode Island : Design / Build / Repair / Restore
How have you secured the dams (kinda looks like you've already got a piece going between the trusses)? Cutting the dams with a jigsaw?
View Image
jt8
"Democracy is two wolves and a lamb deciding what to have for dinner, liberty is a well armed lamb protesting the vote." -- Benjamin Franklin
Edited 8/24/2007 12:14 pm by JohnT8
Sorry for the late reply, Mike summed it up very well.
Give it a try some time, you'll be glad you did.
Matt
So tell me....
On the stilletto valley do you use more, less or about the same amount of shingles?
Do you think there will be any waranty problems?
It looks like a good system but I too am a little skeptical.
It would make it faster it seems, and you wouldnt have to worry about cutting too deep on a hot day.
It uses alot less shingles. On a recent roof that was 1,400 sq I probably saved close to 30 square in odd cut shingles i would guess alot more.
I am not sure on warranty issues, haven't run into that yet. I couldn't see why they wouldn't like it. Thats anybodys guess.
It is much faster, in most cases. Sometimes the pitch of the roof won't allow you to run full shingles all the way up the valley.
I have run more valleys than I care to remember this way, without one leak. So it works very well for me. My area is saturated with guys who will do the work for next to nothing I had to start coming up with some production ways of doing things to stay competitive.
Matt
Well if it doesnt leak there shoudnt be a waranty issue I guess. I'll have to try it next time.
Do you use that system on a standard three tab? And if so do the tabs just end where they end, meaning not necessarily the point of the tab landing on the edge of the diagonal shingle?
I mentioned your "Stilletto valley" to a friend the other day and he told me that he learned it from the guy that roofs track homes - must be something to that, "find a quicker/faster way to compete" thing that you mentioned.
Doug
I don't use it on 3 tabs. First priority with those is the rain lines matching up. Pretty much makes starting at the valley a bad idea.
If the roof has a valley on both sides then the shingles are cut square at the point where the bottom of the course hits the valley line.
It is a great way to cut down time on a roof, I couldn't see myself doing it any other way now.
Matt
<We used Jam-sill on the last house and had a terrible time with the amount it pushes out the bottom of the windows and doors.>Mike, are you talking about a terrible time trimming? I like that they're rigid when put together, and we've always been able to push the bottoms in to get a pretty good fit.The last pans we got were of unknown origin, but made of something like milk jug plastic. Much harder to keep lined up during install, but very thin. Someone's got it in for me, they're planting stories in the press
Whoever it is I wish they'd cut it out but when they will I can only guess.
They say I shot a man named Gray and took his wife to Italy,
She inherited a million bucks and when she died it came to me.
I can't help it if I'm lucky.
Yes, a terrible time trimming. The windows were Marvins, pre-cased on the exterior with aluminum, and installed with "masonry clips." The bottoms were kicked out about 3/16". I wasn't aware it would be a problem until the siding had been caulked to the window trim, so there was no way to fix it. The siders could have told me they saw big gaps at the bottom of the casing but not at the top. I could have supervised more closely too I guess.
We ended up with tapered extension jambs, rolled casing, cut into the sheetrock--all the tricks you pull out now and then but this was almost every window and door on a new house. If we hadn't been on an extremely tight deadline I would have pulled all the windows and started over.
Last week I installed two Marvin windows on my new job, on a simple Vycor site-built pan. Nice, clean, and consistent. They will be easy to trim.
Mike, I keep returning to this thread...I sure like the way you do things.
Do you have any photos that show how you flash your door openings?
I am just starting construction on my personal home (form boards for foundation are set) I will be using hardi-plank siding over felt. I am building in a historic district. My windows will be pre-cased wood windows(no flanges). It is hard to find good details for the flangless stuff.
John B
Edited 3/24/2008 7:01 am by homedesign
Mike out of curiosity, what kind of windows are they?
ThankBarney
these are Andersen 400...... i've also used Andersen 200... equally nice..... but more of a builder's window ( with builder's pricing )Mike Smith Rhode Island : Design / Build / Repair / Restore
Biggest diff in the 200 is cheaper locks and handles. Seem less likely to last, but same warrantee from a good company.I think there are fewer choices of size available in the 200 series too
Welcome to the Taunton University of Knowledge FHB Campus at Breaktime. where ... Excellence is its own reward!
fewer sizes, different sill detail.....Mike Smith Rhode Island : Design / Build / Repair / Restore
Thanks Mike. I'll have to check out the anderson web site to see the windows. As always you have continued to be a great source of information. Hope I'm not bothering you.Thanks
Barney
Hi Mike,
Awesome pictures and write up. Great care and detailing throughout the project.
I was wondering the angle on the window and garage top trim piece. I really like the look and proportions of that trim.
Great job!
Big... you talking about the flare on the top casing ?
View Image
I'm pretty sure that is 15 degrees....
if i remember correctly. the windows are 5/4 x 4 side casing with 5/4 x 6 tops and the garage is 5/4 x 4 side casing with 5/4 x 8 topsMike Smith Rhode Island : Design / Build / Repair / Restore
Thanks Mike!
Yes, that was the trim piece I was talking about. Looks like the trim above the windows is ?X4 and the garage is ?X6. Is that correct?
Once again great job,
JT
thanks for the praise
<<<
if i remember correctly. the windows are 5/4 x 4 side casing with 5/4 x 6 tops and the garage is 5/4 x 4 side casing with 5/4 x 8 tops>>>Mike Smith Rhode Island : Design / Build / Repair / Restore
just draggin this up to talk about trex window sillsMike Smith Rhode Island : Design / Build / Repair / Restore
I've been slicing and dicing trex for applied sills ever since you first brought it up. That's what happens when you are brought up to listen to and respect your elders. Gems of wisdom outa the mouths of the aged should not be disregarded.
george trembly was looking for the sequence on "stilletto" roofsi think it starts with post # 95i can't right click the link.....Mike Smith Rhode Island : Design / Build / Repair / Restore
I hope this works for you....
http://forums.taunton.com/tp-breaktime/messages?msg=92880.95
Quantum materiae materietur marmota monax si marmota monax materiam possit materiari?
Thanks, fellows! We'll see if I can convert another roofer to the "Stilletto valley" . . .
George Tremblay
wanted to bump this and adverse... someone said they couldn't find themMike Hussein Smith Rhode Island : Design / Build / Repair / Restore
not to be greedy, but do you have another project coming up that you will be able to feature?
soon as i get one..... you get one
want a kitchen ?Mike Hussein Smith Rhode Island : Design / Build / Repair / Restore
Mike,
"Soon as I get one...you get one". Are things slow there?
Seeing your projects, makes me think you may be about as recession proof as a contractor can be.
I'm looking at a gut job now, that would be a great mooney wall candidate.
Have a good day!
Brudoggie
Edited 8/27/2008 9:22 am ET by Brudoggie
no... but replacing 40 windows.......
or redoing all the trim on a house
or the other like jobs
not exactly photogenici'll see what i can do about resizing the pics from a kitchen job we finished this springMike Hussein Smith Rhode Island : Design / Build / Repair / Restore
Mike,I hear you! Been on a rash of 1 to 5 day jobs, since summer.My head is spinning from all the planning and such. I'd almost kill, for a nice couple month or more job. But, work is work. Many here have none, or are cannibalizing each other to get it. I've had some interesting calls lately. Not sure how guys can survive with the prices I'm hearing. I can't touch them! And most of the customers are calling looking for an even better deal! Fortunately the real estate market here is pretty beat up, so I think I'm going to pick up a house to renovate, then sell, or rent. Note, I didn't say "flip". The place is a gut job, and I can get it for almost nothing. We're going to do it justice. Decent area, with most homes nearby in much nicer condition. The numbers look alright.DW is already planning some landscaping improvements. She's into that stuff. And one of my subs lives right across the alley. At almost $4 a gallon, he's psyched!We'll see, I'm doing the due diligence now. Hope to make an offer soon. First I have to clean my plate of another dozen or so small jobs.Brudoggie
sounds like fun...i still have some long range stuff for ourselves in the works..
but it requires selling our houseand the market isn't on the upswing yetMike Hussein Smith Rhode Island : Design / Build / Repair / Restore
Mike-
"Selling our house 1st" ?????
Are you moving??? Or are you referring to a house you've built??/
http://www.grosshillrentals.com
Dougy...... we're moving as soon as we can get our price..
best estimate would be 2 - 3 years ?
wanna move downtown & put an addition on my office
been talking to Brian about a DieselPig fest ??????
when are you gonna come down and get a thrashing on the golf course
you and the family oughta plan a weekend at our houseMike Hussein Smith Rhode Island : Design / Build / Repair / Restore
Mike,
Are you going to live at the office?.
I tried to sell my wife on something similar, couldn't do it.
Had a line on a big 3 story brick building down town. First floor was comercial office space. Would have been nice for her business, and an office for mine. Second level was clearspan, used to be a roller rink. Would have made a great shop area. And upper level was a huge apartment. Needed renovation, but would have been cool.
DW was concerned about being able to seperate work from personal time, with that set up. She was probably right, she usually is.
Brudoggie
back in '95 i remodeled this cement block 24x24 house into a one-bedroom, put a 20 x 26 addition on it with
apartment in the rear and my office in the front... it was for my Mom's retirement home... all single floor , single level
right out back there is a 3-car detached garage
if i fill in the triangle between the house & the garage , i can add two bedrooms and enlarge the office and add a separate bath for the office
wife and i both agree it would be ideal for us
Mike Hussein Smith Rhode Island : Design / Build / Repair / Restore
Mike,
I think someone else has the Fest for 2009, no????
I'd gladly help out DP if he holds one in our one-horse town.
http://www.grosshillrentals.com
doug.... DP talked about 2009...
Blodgett is talking about 2009
and Pete Draganic was talking about 2009.... we'll have to wait and see how things shake out
Mike Hussein Smith Rhode Island : Design / Build / Repair / Restore
Look forward to it. I know you're willing to share, but didn't know if all of your clients were always agreeable. Thanks for taking the time.
want a kitchen ?
Well, now that you mention it, yes I DO need a kitchen.
View Image
I think on at least one of your threads you sheathed the K walls with 1/2" ply? If so, did you have a preference on the sheet layout? Put 'em in vertically, horizontally, or do you care?
jt8
i don't care... i'd do whatevr is easierthing about ply is if there is going to be tile or laminate backsplash... you don't need the sheetrockand you've got screw anchors everywhereMike Hussein Smith Rhode Island : Design / Build / Repair / Restore
Edited 8/27/2008 2:37 pm ET by MikeSmith
That's what happens when you are brought up to listen to and respect your elders. Gems of wisdom outa the mouths of the aged should not be disregarded.
Congratulations!
RalphWicklund receives
The Not-a-Bad Line Award.
Saaalute!View Image View Image
What are you using for form panels there?SamT
I wondered that too..
looks like Luaun doors! LOL.
i'll luan door ya.....
i think these are Simplex forms.. i know Joe had them all stamped at the factory with his company name....Fall River Forms
steel frame with 1" plyform... he has 4', 5' 6' & 8'...
these are the 4 footers, when we're doing minimum foundations, i design my grades for 8 " exposed concrete and 40" bury.. so the 4' form on a 10" footing works nice
View Image
these are the 5 ' forms.. where we had to step the footing down because the loam was deeper than i thought
View Image
here Joe & his son, Mike are "lining" the forms by string and eyeball... his diagonals are always +/- 1/4" and his grades are +/- 1/4"
View Image
here's the garage .. they came back and poured this on a 2d trip.. it was in the way of the house
View Image
Mike Smith Rhode Island : Design / Build / Repair / Restore
Edited 7/29/2007 5:17 pm ET by MikeSmith
Edited 7/29/2007 5:18 pm ET by MikeSmith
Edited 7/29/2007 5:20 pm ET by MikeSmith
Edited 7/29/2007 5:21 pm ET by MikeSmith
the next day the forms were stripped
View Image
meantime i had the 6x4 pt sill stock delivered so anything that was going to twist could go ahead a do it's worst
View Image
couple days later Randy started backfill.. this is a nice bankrun gravel with bowling ball sized round granite rocks in it... compacts great.. especially in closed areas
View Image
nice rental truck , huh... that's Randy's son, Dave driving.. the rig & driver is leased from Offshore... the company that just about has a monopoly on hauling to Block Island
this is more like it .. some of Randy's old iron.. i protected the bolts & top of wall with a couple of the 4x6 so he could drive over the top
View Image
View Image
Mike Smith Rhode Island : Design / Build / Repair / Restore
Edited 7/29/2007 5:30 pm ET by MikeSmith
Edited 7/29/2007 5:31 pm ET by MikeSmith
Edited 7/29/2007 5:35 pm ET by MikeSmith
Edited 7/29/2007 5:37 pm ET by MikeSmith
Edited 7/29/2007 5:38 pm ET by MikeSmith
we did some lifts.. and compacted the material with a small vibratory roller
View Image
the town requires 1"copper for the water hookup.... we had run a 4" sleeve under the footing so we could install it below frost
View Image
it always amazes me how much equipment comes and goes on these jobs
View Image
laying the waterline to the future curbstop the town will install
View Image
Mike Smith Rhode Island : Design / Build / Repair / Restore
Edited 7/29/2007 5:44 pm ET by MikeSmith
Edited 7/29/2007 5:45 pm ET by MikeSmith
Edited 7/29/2007 5:45 pm ET by MikeSmith
Edited 7/29/2007 5:47 pm ET by MikeSmith
Edited 7/29/2007 5:48 pm ET by MikeSmith
Mike, do you have to cover the end of that pipe while you wait so some enterprising scavenger doesn't walk off with it?A great place for Information, Comraderie, and a sucker punch.
Remodeling Contractor just outside the Glass City.
http://www.quittintime.com/
cal... there are only about 2' sticking above ground
Mike Smith Rhode Island : Design / Build / Repair / Restore
That's Block Island?
"I cut this piece four times and it's still too short."
I think Sam and I meant these that you reposted by Dave's job...
View Image
Sorry for the confusion.
Hey, nice lookin job there ( yours).
Yeah, what're them there slick side forms?SamT
Let's pester Dave, he'll know!
Look at this. There ain't nuthin holding that endcap on. One little clip and it's jist hooked to another one.The bottom ain't got nuthin at all, jist cantilevered off the inside corner clips!I wanna know what kinda system that is. That's great!SamT
Amazing what a feller can do with a few old doors. LOL
Trying not to hijack Mike here... the form panels are 1" form ply, which looks like a version of MDO. It is EXPENSIVE. It is OILY. The outside panels are installed first and there are screws holding those corners together. The rebar is installed second. The inside panels are installed third. When they strip they know how to peel things off to get the screws exposed and remove them. They did not leave but about 3 square feet of scrap panel in my debris pile. If you are actually interested I'll swing by the lumberyard and get the hardware names off some of the cartons. I know that Award makes the cleats, not sure about the snap ties.
I didn't know they made form ply in 1". I am familiar with 1/2" FP.Don't bother getting me any more info, it looks like I'll never again work at hard physical labor for more than 1 or 2 hours at a time.Now, I'm trying to figger out how and where to market my knowledge.SamT
Edited 7/29/2007 9:51 pm by SamT
Bummer dudes
[IMG]http://i189.photobucket.com/albums/z79/mikekennett/lunker07.jpg%5B/IMG]
Bottom line, you get a single pour foundation and for better or worse the 1x4 is left embedded. I was aghast the first time I saw that, but it's de rigeur around here... so be it.
Looks like they're giving the termites a route in. Do you know of any moisture issues with leaving those 1x4's in? I have visions of those things eventually rotting and the HO seeing spots of seepage around the slab from the 1x4 holes.
jt8
"Even if I knew that tomorrow the world would go to pieces, I would still plant my apple tree." -- Dr. Martin Luther King, Jr.
" the bottom of our foundations have to be 40" below finish grade"What is the picture with the keyway.http://forums.taunton.com/n/mb/at.asp?webtag=tp-breaktime&guid=D6EBDDC8-5FC1-4D6C-AACD-29BF15E0F9D4&frames=noThat looks like it is just on the surface. Is that for a detached garage with a floating foundation?.
.
A-holes. Hey every group has to have one. And I have been elected to be the one. I should make that my tagline.
that's the footing on the low corner of the foundation... then.... now it's buried 40" below grade
View ImageMike Smith Rhode Island : Design / Build / Repair / Restore
"here Mike is putting the keyway in the footing with a wooden sled"Mike whats the Keyway for?ML
typical foundation wall detail.... it helps lock the poured wall onto the footingMike Hussein Smith Rhode Island : Design / Build / Repair / Restore
Another Mike Smith pictorial. Something to look forward to as we prepare for fall.
Mike,
Looking forward to the progress on this. Thanx for sharing.
Chuck Slive, work, build, ...better with wood
Where are all the photos?
Heeeyyyy, somebody worked really hard to loose those pics... you might have just hurt their feelings.
600 - 700 pictures..... all gone
KMA
>KMA< I think that's KMMFA. >KMA< I think that's KMMFA.
It's beginning to look like
It's beginning to look like cal's tagline is right... the punks have sucker punched the whole site.
And, its KMMFBFHWA